


Εγχειρίδιο χρήστη
1 Introduction2 General view
3 Entering coins
4 View Coins
5 Managing a collection file
6 Reports
7 References
8 Settings
9 Image Editor
1 Εισαγωγή
1.1 Περιγραφή
Το OpenNumismat είναι μια εύχρηστη και αξιόπιστη εφαρμογή που σχεδιάστηκε για λάτρεις και συλλέκτες νομισμάτων, για να δημιουργήσουν μια νομισματική συλλογή.
Με το OpenNumismat θα είστε σε θέση να δημιουργήσετε, να οργανώσετε και να διαχειριστείτε τον δικό σας κατάλογο νομισμάτων με αναλυτική περιγραφή και φωτογραφίες για καθένα από τα στοιχεία.
Το OpenNumismat διανέμεται πλήρες και απολύτως δωρεάν. Ο πηγαίος κώδικας έχει άδεια χρήσης GPL-3.0 και είναι διαθέσιμος στο GitHub.
Ο επίσημος ιστότοπος βρίσκεται στο http://opennumismat.github.io.
1.2 Χαρακτηριστικά της εφαρμογής
OpenNumismat is based on the PySide6 library with the SQLite database engine to store the data collection, which allowed to achieve lightness and responsiveness of the interface and cross-platform.
A complete list of the used components and libraries is available here.
Τα εικονίδια που χρησιμοποιούνται στο περιβάλλον χρήστη, βασίζονται στο LED Icon Set v1.0 και Soft Scraps Icons του deleket και στα Flag icons.
Η μετάφραση του περιβάλλοντος χρήστη έγινε από ενθουσιώδεις χρήστες, μέσω της υπηρεσίας Transifex. Ευχαριστούμε πολύ για τη βοήθειά σας!
1.3 Άδεια χρήστη
Το OpenNumismat είναι δωρεάν λογισμικό: Μπορείτε να το αναδιανείμετε και/ή να το τροποποιήσετε υπό τους όρους της Γενικής Δημόσιας Άδειας GNU, όπως αυτή δημοσιεύεται από το Free Software Foundation, είτε της έκδοσης 3 της Άδειας, είτε (κατ' επιλογή σας) οποιασδήποτε μεταγενέστερης έκδοσης.
Το OpenNumismat διανέμεται με την ελπίδα ότι θα είναι χρήσιμο, αλλά ΧΩΡΙΣ ΚΑΜΙΑ ΕΓΓΥΗΣΗ και χωρίς καν την ενδεικτική εγγύηση της ΕΜΠΟΡΕΥΣΙΜΟΤΗΤΑΣ ή ΚΑΤΑΛΛΗΛΟΤΗΤΑΣ για ΣΥΓΚΕΚΡΙΜΕΝΟ ΣΚΟΠΟ. Δείτε την Γενική Δημόσια Άδεια GNU για περισσότερες λεπτομέρειες.
Θα πρέπει να έχετε λάβει ένα αντίγραφο της Γενικής Δημόσιας Άδειας GNU μαζί με το OpenNumismat. Εάν όχι, δείτε το https://www.gnu.org/licenses/.
2 Γενική εικόνα
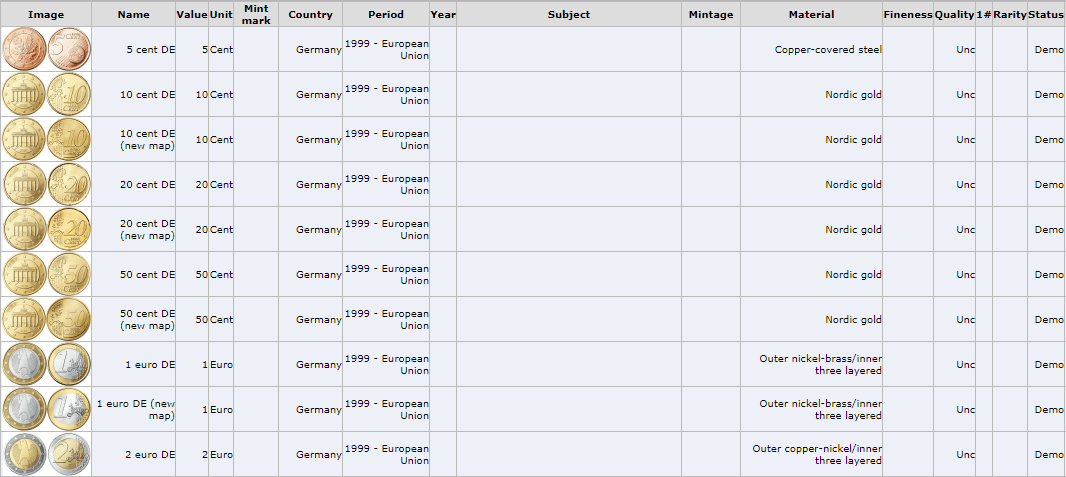
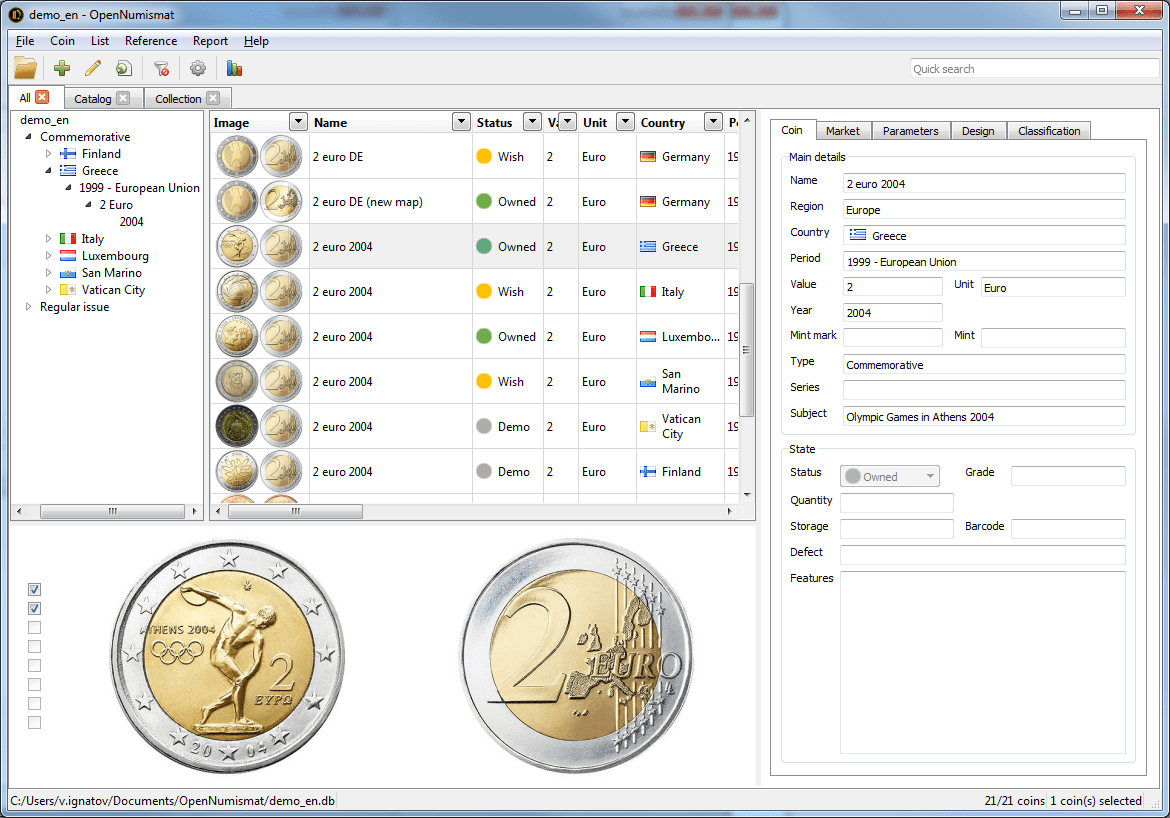
Κατά την πρώτη εκκίνηση της εφαρμογής, ανοίγει το κύριο παράθυρο με μια συλλογή επίδειξης:
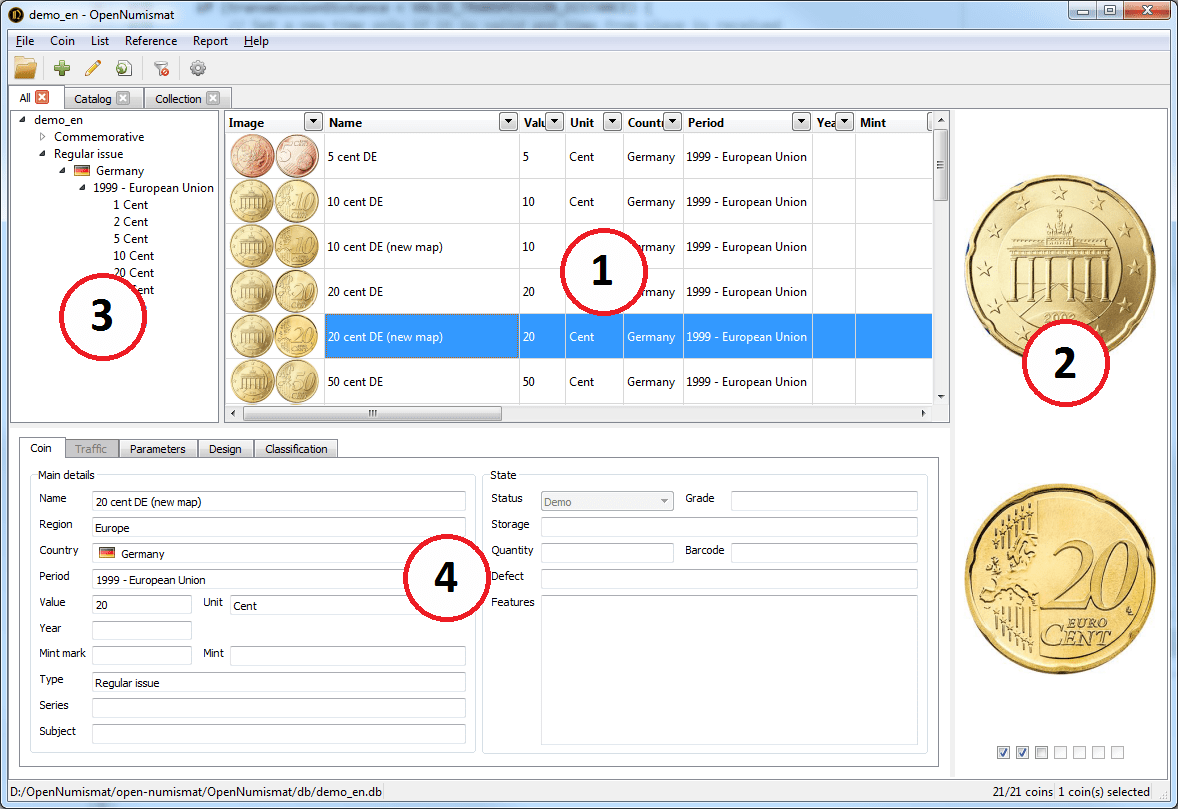
Το κύριο παράθυρο αποτελείται από τα ακόλουθα βασικά στοιχεία:
- Πίνακας νομισμάτων
- Πίνακας εικόνων
- Δέντρο
- Πίνακας πληροφοριών
Όταν κάνετε κλικ πάνω σε οποιοδήποτε νόμισμα στον πίνακα νομισμάτων, εμφανίζονται αναλυτικές πληροφορίες: στον πίνακα εικόνων - φωτογραφίες κέρματος, το δέντρο ξεδιπλώνεται στα στοιχεία περιγραφής του κέρματος, ο πίνακας πληροφοριών εμφανίζει όλα τα δεδομένα που έχουν εισαχθεί για το κέρμα.
Μπορείτε να δημιουργήσετε μια νέα κενή συλλογή ή να επεξεργαστείτε μια δοκιμαστική, εισάγοντας νέα δεδομένα.
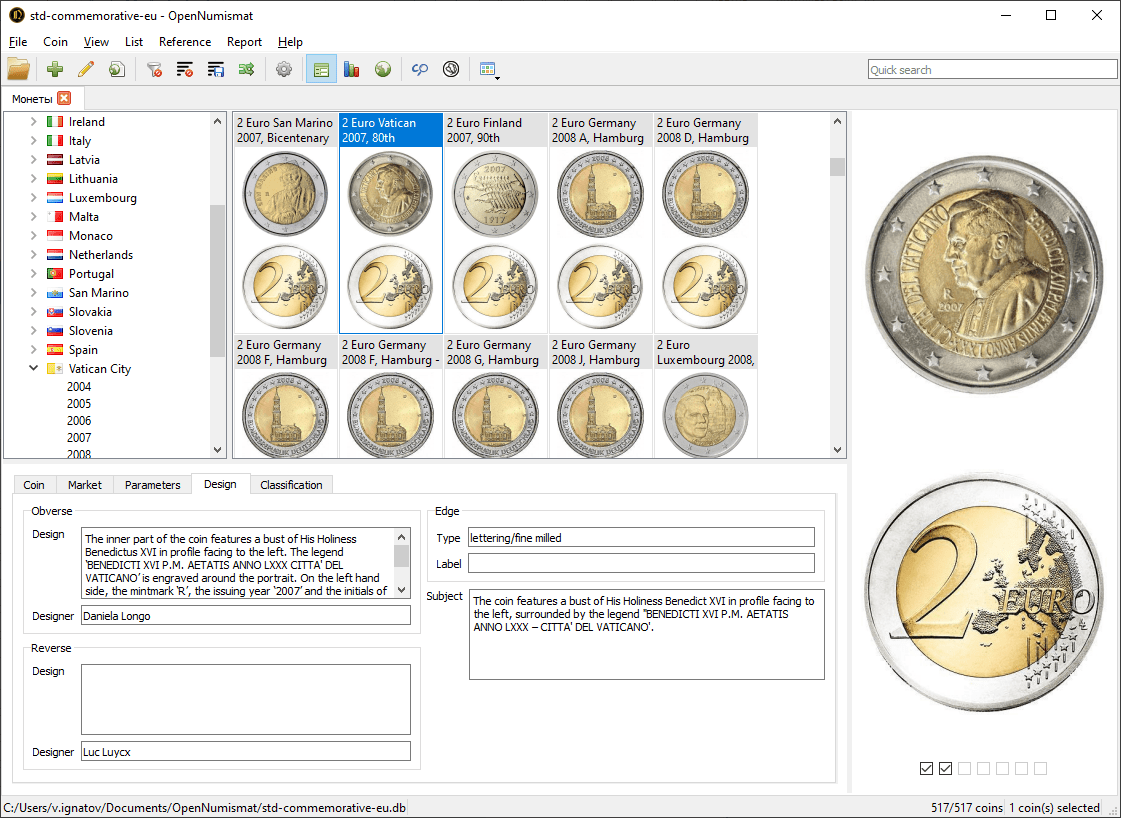
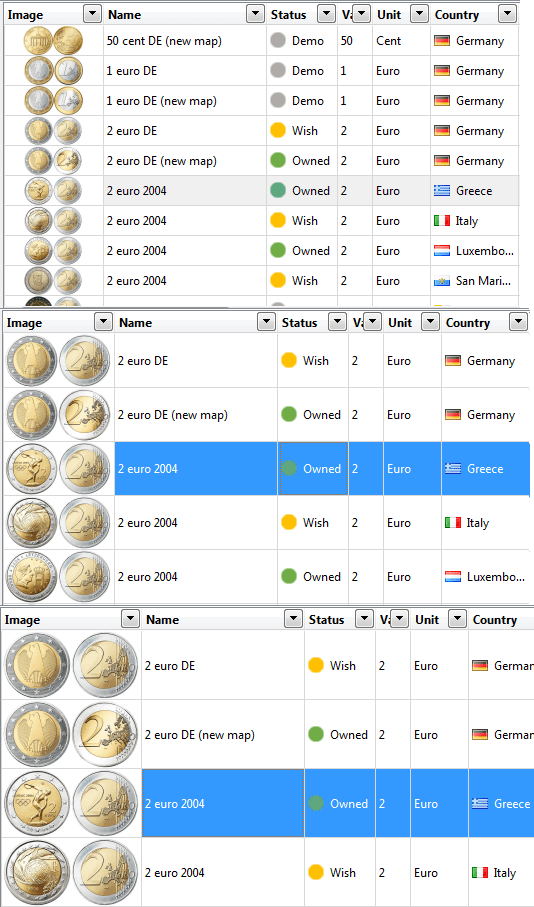
2.1 Table of coins view
You can change the view of Table of coins by menu View->Change view
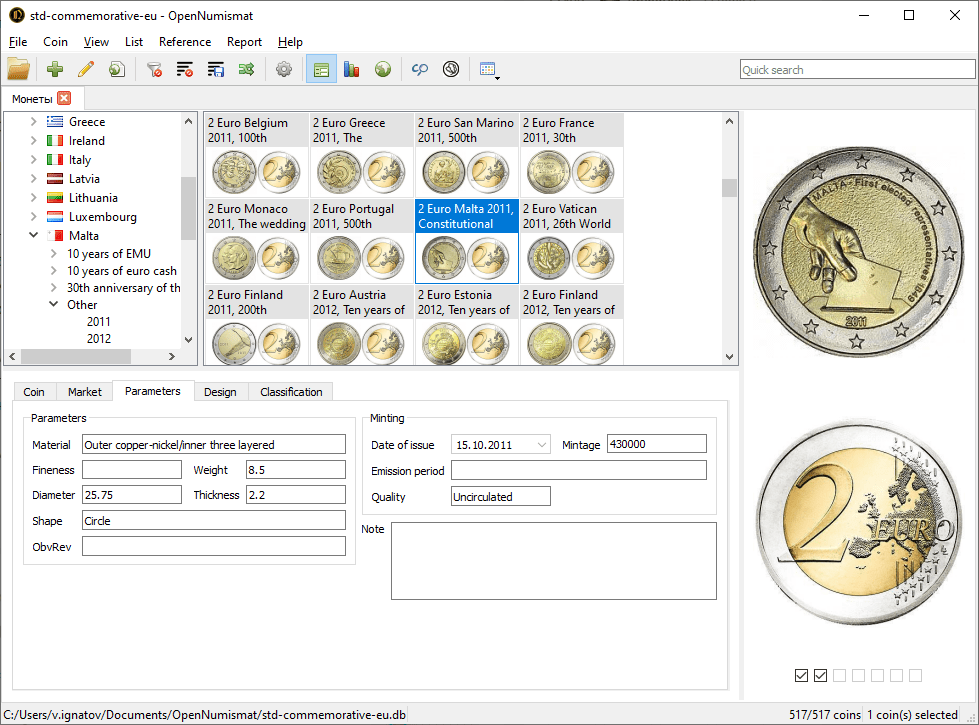
2.2 Details panel
You can switch Info panel to Statistics or Map by menu View->Details

3 Εισαγωγή νομισμάτων
3.1 Προσθήκη ενός νομίσματος
Διαχειριστείτε τη συλλογή σας, προσθέτοντας καταχωρήσεις για κάθε νόμισμα που αγοράσατε, πουλήσατε ή επιθυμείτε.
To add a new coin, select the Record->Add menu or press the Ins key. After that, the Edit dialog opens:

The Edit dialog contains 7 tabs with the following fields:
- Overall - Main details:
- Category - type of collectable item;
- Όνομα - ένα περιγραφικό όνομα του νομίσματος (μπορεί να δημιουργηθεί αυτόματα από τα υπόλοιπα πεδία πατώντας το κουμπί «Δημιουργία»)
- Περιοχή
- Χώρα
- Period - period in the history of the country or coinage period;
- Emitent;
- Χάρακας
- Αξία
- Μονάδα
- Year - gregorian year;
- Year on coin;
- Νομισματοκοπείο
- Σήμανση νομισματοκοπείου - ένα σημάδι του νομισματοκοπείου
- Τύπος
- Σειρά - μια σειρά αναμνηστικών νομισμάτων
- Θέμα - ένα γεγονός ή αντικείμενο στο οποίο αφιερώνεται το αναμνηστικό νόμισμα.
- Overall - State (state of coin from the collection):
- Status - the main characteristic that determines the presence of a coin in the collection. The coin status affects the availability and content of the Market tab. Available values (can be renamed from Settings):
 Demo - an existing item that is not present and is not needed in the collection;
 Bidding - an item that is currently being bid on;
 Ordered - an object that has been ordered;
 Owned - an object that is owned in the collection;
 Duplicate - copy or spare item of the collection;
 Replacement - an item that is for exchange with a better item;
 Sold - item that has been sold;
 Wish - an object that is desired for purchase;
 Sale - an item that has been put up for sale;
 Missing - an item that is missing from the collection (stolen or lost);
 Pass - object that is under watched in auction or store.
 - Αξιολόγηση - ο βαθμός φθοράς των νομισμάτων
- Ποσότητα - ο αριθμός των διπλότυπων ή κερμάτων σε ρολό
- Μορφή - μορφή διανομής (μεμονωμένο νόμισμα, συλλογή ή ρολό)
- Κατάσταση
- Seat - a seat of the coin in the storage;
- Αποθήκευση - μια περιγραφή της φυσικής θέσης του νομίσματος
- Γραμμοκώδικας
- Grader;
- Ελάττωμα - μια περιγραφή του κατασκευαστικού σφάλματος του νομισματοκοπείου
- Χαρακτηριστικά.
- Status - the main characteristic that determines the presence of a coin in the collection. The coin status affects the availability and content of the Market tab. Available values (can be renamed from Settings):
- Κατάστημα - Αγορά:
- Ημερομηνία
- Τιμή
- Κόστος - τελική τιμή συμπεριλαμβανομένης της προμήθειας
- Commission - additional costs associated with the acquisition of a coin (auction fee and/or shipping cost). It is allowed to enter the commission amount, as well as the percentage of the price (for example, 10%). The field is available only in the coin editing window;
- Πωλητής
- Τόπος
- Invoice - link to the purchaise invoice document on disk or URL;
- Πληροφορίες.
- Κατάστημα - Πώληση:
- Ημερομηνία
- Τιμή
- Πώληση - το συνολικό εισπραχθέν ποσό λαμβάνοντας υπόψη την προμήθεια
- Commission - additional costs associated with the acquisition of a coin (auction fee and/or shipping cost). It is allowed to enter the commission amount, as well as the percentage of the price (for example, 10%). The field is available only in the coin editing window;
- Αγοραστής
- Τόπος
- Invoice - link to the sales invoice document on disk or URL;
- Πληροφορίες.
- Map
- Address;
- Latitude;
- Longitude;
- Technical data - Parameters (physical parameters of the coin):
- Composition;
- Υλικό
- Material 2;
- Λεπτότητα
- Βάρος
- Διάμετρος
- Πάχος
- Width;
- Height;
- Σχήμα
- Πρόσθια/Οπίσθα - η αναλογία της πρόσθιας με την οπίσθια όψη (μετάλλιο, νόμισμα).
- Technical data - Specificity:
- Diameter - real coin diameter;
- Weight - real coin weight;
- Die Axis - describes how the obverse and reverse dies were aligned to each other when the coin was struck. Most often expressed in degrees, but can also be expressed as the face of a clock in hours;
- Modification.
- Technical data - Minting (coin release data):
- Ημερομηνία έκδοσης
- Νομισματοκοπία
- Περίοδος έκδοσης
- Ποιότητα - τεχνική κοπής
- Σημείωση.
- Σχέδιο (περιγραφή σχεδίου του νομίσματος):
- Πρόσθια όψη - η εικόνα της πρόσθιας όψης
- Σχέδιο (πρόσθια όψη)
- Σχεδιαστής (πρόσθια όψη)
- Χαράκτης (πρόσθια όψη)
- Χρώμα (πρόσθια όψη)
- Reverse - the reverse image;
- Σχέδιο (οπίσθια όψη)
- Σχεδιαστής (οπίσθια όψη)
- Χαράκτης (οπίσθια όψη)
- Χρώμα (οπίσθια όψη)
- Edge - the image of the edge or the banknote signature;
- Type - type of coin edge or title of the banknote signatory;
- Label - label on the coin edge or banknote signatory name;
- Signature - the image of the banknote signature;
- Type - type of coin rim or title of the banknote signatory;
- Signature - banknote signatory name;
- Θέμα - περιγραφή του θέματος ή του γεγονότος στο οποίο είναι αφιερωμένο το νόμισμα ή ο σχεδιασμός του.
- Ταξινόμηση:
- 1#, 2#, 3#, 4# - αριθμοί της έκδοσης ενός νομίσματος στους καταλόγους
- Σπανιότητα
- Καλό - η κατά προσέγγιση τιμή ενός νομίσματος στην κατάσταση F-12, F-15
- VF - η κατά προσέγγιση τιμή ενός νομίσματος στην κατάσταση VF-20, VF-25, VF-30, VF-35
- XF - η κατά προσέγγιση τιμή ενός νομίσματος στην κατάσταση EF-40, XF-45
- Unc - η κατά προσέγγιση τιμή ενός νομίσματος στην κατάσταση MS-60 και άνω
- Παραλλαγή, Πρόσθια όψη, Οπίσθια όψη, Περιφέρεια - μια σύντομη περιγραφή της ποικιλίας του νομίσματος, της πρόσθιας όψης, της οπίσθιας όψης και της περιφέρειάς του
- URL - Σύνδεσμος ιστού για πληροφορίες σχετικά με το νόμισμα ή προς ένα αρχείο στο δίσκο.
- Εικόνες;
- Photo 1, Photo 2, Photo 3, Photo 4, Photo 5, Photo 6 - 6 additional photos or images. You can add specific title for an image by double-click on image title or right click on image.
- Σύστημα (Μη επεξεργάσιμο. Μπορεί να εμφανίζεται μόνο στον πίνακα νομισμάτων):
- ID - ο μοναδικός αριθμός του νομίσματος στη συλλογή
- Position - default sort order in Table of coins;
- Created - date the coin was added;
- Updated - the date of the last editing of the coin;
- Εικόνα - μια βελτιστοποιημένη εικόνα της πρόσθιας και της οπίσθιας όψης του νομίσματος για έξοδο στον Πίνακα των νομισμάτων.
Για ορισμένα πεδία, οι τιμές μπορούν να ληφθούν από την αναφορά (δείτε κεφ. 7):

Στο παράθυρο Ρυθμίσεων, μπορείτε να καταργήσετε ορισμένα από τα αχρησιμοποίητα πεδία (δείτε κεφ. 8).
Ορισμένα πεδία (όπως Αξία, Έτος, Ποσότητα, Τιμή, Λεπτότητα, Βάρος, Διάμετρος, Νομισματοκοπία) είναι για εισαγωγή μόνο αριθμητικών τιμών. Για εισαγωγή τιμών σε διευρυμένη μορφή σε αυτά τα πεδία («π.Χ.» στο πεδίο Έτος, κλάσματα σε Ονομαστικό πεδίο, εύρος στο πεδίο Βάρος κλπ.), πρέπει να ενεργοποιήσετε την Ελεύθερη μορφή αριθμητικών πεδίων στο παράθυρο Ρυθμίσεων.
Text fields (such as Subject, Features, Description, Note) support links:

3.1.1 Επεξεργασία εικόνων
The application supports up to 11 images of each coin.
The following image formats are supported: BMP, GIF, JPEG, PNG, TIFF, WEBP. Images are saved in WebP format with transparency. Large images are compressed so that the maximum side does not exceed 1024 pixels (you can change it in the Settings dialog).
To insert or change an image, right-click on the field and select one of the drop-down menu items:
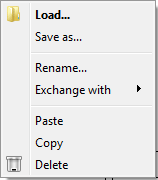
- Φόρτωση... - επιλογή εικόνας από ένα αρχείο στο δίσκο
- Αποθήκευση ως... - αποθηκεύει την εικόνα σε ένα αρχείο στο δίσκο
- Μετονομασία... - ορισμός ενός μοναδικού ονόματος για την εικόνα που θα εμφανιστεί στο αναδυόμενο παράθυρο του πίνακα εικόνας (δείτε κεφ. 4.2);
- Ανταλλαγή με - ανταλλάσσει δύο εικόνες
- Επικόλληση - επικόλληση εικόνας από το πρόχειρο (μπορεί να είναι ένα αρχείο γραφικών, μια εικόνα που έχει αντιγραφεί από έναν επεξεργαστή εικόνας ή έναν σύνδεσμο ιστού)
- Αντιγραφή - αντιγράφει την εικόνα στο πρόχειρο για επικόλληση αργότερα στον επεξεργαστή εικόνας
- Διαγραφή - διαγράφει την τρέχουσα εικόνα.
Double clicking on the image field opens the file selection window if the image is not yet installed, or opens the image in the Image Editor (see 9) or in the standard image viewer of your OS.
Η εικόνα του νομίσματος στον πίνακα νομισμάτων δημιουργείται αυτόματα από την πρόσθια και την οπίσθια εικόνα.
3.2 Επεξεργασία ενός νομίσματος
To edit the coin data, you need to double-click on the required coin, right-click on the desired coin and select Edit..., select the coin and press Enter key or select the Record->Edit... menu. After that, the Edit dialog will be opened, described in 3.1.
3.3 Κλώνος νομισμάτων
Για γρήγορη προσθήκη ενός παρόμοιου νομίσματος, μπορείτε να χρησιμοποιήσετε την κλωνοποίηση. Για να γίνει αυτό, κάντε δεξί κλικ στο νόμισμα και επιλέξτε Κλώνος. Θα ανοίξει το παράθυρο Επεξεργασίας με συμπληρωμένες τις πληροφορίες σχετικά με το νέο νόμισμα. Επεξεργαστείτε τα απαιτούμενα πεδία και αποθηκεύστε τα.
You can also copy (using Ctrl + Ins or Ctrl + C) the existing coin and paste it (by pressing Shift + Ins or Ctrl + V) - the Edit dialog will also open.
A copied coin or coin group (see below) can be inserted into a third-party application (for example, MS Excel or Notepad). In this case, when inserting into a third-party application, only text fields (without images) will be copied.
Μπορείτε επίσης να προσθέσετε ένα νέο νόμισμα με προσυμπληρωμένα πεδία από το Δέντρο. Για να γίνει αυτό, κάντε δεξί κλικ στο στοιχείο Δέντρο και επιλέξτε Προσθήκη νέου νομίσματος.... Στο παράθυρο Επεξεργασίας που θα ανοίξει θα συμπληρωθούν όλα τα συνήθη πεδία για νομίσματα που αντιστοιχούν σε αυτό το στοιχείο.
3.4 Επεξεργασία πολλών νομισμάτων
Sometimes you need to change some fields at once for several coins. To do this, select the required coins (to select several coins, use the click with the Shift or Ctrl key pressed, to select all the coins, press Ctrl + A), right-click on the selected coin group and select Multi edit... or the Record->Edit... menu.
In the opened Edit dialog, all matching fields for the selected coin group will be filled. Each field will have a checkbox that allows or denies the application of the field value to the whole group of coins when saving:
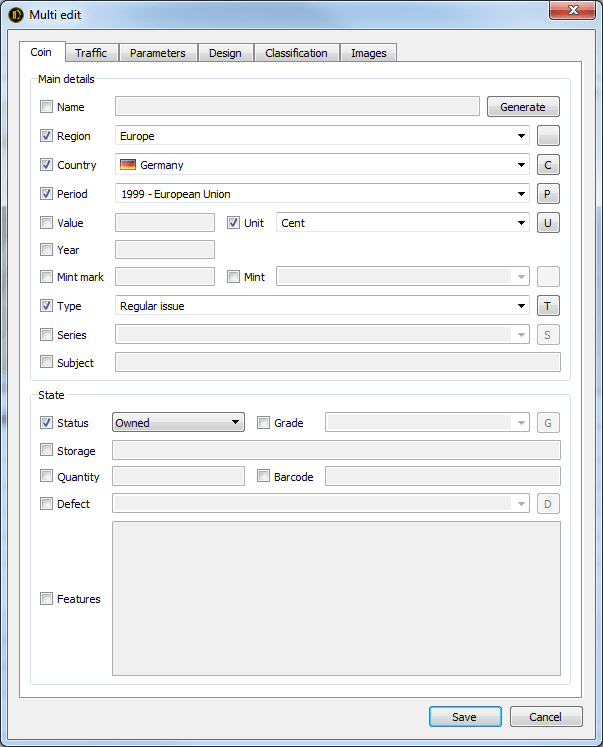
Επίσης, η επεξεργασία ομάδας είναι διαθέσιμη και από το Δέντρο - κάντε δεξί κλικ στο στοιχείο δέντρου και επιλέξτε Επεξεργασία νομισμάτων....
3.5 Κατάργηση
You can remove coins from the collection one by one or by a group. To delete, select the Record->Delete menu, right-click on the selected coin or coin group and select Delete or press the Del key.
Προειδοποίηση: Τα αφαιρούμενα νομίσματα καταργούνται ταυτόχρονα και από τη συλλογή και δεν μπορεί να γίνει επαναφορά τους..
4 View Coins
4.1 Table of coins
The Table of coins is the central element of the application, serves to display coin data according to those selected with the settings.
The number and location of fields can be set in the List->Select columns... menu or by right-clicking on the table header and selecting Select columns....
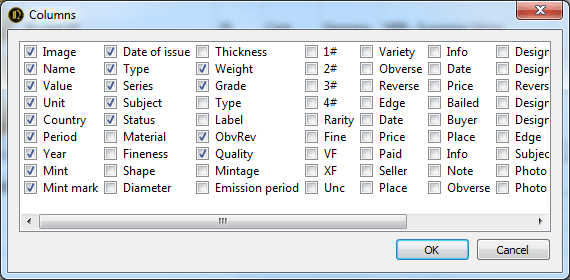
In the opened dialog, it is necessary to mark the fields of interest. Dragging the names of fields with a mouse can change the location of the fields relative to each other. You can also drag field headers directly into the coin table. Clicking on the field header sorts the table according to the selected field.
You can control the width of a column in a table by expanding the border of the column heading with the mouse or by right-clicking on the header and selecting Adjust size.
4.2 Image Panel
This panel displays images tied to the coin. At the bottom of the panel are checkboxes allowing you to control the number of simultaneously displayed images.
Double-clicking opens the imagen in the Image Editor (see 9) or in the standard image viewer of your OS. When you hover your mouse over an image, a unique image name is displayed, if it was specified when editing the coin.
4.3 Filter
Using the menu in the column headings of the table, you can filter coins by the value of the fields.
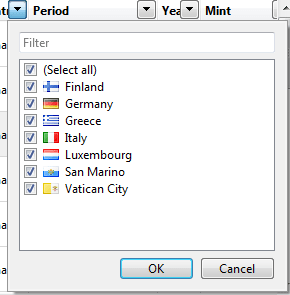
The Filter menu contains all column values. Marked values will be displayed, the rest will be hidden. To mark all items or remove marks from all values, select (All). At the top of the menu is a field that allows you to filter out the menu values.
To reset all filters in the current list, click the Clear all filters button on the toolbar:
![]()
4.4 Tree
The tree on the left side of the application window allows you to group coins by field values. When selecting a tree element, the coins corresponding to the selected value are displayed in the table.
To customize the tree, right-click on the tree element and select Customize tree...:
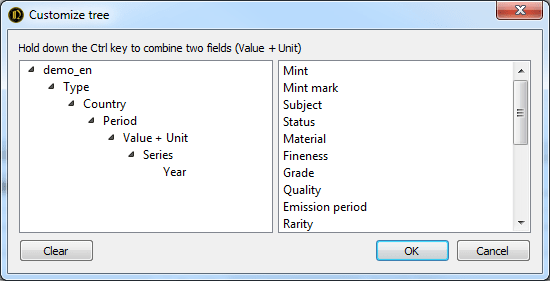
In the opened dialog you can change the structure of the tree by dragging the elements with the mouse. Items that are dragged from right to left are added to the end of the tree. Dragging from left to right removes items from the tree. To merge two fields (for example, Value+Unit), hold down the Ctrl key while dragging.
4.5 Lists
The lists allow you to have several independent collection views. Each list stores its own settings for fields, columns, filters and tree. This allows the lists to be used as permanent filters.
Add a new list by clicking on the List->New... menu or by double-clicking on the list panel (from the empty space next to the headings of the existing lists) and entering the name of the new list. You can also create a copy of the existing list by right-clicking on the source list and selecting Clone.
You can change the name of the list by selecting the List->Rename... menu or by right-clicking on the list title and selecting Rename....
Closed lists are not deleted and are available in the List->Open menu. To permanently delete private lists, select the List->Open->Remove all menu.
4.6 Status Bar
At the bottom of the application window there is a status bar showing the name and path to the collection file, the total number of coins in the collection and in the current Table of coins, the number of coins in the selected group.

5 Managing a collection file
The collection file is a regular file with the extension .db and stores all data about the collection including images other than references (see 7). You can copy, move, delete and rename it by means of your OS.
5.1 Creating/Opening
To create a new collection, select the menu File->New.... In the dialog that opens, select the location and name of the new collection file.
To open an existing collection file, select the File->Open... menu and select the desired file. You can also associate collection files (for example, if you select the appropriate option when installing the application) and open them automatically when you "call" from the file manager.
The File menu displays up to 5 recently opened collections available for quick opening.
5.2 Backup
To prevent data loss of the collection due to hardware, software, human errors, as well as the work of malicious programs, it is recommended to perform a backup. To create a backup copy of the collection, select the menu File->Backup. This will create a copy of the current collection with the date and time stamp added (for example, demo_171025115112.db for the copy made at 11:51:12 on 25/10/2017) in the directory specified in the settings. To restore the data, just rename the backup file by deleting the time stamp. You can also copy the collection file using your OS.
Note: It is recommended to store backups on a physical medium other than the worker. Choosing a cloud storage, such as Dropbox, can be a good option. It is also important to make backup copies on a regular basis, before or after making a large number of changes (see 8.4).
5.3 Vacuum
In view of the peculiarities of SQLite implementation, which provides storage of collection data, memory is not automatically released when data is deleted in the collection file. Over time, this can lead to an increase in the size of the collection file, its fragmentation and slowdown of the application. If necessary, you can reduce the size of the collection file by releasing unnecessary "empty" space by selecting the File->Vacuum menu.
5.4 Password
In the menu File->Set password... you can set the password that will be requested each time the collection is opened.
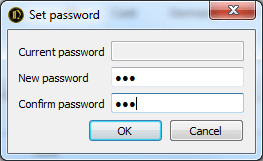
Note: data encryption is not carried out, so the password protection cannot be considered complete.
5.5 Synchronization
Changes made in multiple copies of a collection file can be merged safely with the menu File->Synchronize....
The most important properties of the synchronization algorithm:
- All new entries will be added (detected by Created field) to opened collection.
- Entries with the same value of ID and Created field will be updated when Updated field value is less in opened collection.
5.6 Importing
OpenNumismat allows you to import data from collections creted in another software (MS Excel, CoinManage, Collection Studio and Tellico) or sites (Colnect, Numista and uCoin.net).
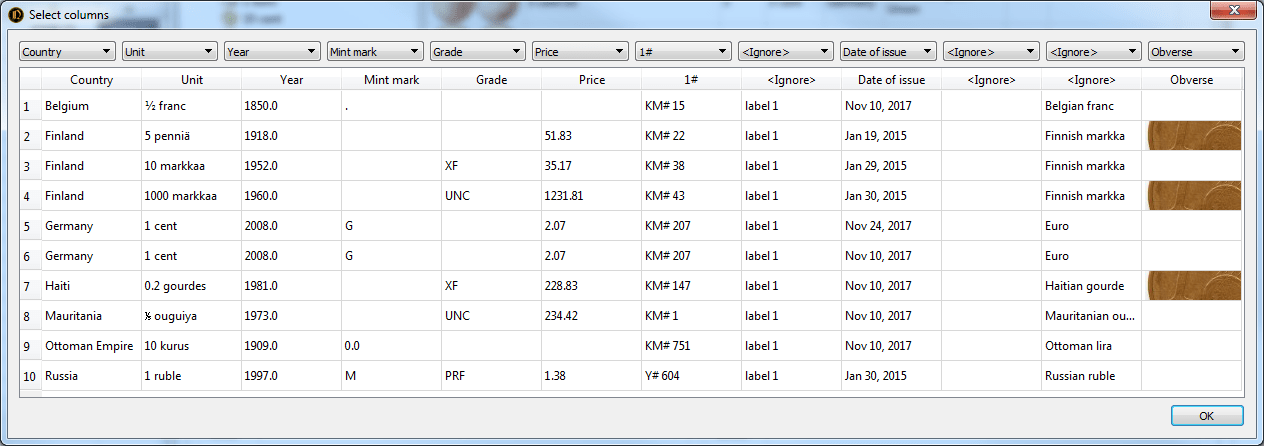
For importing from MS Excel select the menu File->Import->Excel and select the source file. After that, the dialog for assigning fields with the first 10 coins from the source file will be opened:
6 Reports
6.1 Generating reports
The application supports the generation of reports on templates. You can edit existing ones or create your own report templates.
The generated report can be printed or saved in HTML, PDF, MS Word formats from the Preview dialog.
To create a report, you need to select the coins for which data will be included in the report and open the Preview dialog by selecting the Report->Report... menu:
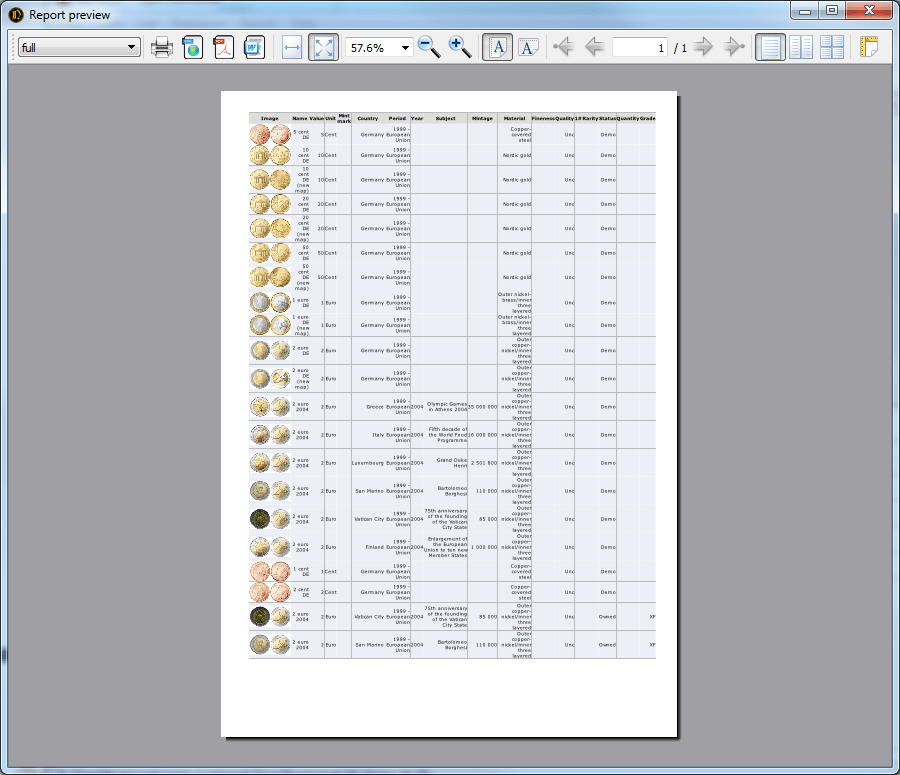
In the Preview dialog, you can select a report template (the left list on the toolbar), control the preview mode, and print or save the report to a file of the desired format (right buttons on the toolbar).
Note: Preview dialog use old library for generating HTML. So reports in preview may be corrupted and do not match the view in modern browsers. Also it may crash when generating large reports (more than 100 coins). For viewing and printing you can use Quick report (see 6.2) for open report in your browser.
6.2 Quick Report
By selecting the Report->View in browser menu, you can quickly view the report for the selected coins in HTML format.
For a quick report, used the template set in the Settings dialog as the Default template.
6.3 Editing Templates
The engine for generating template reports is based on the open-source Jinja2 library.
User templates should be placed into Documents folder (usually C:\Users\user\Documents\OpenNumismat\templates). Each template is in a separate subfolder, the name of which is used as the template name.
The reports are generated in UTF-8 encoding and, accordingly, the templates should be in the same encoding. Therefore, for editing templates it is recommended to use, for example, Notepad++.
Attention: when deleting, reinstalling or updating the application, user templates can be lost. Always back up your templates, if you make changes to them, before these actions.
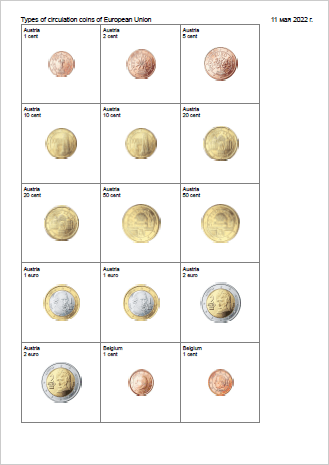
6.4 Report template examples
Commemoratives_ByCountry
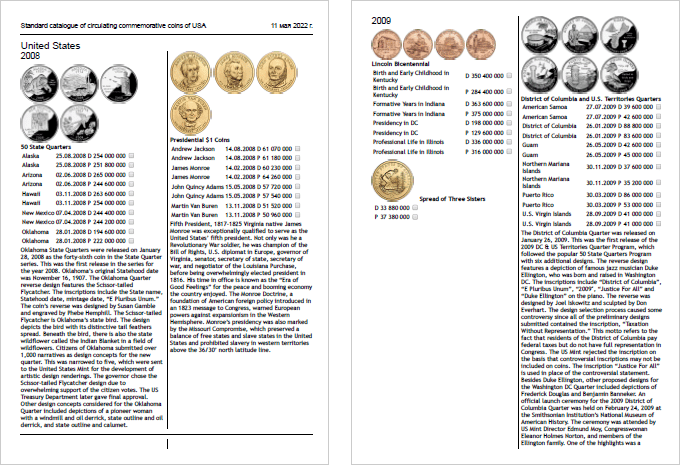
Commemoratives_ByYear
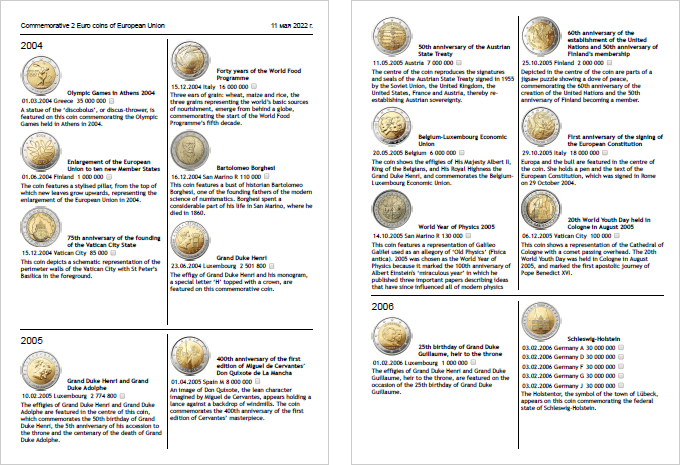
holders
6.5 Exporting the Table of coins
OpenNumismat allows you to save the current Table of coins with all applied filters and sorting in a separate file in MS Excel, HTML or CSV format (Note: in the current implementation, images are not exported).
You can export the Table of coins in the menu Report->Save current list.... In the opened dialog select the file name, the required format and save the file.
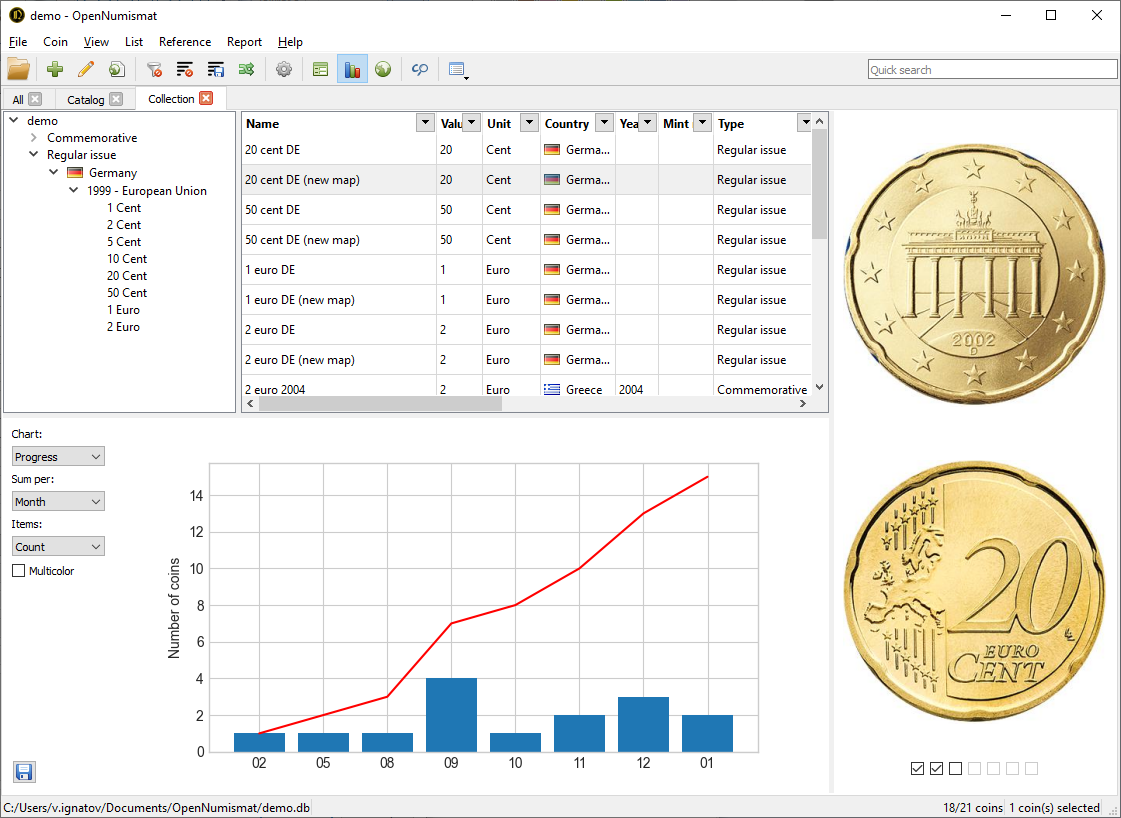
6.6 Statistics
Also for create any diagram and calculating statistics you can use MS Excel. Copy coins that you need from OpenNumismat to MS Excel or export Table of coins to MS Excel file (see 6.5) and use its functionality.
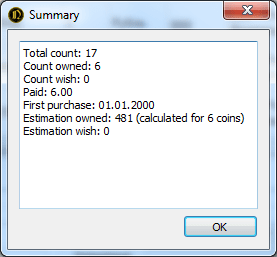
6.7 Summary
7 References
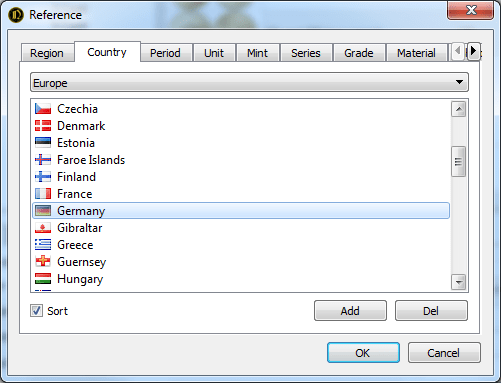
References make it easy to enter data when editing a coin, and also add icons (such as flags) to the data display. References are available for the following fields: Region, Country, Period, Ruler, Unit, Mint, Series, Grade, Material, Shape, Quality, Edge, Rarity, ObvRev, Type, Defect, Place (purchase or sale).
Editing references is available from the Edit dialog:
or from menu Reference->Edit...:
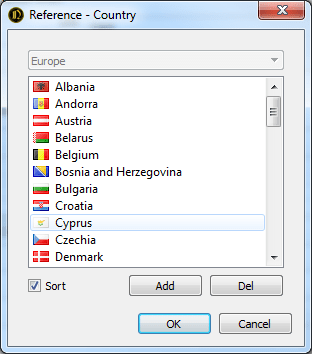
Right-clicking on the entry in the directory opens access to adding or deleting the item's icon:

References for Country, Period, Ruler, Unit, Mint, Series is a cross-references and their updating is available only if you select the value of the base field that exists in the reference. For example, to add a new mint, you should first select an existing country.
The Sort check box sorts all the entries in the directory, otherwise all items will be displayed in the order they were entered.
To quickly fill references with entered data from the collection, select the Reference->Fill from collection menu.
By default, references are stored in a separate file with a .ref extension, which can be copied, renamed or deleted by means of your OS. The path to the references file can be specified in the Settings dialog.
Also you can attach current reference to a collection file. Select Reference->Attach current reference for attaching or Reference->Detach current reference for remove reference from collection and use default from Settings.
You can customize default reference with Reference generator.
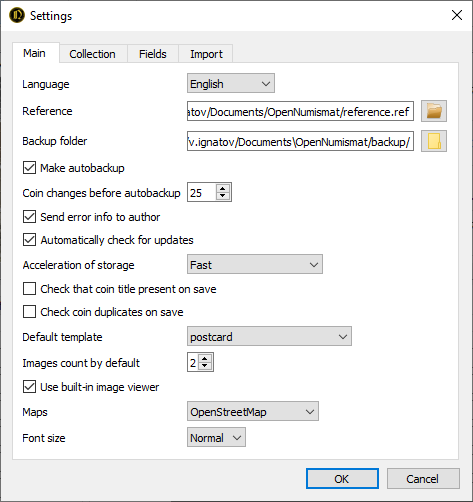
8 Settings
The Settings dialog allows you to configure the appearance and behavior of the application. To open the dialog, select the menu File->Settings:
8.1 Fields
The Fields panel of the settings dialog allows you to rename and remove part of the collection fields from the interface. In this case only the selected fields will be displayed in the program interface, but the data will be saved for all fields.
8.2 Acceleration of storage
The SQLite database engine have a multiple settings that affect the speed and reliability:
- Reliable - all changes will be guaranteed to be saved;
- Fast - changes can be lost when power is turned off during operation (recommended for most cases);
- Extra fast (dangerous) - recommended when you perform a large number of changes, provided that you perform a backup.
8.3 Images count by default
Default images count in Image panel.8.4 Autobackup
You can enable autobackup. This feature will make backups after changing specified count of records.8.5 Collection
Collection specific settings (stored for each collection file):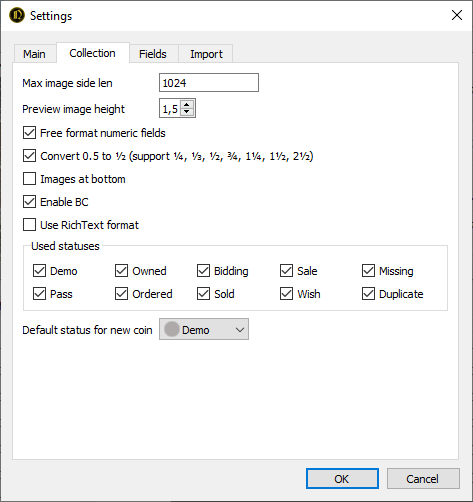
Ύψος εικόνας προεπισκόπησης:
Free format numeric fields - for entering values in the expanded format (question mark in the Year field, fractions in the Nominal field, range in the Weight field, etc.).
Images at bottom:
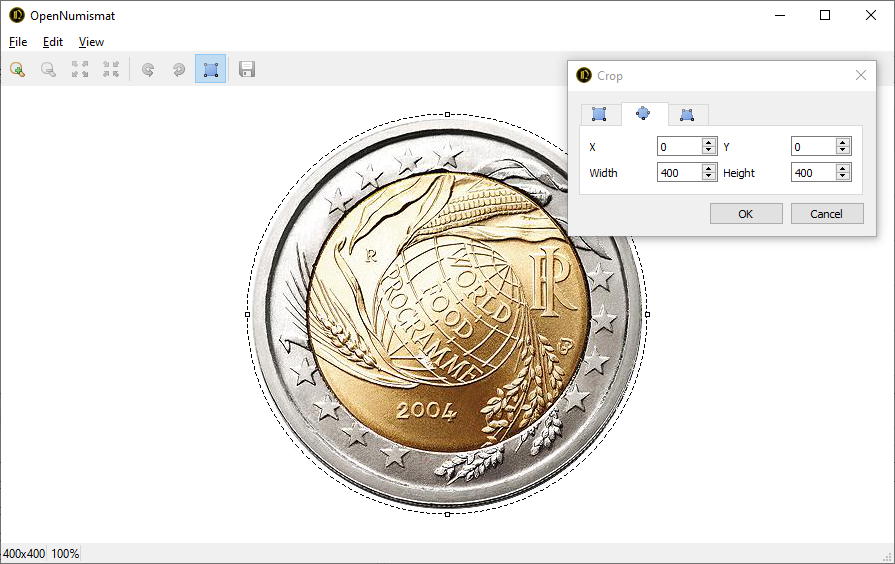
9 Image Editor
OpenNumismat has a built-in Image Editor (main project is https://github.com/OpenNumismat/ImageEditor), that can be enabled from Settings.
Χαρακτηριστικά
- Support popular image formats: JPEG, PNG, BMP, TIFF, GIF, WebP
- Takes a photo from webcam (for better results try Camo)
- Image editing tools: resize, rotate, crop (rectangle, ellipse, perspective transformation)
- Remove background with rembg
- Up to 10 Undo/Redo actions
- Single click to switch between best fit and actual size mode
- Full Screen mode
- Mouse wheel zoom
Keyboard Shortcuts
Ctrl + O — Open file
Ctrl + S — Save
Ctrl + C, Ctrl + Insert — Copy
Ctrl + V, Shift + Insert — Paste
Ctrl + Z — Undo
Ctrl + Y — Redo
Alt + ← — Rotate to left
Alt + → — Rotate to right
C — Open crop tool
R — Open rotate tool
B — Remove backgroud with AI
Ctrl + ← — Previous image
Ctrl + → — Next image
Ctrl + ↑ — Previous record
Ctrl + ↓ — Next record
+ — Zoom in
- — Zoom out
0 — Fit to window
1, A — Scale 100%
2 — Scale 200%
3 — Scale 300%
4 — Scale 400%
5 — Scale 500%
6 — Scale 600%
F11 — Full screen
Esc — Quit
Mouse wheel upward — Zoom in
Mouse wheel downward — Zoom out
Mouse left button dbl click — Zoom in
Mouse middle button press — Zoom in
Mouse right button dbl click — Zoom out