


Посібник користувача
1 Introduction2 General view
3 Entering coins
4 View Coins
5 Managing a collection file
6 Reports
7 References
8 Settings
9 Image Editor
1. Вступ
1.1 Опис
OpenNumismat is a handy and reliable application designed for numismatists and coin collectors, to create a numismatic collection.
Завдяки OpenNumismat ви зможете створювати, організовувати і керувати власними каталогами монет з детальним описом і фотографіями для кожного елемента.
OpenNumismat поширюється повністю безкоштовно. Вихідний код ліцензований під GPL-3.0 і доступний у GitHub.
Official website is located at https://opennumismat.github.io.
1.2 Особливості реалізації
OpenNumismat is based on the PySide6 library with the SQLite database engine to store the data collection, which allowed to achieve lightness and responsiveness of the interface and cross-platform.
Повний список використовуваних компонентів і бібліотек доступнийтут.
Icons used in the interface, based on the LED Icon Set v1.0, Soft Scraps Icons by deleket and Flag icons.
Переклад інтерфейсу, реалізованого ентузіастами за допомогою сервісу Transifex. Дякуємо за допомогу!
1.3 Ліцензія
OpenNumismat - вільне програмне забезпечення; Ви можете розповсюджувати її та/або вносити зміни відповідно до умов Загальної Публічної Ліцензії GNU (GNU GPL) у тому вигляді, у якому вона була опублікована Фундацією Вільного Програмного Забезпечення (FSF); або 3ї версії Ліцензії, або (на Ваш розсуд) будь-якої більш пізньої версії.
Програма OpenNumismat розповсюджується із сподіванням, що вона виявиться корисною, але БЕЗ БУДЬ-ЯКОЇ ҐАРАНТІЇ, без навіть УЯВНОЇ ҐАРАНТІЇ КОМЕРЦІЙНОЇ ПРИДАТНОСТІ чи ВІДПОВІДНОСТІ БУДЬ-ЯКОМУ ПЕВНОМУ ЗАСТОСУВАННЮ. Зверніться до Загальної Публічної Ліцензії GNU за подробицями.
Ви мали отримати копію Загальної публічної ліцензії GNU разом з OpenNumismat. Якщо ні, дивіться, на https://www.gnu.org/licenses/.
2 Загальний вигляд
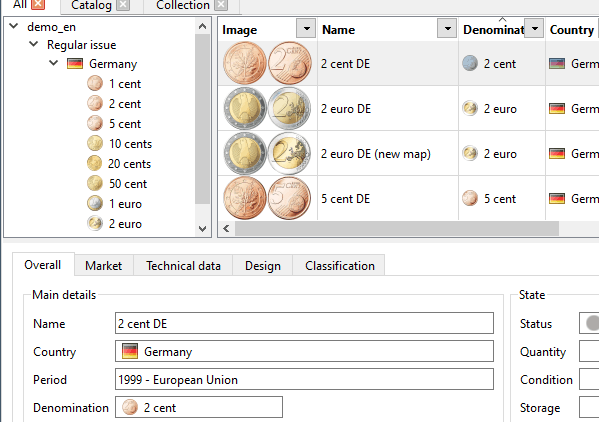
Під час першого запуску програми відкриється головне вікно з демонстраційною колекцією:
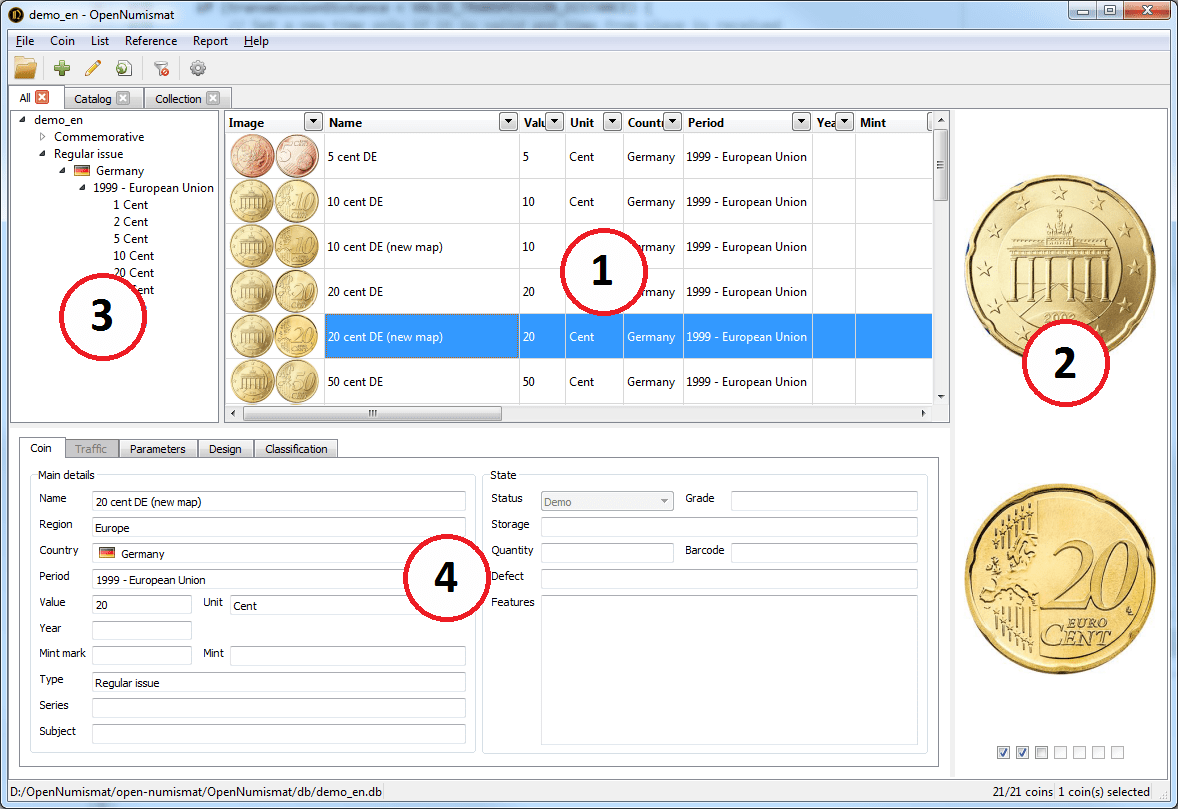
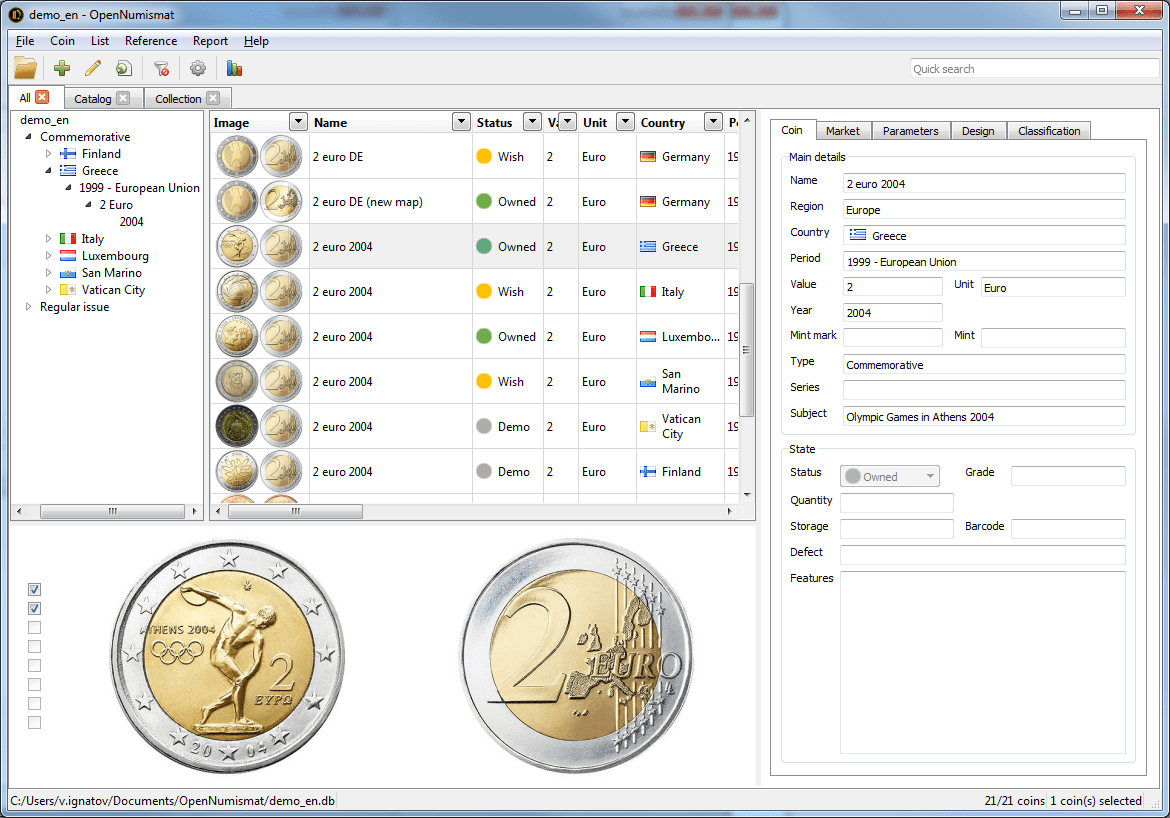
Головне вікно складається з наступних основних елементів:
- Таблиця монет
- Панель "Зображення"
- Дерево
- Інформаційна панель
При натисканні на будь-яку монету в Таблиці монет відображається докладна інформація: на панелі «Зображення» - фотографія монети, Дерево розгортається до елемента, що описує монету, на панелі «Інформація» відображаються всі введені дані монети.
Ви можете створити нову порожню колекцію або відредагувати демонстраційну, ввівши нові дані.
2.1 Таблиця перегляду монет
You can change the view of Table of coins by menu View → Change view
2.2 Панель деталей
You can switch Info panel to Statistics or Map by menu View → Details

3 Введення монет
3.1 Додавання монет
Керуйте своєю колекцією, додавши записи про кожну куплену, продану або бажану монету.
To add a new coin, select the Record → Add menu or press the Ins key. After that, the Edit dialog opens:

Діалогове вікно редагування містить 7 вкладок із такими полями:
- Загальне - Основні деталі:
- Категорія - тип колекційного предмета;
- Ім'я - описання назви монети (можна автоматично створювати з інших полів, натиснувши кнопку "Створити");
- Регіон;
- Країна;
- Період - період в історії країни або період карбування монети;
- Емітент;
- Правитель;
- Value *;
- Unit *;
- Рік - рік по григоріанському календарю
- Рік на монеті
- Монетний двір
- Знак монетного двору
- Тип
- Серія - серія пам'ятних монет;
- Предмет - подія або об'єкт, якому присвячена пам'ятна монета.
- Загальний стан (стан монети з колекції):
- Статус - основна характеристика, яка визначає наявність монети в колекції. Статус монети впливає на доступність і вміст вкладки Ринок. Наведені значення (можна перейменувати в налаштуваннях):
 Демо - існуючий предмет, якого немає і не потрібен в колекції;
 Ставка - предмет, на який зараз зроблена ставка;
 У власності - об'єкт, який знаходиться у власності в колекції
 Дублікат - копія або запасний елемент колекції;
 Заміна - предмет, який підлягає обміну на кращий
 Продано - предмет, який продано;
 Бажання - об'єкт, який бажаний для покупки;
 Розпродаж - предмет, виставлений на продаж;
 Зниклий – предмет, відсутній у колекції (викрадений або загублений);
 Прохід - який знаходиться під спостереженням на аукціоні чи в магазині.
 - Оцінка - ступінь зносу монети;
- Кількість - кількість дублікатів або монет в ролі;
- Формат - формат розповсюдження (одна монета, набір монет або рол);
- Стан монети;
- Місце - місце розміщення монети в сховищі;
- Зберігання - опис фізичного розташування монети;
- Штрих-код;
- Оцінювач монет;
- Дефект - опис помилки монетного двору;
- Особливості.
- Статус - основна характеристика, яка визначає наявність монети в колекції. Статус монети впливає на доступність і вміст вкладки Ринок. Наведені значення (можна перейменувати в налаштуваннях):
- Ринок - Купівля;
- Дата;
- Ціна;
- Оплачено - остаточна ціна з урахуванням комісії;
- Commission - additional costs associated with the acquisition of a coin (auction fee and/or shipping cost). It is allowed to enter the commission amount, as well as the percentage of the price (for example, 10%). The field is available only in the coin editing window;
- Продавець;
- Місце купівлі;
- Invoice - link to the purchase invoice document on disk or URL;
- Додаткова інформація.
- Ринок - Продаж:
- Дата;
- Ціна;
- Bailed - the total received amount after commission;
- Commission - additional costs associated with the acquisition of a coin (auction fee and/or shipping cost). It is allowed to enter the commission amount, as well as the percentage of the price (for example, 10%). The field is available only in the coin editing window;
- Покупець;
- Місце купівлі;
- Рахунок-фактура - посилання на документ накладної на продаж на диску або URL;
- Додаткова інформація.
- Мапа
- Адреса;
- Широта;
- Довгота;
- Технічні дані - Параметри (фізичні параметри монети):
- Склад;
- Матеріал;
- Матеріал 2;
- Fineness - available formats 0.999, 999, 9995, 999.5;
- Маса;
- Діаметр;
- Товщина;
- Ширина;
- Висота;
- Форма;
- Аверс/Реверс - співвідношення аверсу та реверсу (медальне, монетне).
- Технічні дані - Специфікація:
- Діаметр - реальний діаметр монети;
- Weight - реальна вага монети;
- Вісь штампів – описує, як аверс і реверс штампів були вирівняні одна до одної під час карбування монети. Найчастіше виражається в градусах, але також може бути виражений циферблатом годинника;
- Модифікації.
- Технічні дані - Карбування (дані про випуск монет):
- Дата випуску;
- Тираж;
- Період емісії;
- Якість - техніка карбування;
- Примітка.
- Дизайн (опис дизайну монети):
- Аверс – зображення аверсу;
- Дизайн (аверс);
- Дизайнер (аверс);
- Гравер (аверс);
- Колір (аверс);
- Реверс – зображення реверсу;
- Дизайн (реверс);
- Дизайнер (реверс);
- Гравер (реверс);
- Колір (реверс);
- Гурт - зображення гурту або підпис на банкноті;
- Тип - тип гурту монети або посада підписанта банкноти;
- Напис - напис на торці монети або ім'я підписанта банкноти;
- Підпис - зображення підпису банкноти;
- Тип - тип бурту монети або посада підписанта банкноти;
- Підпис - ім'я підписанта банкноти;
- Тема — опис теми чи події, якій присвячена монета або її дизайн;
- Класифікація:
- 1#, 2#, 3#, 4# - catalog numbers for a coin;
- Рідкість;
- F (Fine) - F (Добре) - приблизна ціна монети в стані F-12, F-15;
- VF (Very Fine) - VF (Дуже Добре) приблизна ціна монети в стані VF-20, VF-25, VF-30, VF-35;
- XF (Extremely Fine) - XF (Надзвичайно добре) приблизна ціна монети в стані EF-40, XF-45;
- UNC (Uncirculated) - UNC (анциркулейтед) приблизна ціна монети в сані MS-60 і вище;
- Різновид, Аверс, Реверс, Гурт - короткий опис різновиду монети, її аверсу, реверсу та гурту;
- URL - веб-посилання на інформацію про монету або на файл на диску.
- Зображення:
- Фото 1, Фото 2, Фото 3, Фото 4, Фото 5, Фото 6 - 6 додаткових фотографій або зображень. Ви можете додати певний заголовок для зображення, двічі клацнувши назву зображення або клацнувши правою кнопкою миші зображення.
- Система (не редагується, може відображатися тільки в Таблиці монет):
- ID - унікальний номер монети в колекції;
- Позиція - порядок сортування за замовчуванням у Таблиці монет;
- Created - дата додавання монети;
- Оновлено - дата останньої правки монети;
- Зображення - оптимізоване зображення аверсу та реверсу монети для виведення в Таблицю монет.
For some fields, values can be obtained from the reference (see 7):

In the Settings dialog, you can remove some of the unused fields (see 8).
* You can disable the Value field and rename the Unit field to Denomination in the Settings dialog. Then you can add denomination icons through the reference:
Some fields (such as Value, Year, Quantity, Price, Fineness, Weight, Diameter, Mintage) are for entering only numeric values. To enter values in the expanded format ("BC" in the Year field, fractions in the Nominal field, range in the Weight field, etc.) in these fields, you must enable the Free format numeric fields in the Settings dialog.
Текстові поля (наприклад, Тема, Особливості, Опис, Примітка) підтримують посилання:

3.1.1 Editing Images
The application supports up to 11 images of each coin.
The following image formats are supported: BMP, GIF, JPEG, PNG, TIFF, WEBP. Images are saved in WebP format with transparency. Large images are compressed so that the maximum side does not exceed 1024 pixels (you can change it in the Settings dialog).
To insert or change an image, right-click on the field and select one of the drop-down menu items:
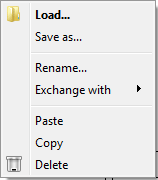
- Load... - select image from file on disk;
- Save as... - saves the image to a file on disk;
- Rename... - set a unique name for the image that will be displayed in the tooltip of the image panel (see 4.2);
- Exchange with - swaps two images;
- Paste - paste an image from the clipboard (it can be a graphic file, an image copied from a image editor or a web link);
- Copy - copies the image to the clipboard for later paste into the image editor;
- Delete - deletes the current image.
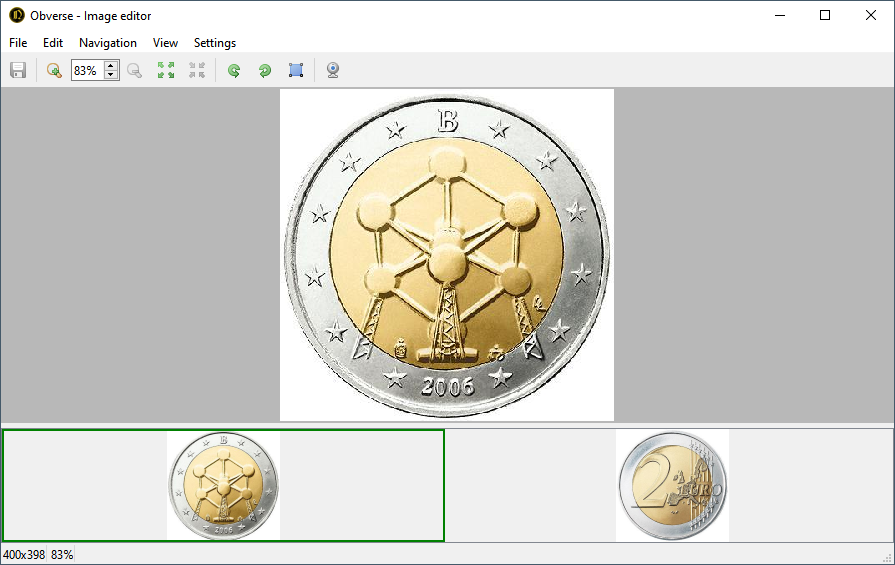
Double clicking on the image field opens the file selection window if the image is not yet installed, or opens the image in the Image Editor (see 9) or in the standard image viewer of your OS.
The coin image in the Table of coins is automatically generated from the obverse and reverse images.
3.2 Editing a coin
To edit the coin data, you need to double-click on the required coin, right-click on the desired coin and select Edit..., select the coin and press Enter key or select the Record → Edit... menu. After that, the Edit dialog will be opened, described in 3.1.
3.3 Clone coins
To quickly add a similar coin, you can use cloning. To do this, right click on the coin and select Clone. The Edit window filled with information about the new coin will open, edit the required fields and save.
You can also copy (using Ctrl + Ins or Ctrl + C) the existing coin and paste it (by pressing Shift + Ins or Ctrl + V) - the Edit dialog will also open.
A copied coin or coin group (see below) can be inserted into a third-party application (for example, MS Excel or Notepad). In this case, when inserting into a third-party application, only text fields (without images) will be copied.
You can also add a new coin with pre-filled fields from the Tree. To do this, right click on the Tree element and select Add new coin.... In the opened Edit dialog all common fields for coins corresponding to this element will be filled.
3.4 Editing Multiple Coins
Sometimes you need to change some fields at once for several coins. To do this, select the required coins (to select several coins, use the click with the Shift or Ctrl key pressed, to select all the coins, press Ctrl + A), right-click on the selected coin group and select Multi edit... or the Record → Edit... menu.
In the opened Edit dialog, all matching fields for the selected coin group will be filled. Each field will have a checkbox that allows or denies the application of the field value to the whole group of coins when saving:
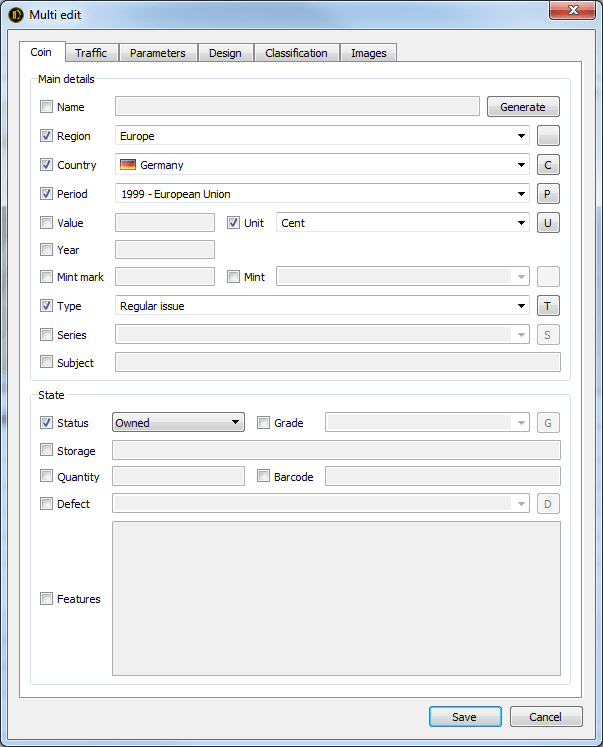
Also, group editing is available from the Tree - right-click on the tree element and select Edit coins....
3.5 Removing
You can remove coins from the collection one by one or by a group. To delete, select the Record → Delete menu, right-click on the selected coin or coin group and select Delete or press the Del key.
Removed coins are removed from the collection at once and can not be repaired - be careful.
4 View Coins
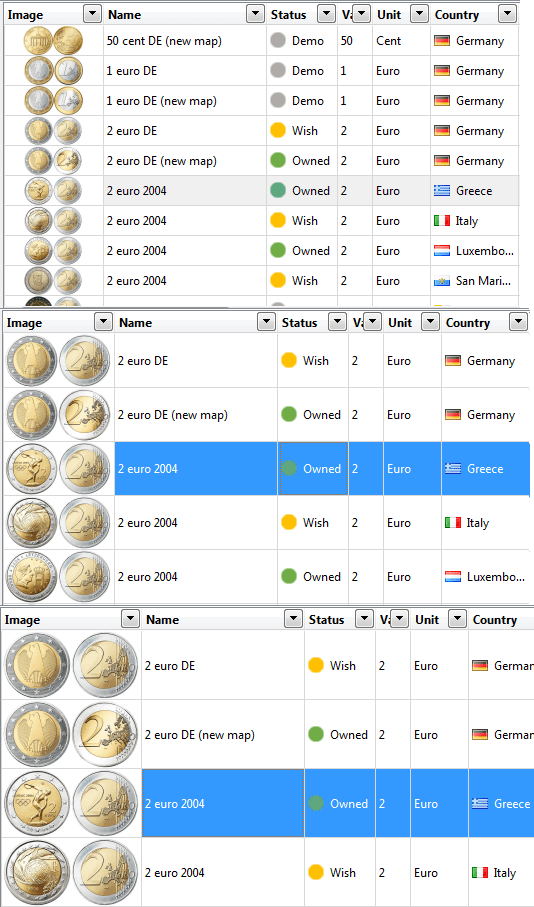
4.1 Table of coins
The Table of coins is the central element of the application, serves to display coin data according to those selected with the settings.
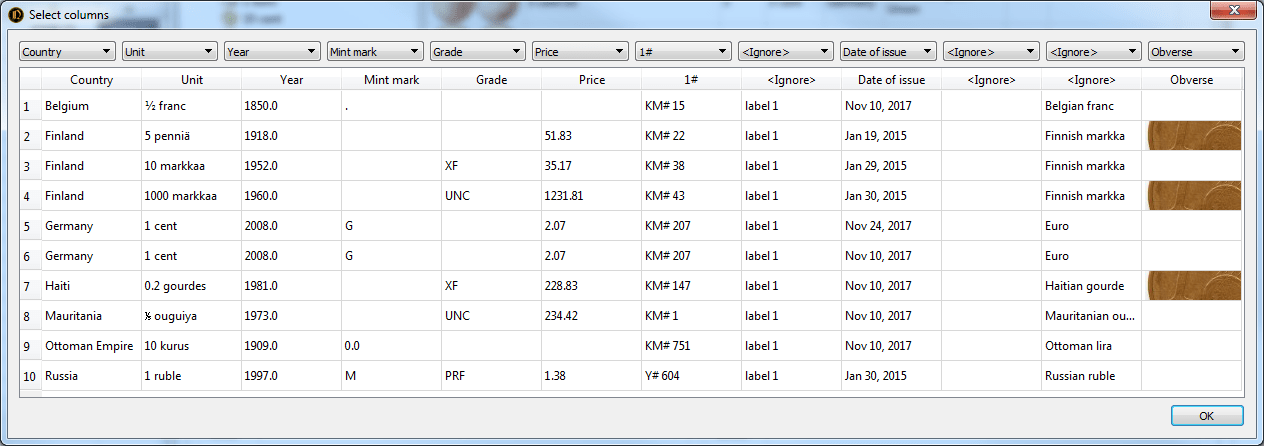
The number and location of fields can be set in the List → Select columns... menu or by right-clicking on the table header and selecting Select columns....
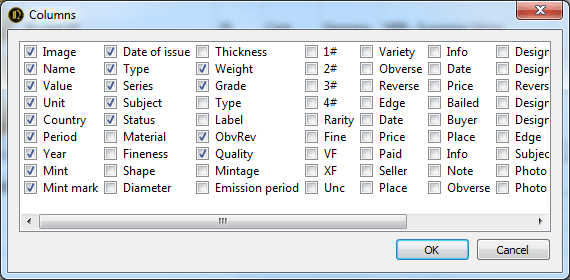
In the opened dialog, it is necessary to mark the fields of interest. Dragging the names of fields with a mouse can change the location of the fields relative to each other. You can also drag field headers directly into the coin table. Clicking on the field header sorts the table according to the selected field.
You can control the width of a column in a table by expanding the border of the column heading with the mouse or by right-clicking on the header and selecting Adjust size.
4.2 Image Panel
This panel displays images tied to the coin. At the bottom of the panel are checkboxes allowing you to control the number of simultaneously displayed images.
Double-clicking opens the imagen in the Image Editor (see 9) or in the standard image viewer of your OS. When you hover your mouse over an image, a unique image name is displayed, if it was specified when editing the coin.
4.3 Filter
Using the menu in the column headings of the table, you can filter coins by the value of the fields.
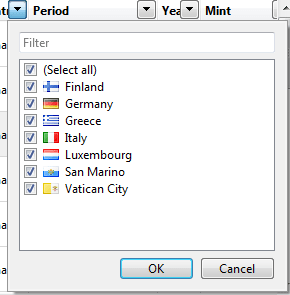
The Filter menu contains all column values. Marked values will be displayed, the rest will be hidden. To mark all items or remove marks from all values, select (All). At the top of the menu is a field that allows you to filter out the menu values.
To reset all filters in the current list, click the Clear all filters button on the toolbar:
![]()
4.4 Tree
The tree on the left side of the application window allows you to group coins by field values. When selecting a tree element, the coins corresponding to the selected value are displayed in the table.
To customize the Tree, click List → Customize tree... menu or right-click on the tree element and select Customize tree...:
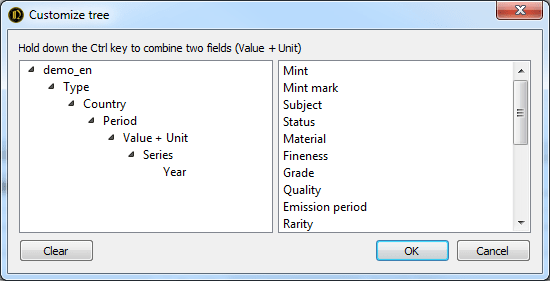
In the opened dialog you can change the structure of the tree by dragging the elements with the mouse. Items that are dragged from right to left are added to the end of the tree. Dragging last item from left to right removes it from the tree. To combine two fields (for example, Value+Unit), hold down the Ctrl key while dragging.
4.5 Lists
The lists allow you to have several independent collection views. Each list stores its own settings for fields, columns, filters and tree. This allows the lists to be used as permanent filters.
Add a new list by clicking on the List → New... menu or by double-clicking on the list panel (from the empty space next to the headings of the existing lists) and entering the name of the new list. You can also create a copy of the existing list by right-clicking on the source list and selecting Clone.
You can change the name of the list by selecting the List → Rename... menu or by right-clicking on the list title and selecting Rename....
Closed lists are not deleted and are available in the List → Open menu. To permanently delete private lists, select the List → Open → Remove all menu.
4.6 Status Bar
At the bottom of the application window there is a status bar showing the name and path to the collection file, the total number of coins in the collection and in the current Table of coins, the number of coins in the selected group.

5 Managing a collection file
The collection file is a regular file with the extension .db and stores all data about the collection including images other than references (see 7). You can copy, move, delete and rename it by means of your OS.
5.1 Creating/Opening
To create a new collection, select the menu File → New.... In the dialog that opens, select the location and name of the new collection file.
To open an existing collection file, select the File → Open... menu and select the desired file. You can also associate collection files (for example, if you select the appropriate option when installing the application) and open them automatically when you "call" from the file manager.
The File menu displays up to 7 recently opened collections available for quick opening.
5.2 Backup
To prevent data loss of the collection due to hardware, software, human errors, as well as the work of malicious programs, it is recommended to perform a backup. To create a backup copy of the collection, select the menu File → Backup. This will create a copy of the current collection with the date and time stamp added (for example, demo_171025115112.db for the copy made at 11:51:12 on 25/10/2017) in the directory specified in the settings. To restore the data, just rename the backup file by deleting the time stamp. You can also copy the collection file using your OS.
Note: It is recommended to store backups on a physical medium other than the worker. Choosing a cloud storage, such as Dropbox, can be a good option. It is also important to make backup copies on a regular basis, before or after making a large number of changes (see 8.1).
5.3 Vacuum
In view of the peculiarities of SQLite implementation, which provides storage of collection data, memory is not automatically released when data is deleted in the collection file. Over time, this can lead to an increase in the size of the collection file, its fragmentation and slowdown of the application. If necessary, you can reduce the size of the collection file by releasing unnecessary "empty" space by selecting the File → Vacuum menu.
5.4 Password
In the menu File → Set password... you can set the password that will be requested each time the collection is opened.
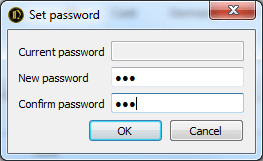
Note: data encryption is not carried out, so the password protection cannot be considered complete.
5.5 Synchronization
Changes made in multiple copies of a collection file can be merged safely with the menu File → Synchronize....
The most important properties of the synchronization algorithm:
- All new entries will be added (detected by Created field) to opened collection.
- Entries with the same value of ID and Created field will be updated when Updated field value is less in opened collection.
5.6 Importing
OpenNumismat allows you to import data from collections created in another software (MS Excel, CoinManage, Collection Studio and Tellico) or sites (Colnect, Numista and uCoin.net).
For importing from MS Excel select the menu File → Import → Excel and select the source file. After that, the dialog for assigning fields with the first 10 coins from the source file will be opened:
6 Reports
6.1 Generating reports
The application supports the generation of reports on templates. You can edit existing ones or create your own report templates.
The generated report can be printed or saved in HTML, PDF, MS Word formats from the Preview dialog.
To create a report, you need to select the coins for which data will be included in the report and open the Preview dialog by selecting the Report → Report... menu:
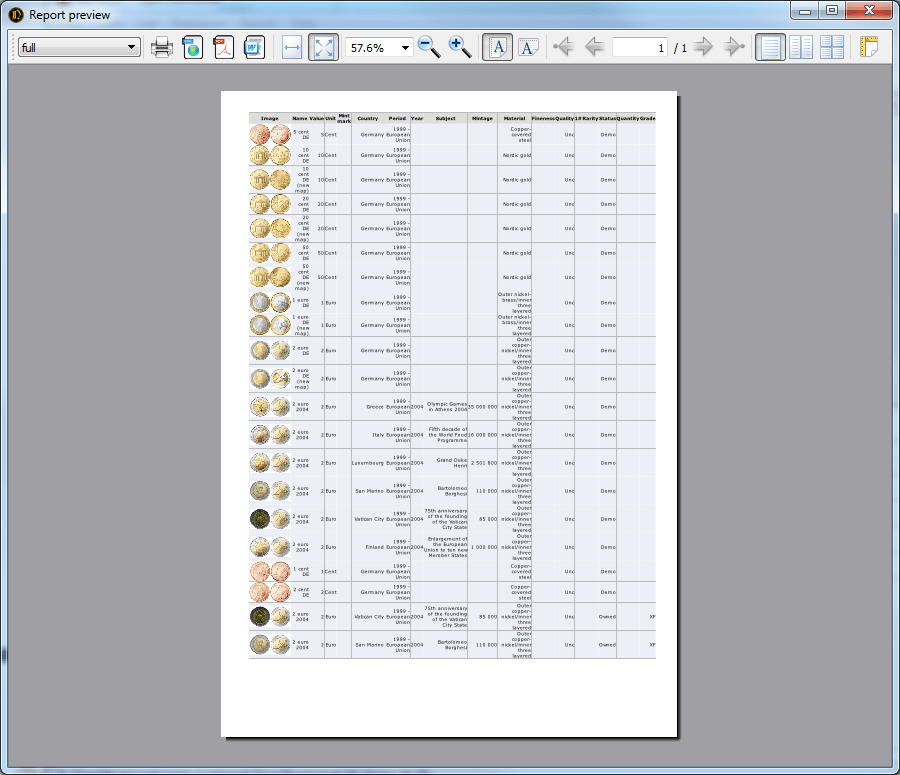
In the Preview dialog, you can select a report template (the left list on the toolbar), control the preview mode, and print or save the report to a file of the desired format (right buttons on the toolbar).
Note: Preview dialog use old library for generating HTML. So reports in preview may be corrupted and do not match the view in modern browsers. Also it may crash when generating large reports (more than 100 coins). For viewing and printing you can use Quick report (see 6.2) for open report in your browser.
6.2 Quick Report
By selecting the Report → View in browser menu, you can quickly view the report for the selected coins in HTML format. The report will be opened in the system browser.
For a quick report, used the template set in the Settings dialog as the Default template.
6.3 Editing Templates
To edit templates you need to have basic HTML skills. The engine for generating template reports is based on the open-source Jinja2 library. The reports are generated in UTF-8 encoding and, accordingly, the templates should be in the same encoding. Therefore, for editing templates it is recommended to use, for example, Notepad++.
User templates should be placed into Documents folder (usually %UserProfile%\Documents\OpenNumismat\templates). Each template is in a separate subfolder, the name of which is used as the template name.
Examples of templates can be found in the program folder (usually C:\Program Files\OpenNumismat\templates) or in the source codes.
The main template file name must be coins.htm. If coin.htm is present, it will be used as a template for generating a report for a single coin. Also, if a report is generated for multiple coins, it will be used for each individual coin, in addition to the overall report based on the coins.htm template.
The context variables records and titles are passed to the generator. titles contains the names of the fields to display (e.g. {{titles.subjectshort}} - Subject).
records - an array of all coins to display. Each array element contains one coin with all fields (e.g. {{records[0].subjectshort}} - Subject of first coin). The correspondence of fields can be found in the table.
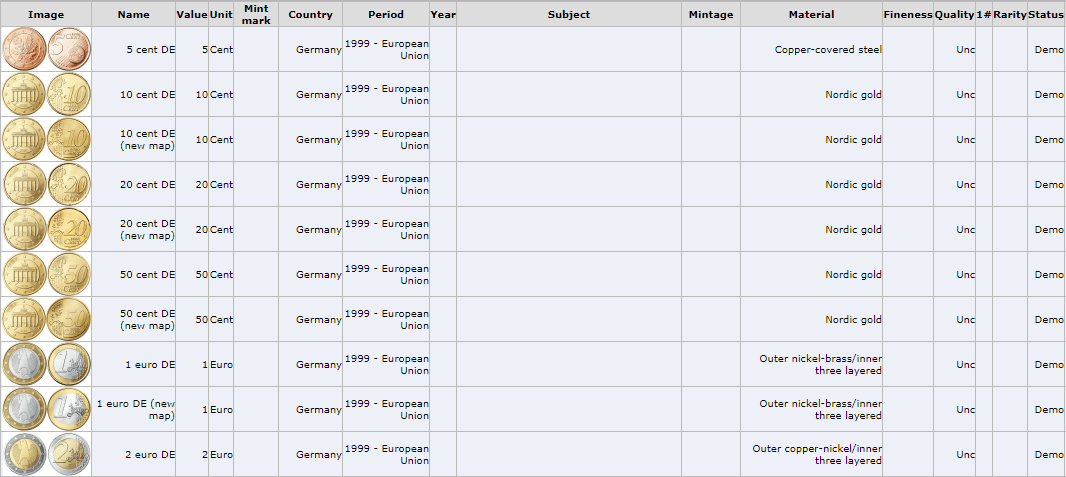
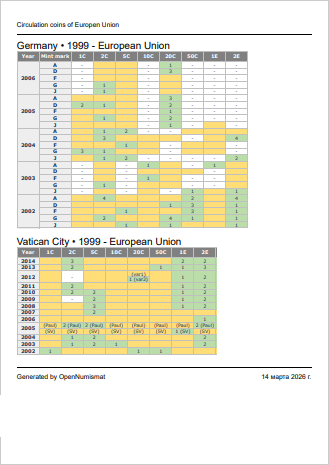
6.4 Report template examples
Commemoratives_ByCountry
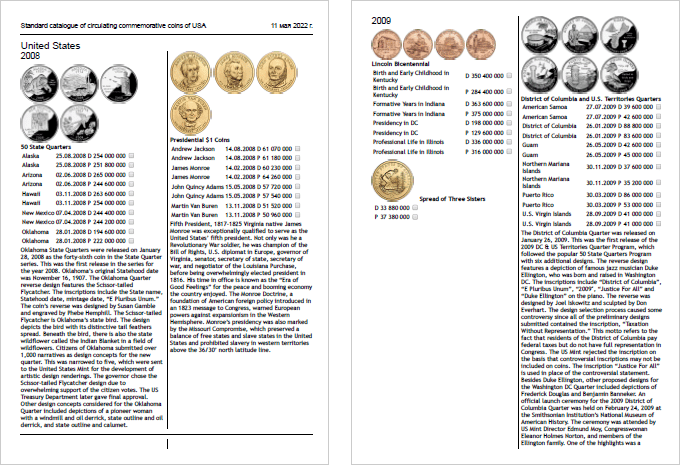
Commemoratives_ByYear
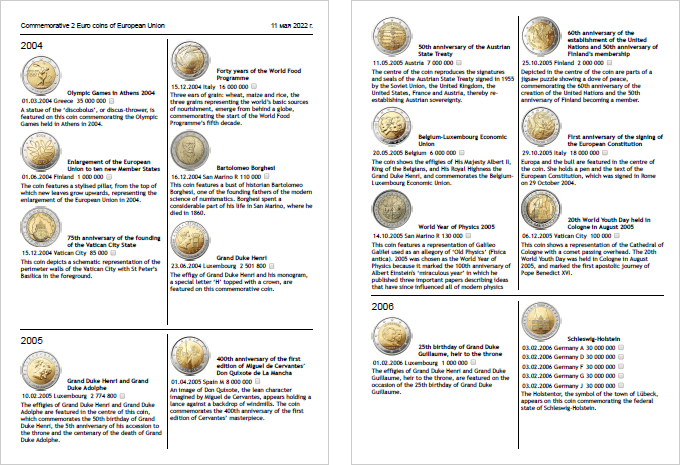
holders
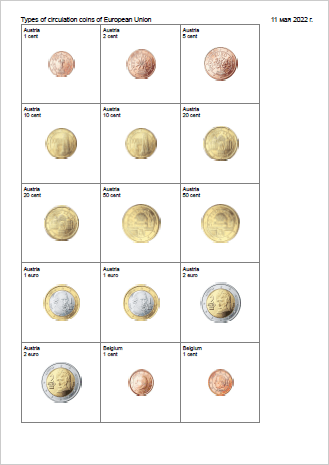
Circulation
6.5 Exporting the Table of coins
OpenNumismat allows you to save the current Table of coins with all applied filters and sorting in a separate file in MS Excel, HTML or CSV format (Note: in the current implementation, images are not exported).
You can export the Table of coins in the menu Report → Save current list.... In the opened dialog select the file name, the required format and save the file.
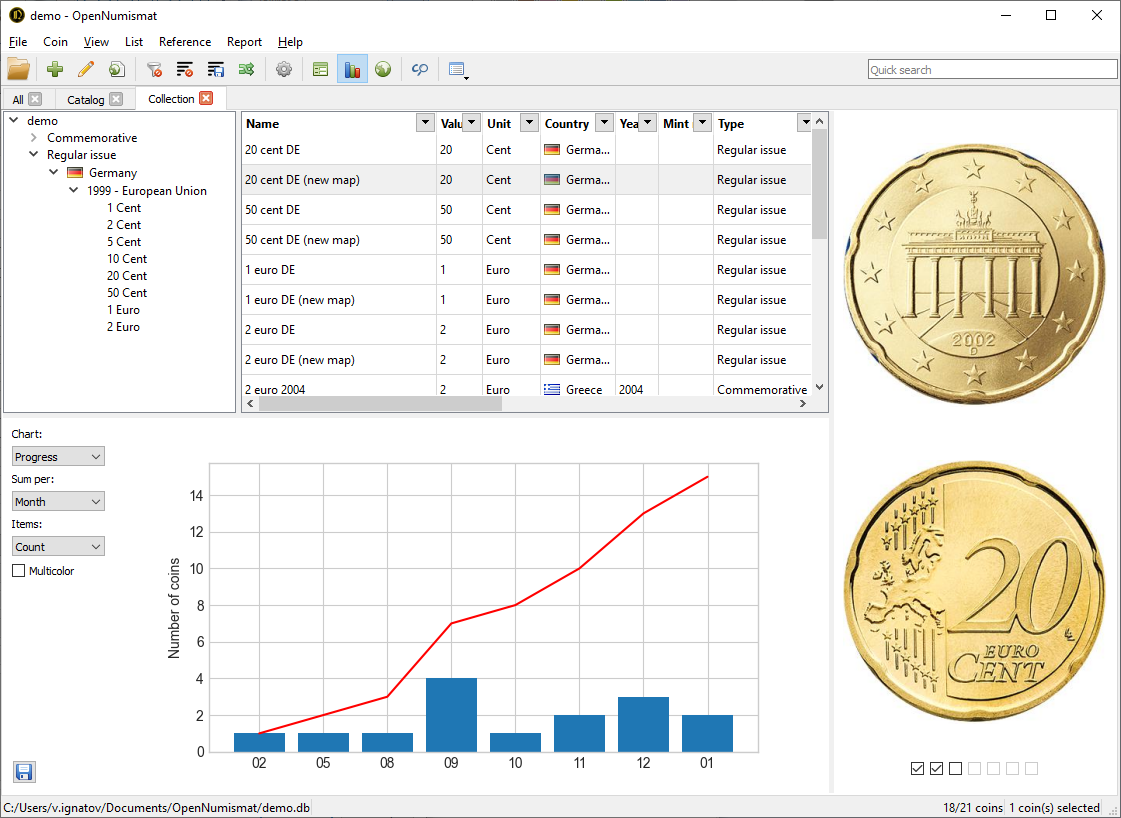
6.6 Statistics
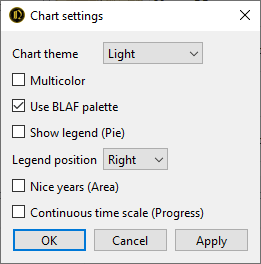
Screenshots of example statistics charts.
Additional settings for statistics charts:
Also for create any diagram and calculating statistics you can use MS Excel. Copy coins that you need from OpenNumismat to MS Excel or export Table of coins to MS Excel file (see 6.5) and use its functionality.
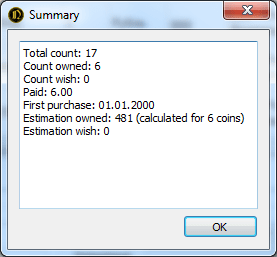
6.7 Summary
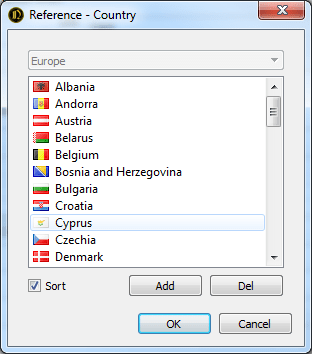
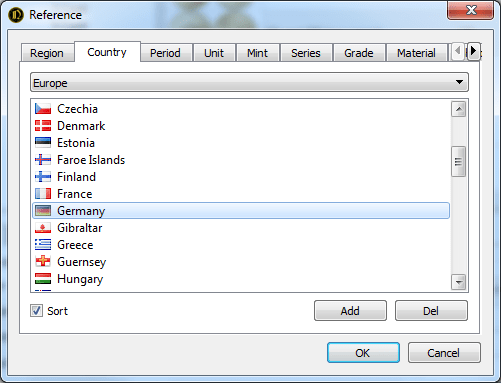
7 References
References make it easy to enter data when editing a coin, and also add icons (such as flags) to the data display. References are available for the following fields: Region, Country, Period, Ruler, Unit, Mint, Series, Grade, Material, Shape, Quality, Edge, Rarity, ObvRev, Type, Defect, Place (purchase or sale).
Editing references is available from the Edit dialog:
or from menu Reference → Edit...:
Right-clicking on the entry in the reference opens access to adding or deleting the item's icon:

References for Country, Period, Ruler, Unit, Mint, Series is a cross-references and their updating is available only if you select the value of the base field that exists in the reference. For example, to add a new mint, you should first select an existing country.
The Sort check box sorts all the entries in the reference, otherwise all items will be displayed in the order they were entered. This order can be changed by Move up/Move down in context menu.
To quickly fill references with entered data from the collection, select the Reference → Fill from collection menu.
By default, references are stored in a separate file with a .ref extension, which can be copied, renamed or deleted by means of your OS. The path to the references file can be specified in the Settings dialog.
Also you can attach current reference to a collection file. Select Reference → Attach current reference for attaching or Reference → Detach current reference for remove reference from collection and use default from Settings.
You can customize default reference with Reference generator.
8 Settings
The Settings dialog allows you to configure the appearance and behavior of the application. To open the dialog, select the menu File → Settings.
8.1 Main
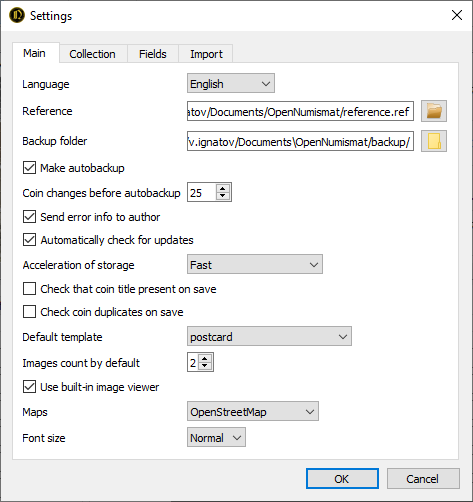
Шлях до резервних копій
The folder where backups will be saved. See 5.2.
Make autobackup after record changes
You can enable autobackup. This feature will make backups upon closing the collection after changing specified count of records.
Відправляти звіт про помилки автору
Enabling this flag allows internal error information to be sent to the author's website. This helps improve OpenNumismat. To better understand and quickly fix the error, please include a description of when the error occurs.
Прискорення сховища
The SQLite database engine have a multiple settings that affect the speed and reliability:
- Reliable - all changes will be guaranteed to be saved;
- Fast - changes can be lost when power is turned off during operation (recommended for most cases);
- Extra fast (dangerous) - recommended when you perform a large number of changes, provided that you perform a backup.
Use webcam
Allows the use of a webcam for scanning barcodes or capturing images in the Image Editor.
Show counters in Tree and Statistics
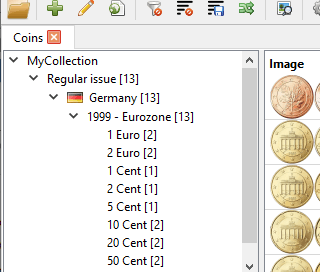
Image background color
When adding an image with a transparency or removing background in the Image Editor, the background will be replaced with the specified color.
8.2 Collection
Collection specific settings (stored for each collection file):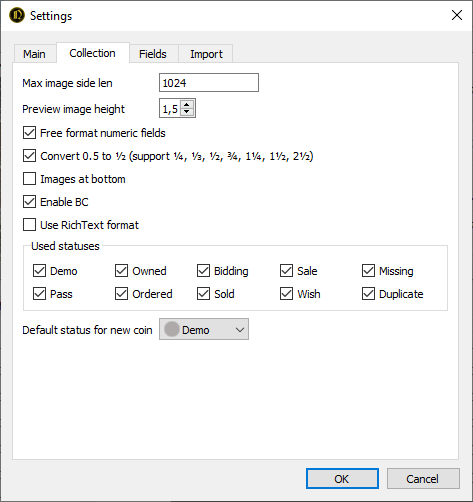
Max image side len, Image quality
These settings control images in the collection file and affect its size.
Setting Max image side len to 0 will preserve the original size.
Setting Image quality to 100% will use lossless compression.
Decreasing Max image side len or Image quality allows to recalculate all images in collection to reduce collection file size (see 5.3).
Висота зображення попереднього перегляду
Зображення внизу
Swaps the Image and Info panels.
Довільний формат числових полів
For entering values in the expanded format (question mark in the Year field, fractions in the Nominal field, range in the Weight field, etc.).
Sort Tree by references
When this setting is enabled, items in the Tree will be sorted according to their position in the reference (see 7). When two fields are combined in the Tree, sorting is performed first by the right-hand field.
8.3 Fields
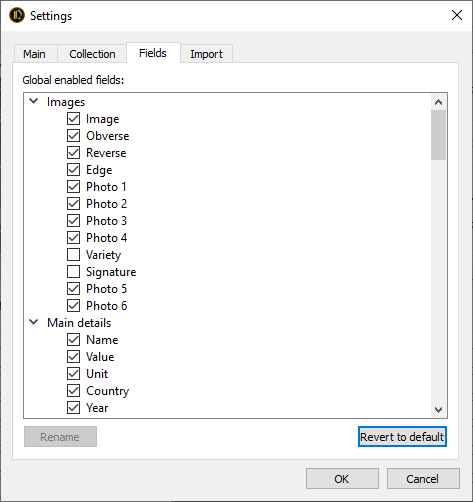
The Fields panel of the settings dialog allows you to rename and remove part of the collection fields from the interface. In this case only the selected fields will be displayed in the program interface, but the data will be saved for all fields.
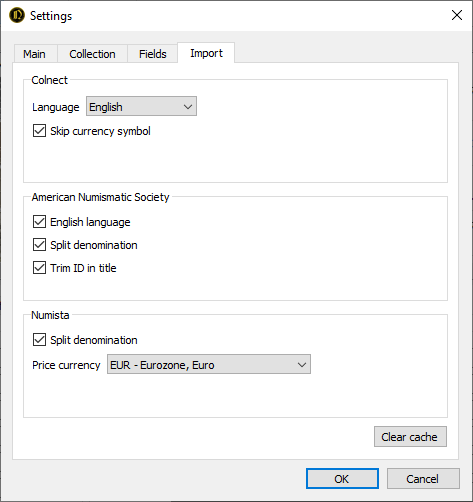
8.4 Import
9 Image Editor
OpenNumismat has a built-in Image Editor (main project is https://github.com/OpenNumismat/ImageEditor), which can be enabled from Settings.
Характеристики
- Supports popular image formats: JPEG, PNG, BMP, TIFF, GIF, WebP
- Capture a photo from webcam (for better results try Camo)
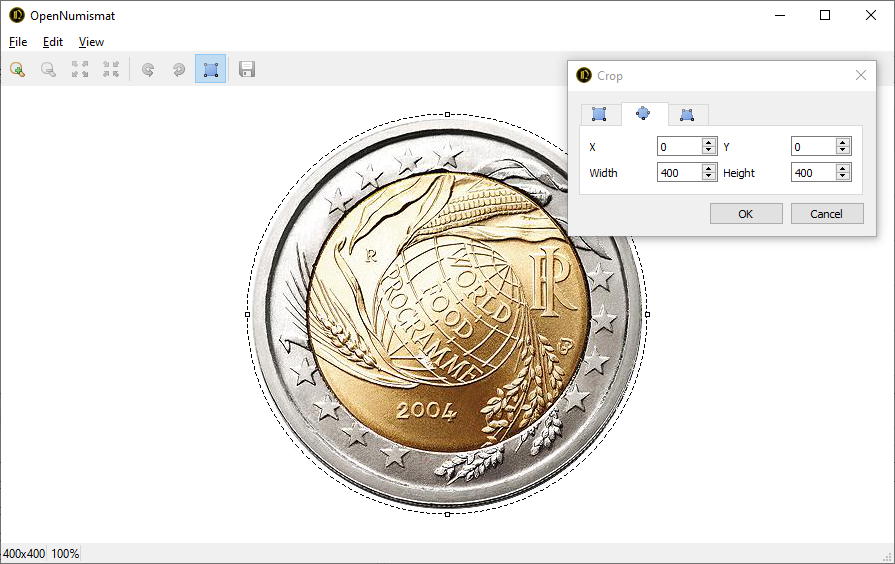
- Image editing tools: resize, rotate, crop (rectangle, ellipse, perspective transformation)
- Remove background with rembg
- Up to 10 Undo/Redo actions
- Single click to switch between best fit and actual size mode
- Full Screen mode
- Mouse wheel zoom
- Navigating through images in a record and through the records themselves
Keyboard Shortcuts
Ctrl + O — Open file
Ctrl + S — Save
Ctrl + C, Ctrl + Insert — Copy
Ctrl + V, Shift + Insert — Paste
Ctrl + Z — Undo
Ctrl + Y — Redo
Alt + ← — Rotate to left
Alt + → — Rotate to right
C — Open crop tool
R — Open rotate tool
B — Remove background with AI
Ctrl + ← — Previous image
Ctrl + → — Next image
Ctrl + ↑ — Previous record
Ctrl + ↓ — Next record
+ — Zoom in
- — Zoom out
0 — Fit to window
1, A — Scale 100%
2 — Scale 200%
3 — Scale 300%
4 — Scale 400%
5 — Scale 500%
6 — Scale 600%
F11 — Full screen
Esc — Quit
Mouse wheel upward — Zoom in
Mouse wheel downward — Zoom out
Mouse left button dbl click — Zoom in
Mouse middle button click — Zoom in
Mouse right button dbl click — Zoom out
Налаштування
Image Editor settings are available under File → Settings.
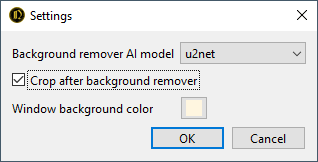
Available background remover AI models:
| Назва | Опис | Feature | Estimated time per image, s | Model size, Mb |
|---|---|---|---|---|
| u2net | pre-trained model for general use cases | optimal | 4.1 | 171 |
| silueta | same as u2net but the size is reduced to 43Mb | fastest | 1.4 | 43 |
| isnet-general-use | new pre-trained model for general use cases | 3.3 | 174 | |
| birefnet-general | pre-trained model for general use cases | best quality | 66.8 | 949 |
| birefnet-general-lite | light pre-trained model for general use cases | high quality | 21.5 | 218 |
The AI model will be downloaded automatically upon first use.