


Benutzerhandbuch
1 Einleitung2 Übersicht
3 Münzen eintragen
4 Münzen anzeigen
5 Eine Sammlung verwalten
6 Berichte
7 Referenz
8 Einstellungen
9 Bildeditor
1 Einleitung
1.1 Beschreibung
OpenNumismat is a handy and reliable application designed for numismatists and coin collectors, to create a numismatic collection.
OpenNumismat versetzt Sie in die Lage, ihren eigenen Münzkatalog herzustellen, die Einträge zu organisieren und zu verwalten und jeden Eintrag mit einer detaillierten Beschreibung sowie mit Fotos zu versehen.
OpenNumismat wird absolut kostenlos vertrieben. Der Quellcode ist unter GPL-3.0 lizenziert und bei GitHub verfügbar.
Official website is located at https://opennumismat.github.io.
1.2 Merkmale der Implementierung
OpenNumismat basiert auf der PySide6-Bibliothek mit der SQLite-Datenbank-Engine zur Speicherung der gesammelten Daten, was eine schlanke und reaktionsschnelle Benutzeroberfläche sowie Plattformunabhängigkeit ermöglicht.
Eine vollständige Liste der verwendeten Komponenten und Bibliotheken ist unter verfügbar
Icons used in the interface, based on the LED Icon Set v1.0, Soft Scraps Icons by deleket and Flag icons.
Übersetzungen der Oberfläche werden von Fans via Transifex bereitgestellt. Vielen Dank für die Hilfe!
1.3 Lizenz
OpenNumismat ist OpenSource Software: Du kannst sie verteilen und/oder modifizieren, solange du die Bedingungen der GNU General Public Licence, veröffentlicht durch die Free Software Foundation, Version 3 oder (nach eigenem Ermessen) jeder späteren Version einhältst.
OpenNumismat wird in der Hoffnung veröffentlicht, dass es nützlich ist, aber OHNE IRGENDEINE GARANTIE, sogar ohne die implizierte Garantie der TAUGLICHKEIT oder EIGNUNG FÜR EINEN BESTIMMTEN ZWECK. Für weitere Details lesen Sie bitte die GNU General Public Lizenz.
Sie sollten eine Kopie der GNU General Public Lizenz zusammen mit OpenNumismat erhalten haben. Wenn nicht, lesen Sie diese bitte auf http://www.gnu.org/licenses/ nach.
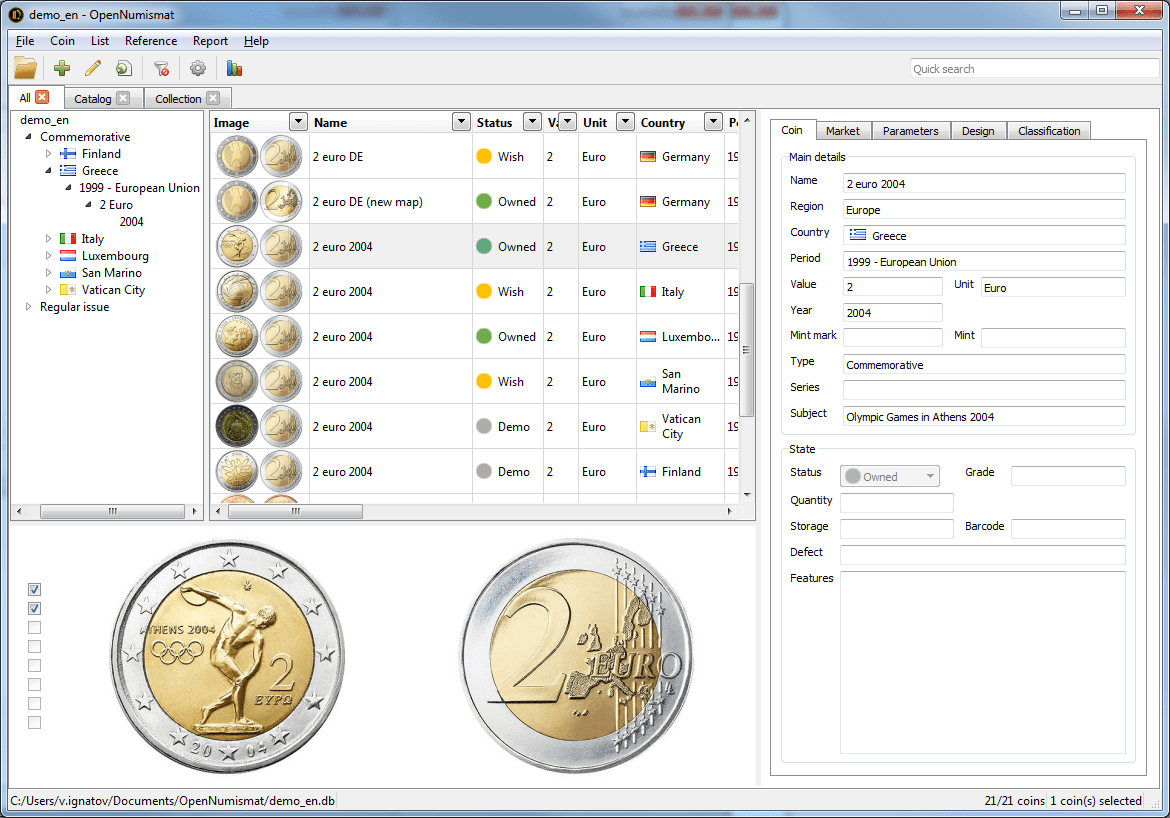
2 Allgemeine Ansicht
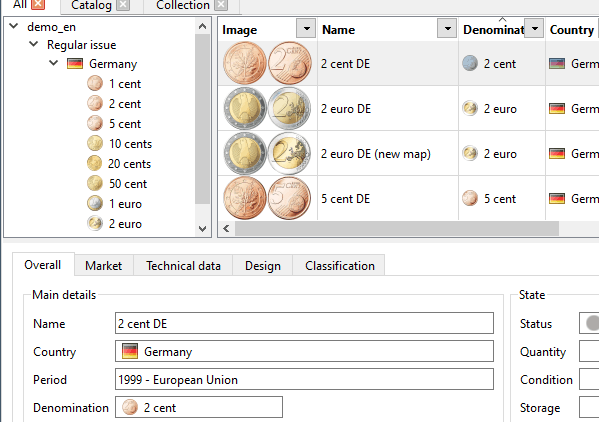
Beim ersten Start öffnet sich das Hauptfenster mit einer Demo-Sammlung:
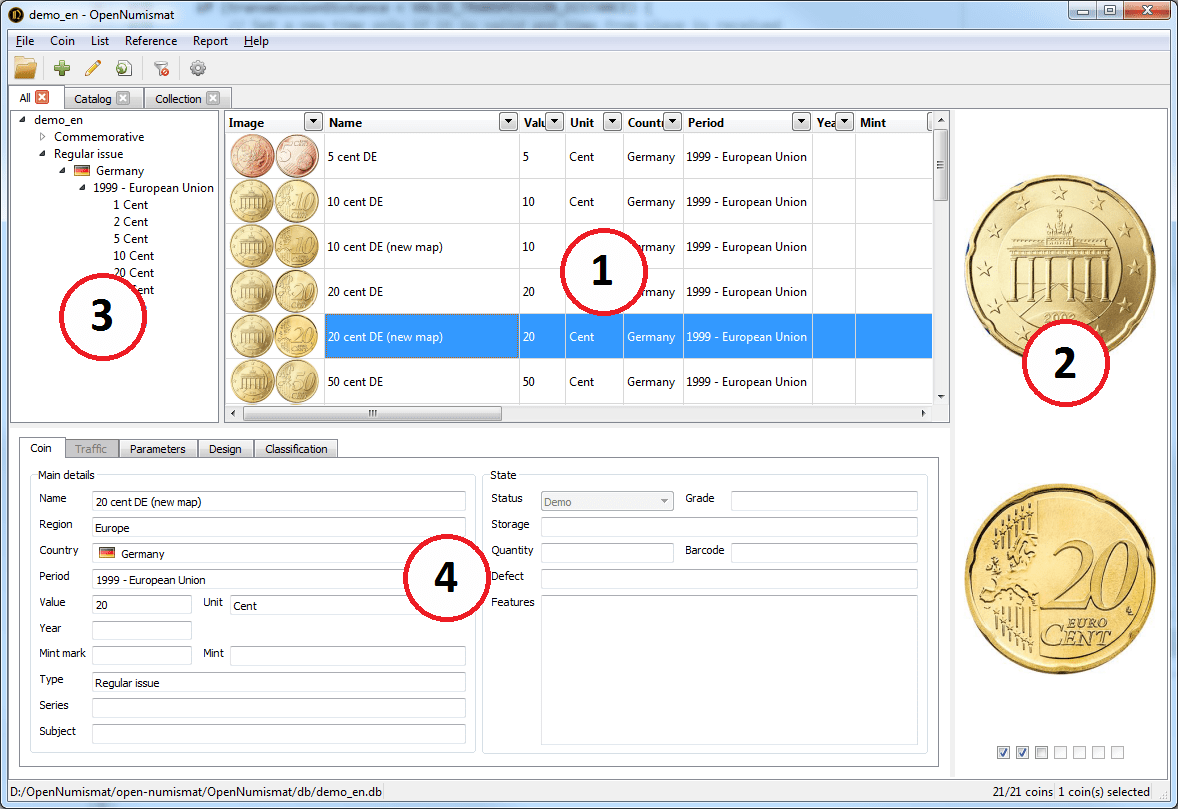
Das Hauptfenster besteht aus den folgenden Elementen:
- Münztabelle
- Bildbereich
- Verzeichnisbaum
- Infobereich
Wenn Sie eine beliebige Münze in der Münztabelle anklicken, werden detaillierte Informationen angezeigt: Im Bildbereich werden Münzfotos angezeigt, der Verzeichnisbaum wird bis zu der entsprechenden Münze aufgeklappt und der Infobereich zeigt alle eingegebenen Münzdetails.
Sie können eine neue leere Sammlung erstellen oder eine Demosammlung durch Eingabe neuer Daten verändern.
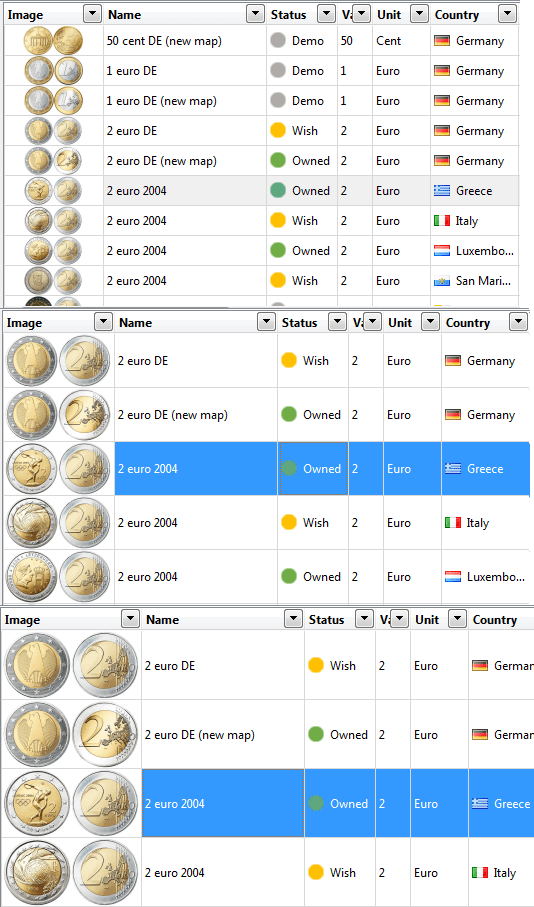
2.1 Übersicht der Münzen
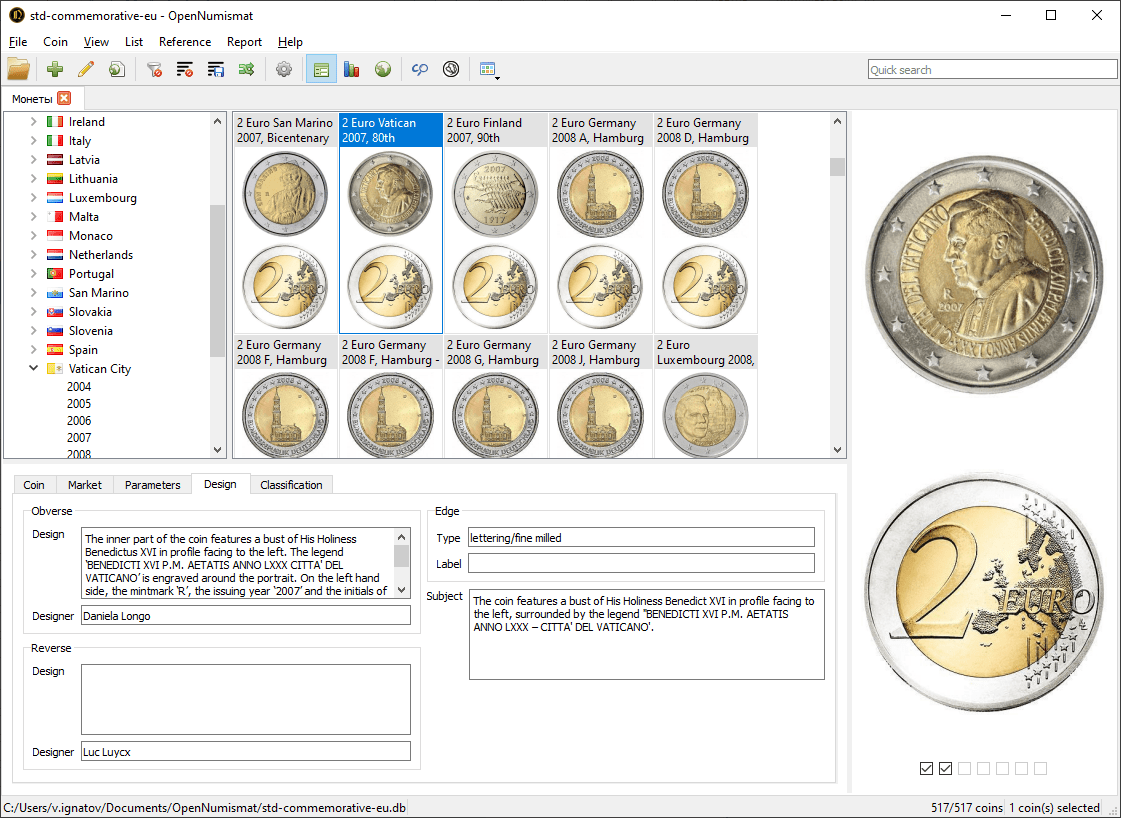
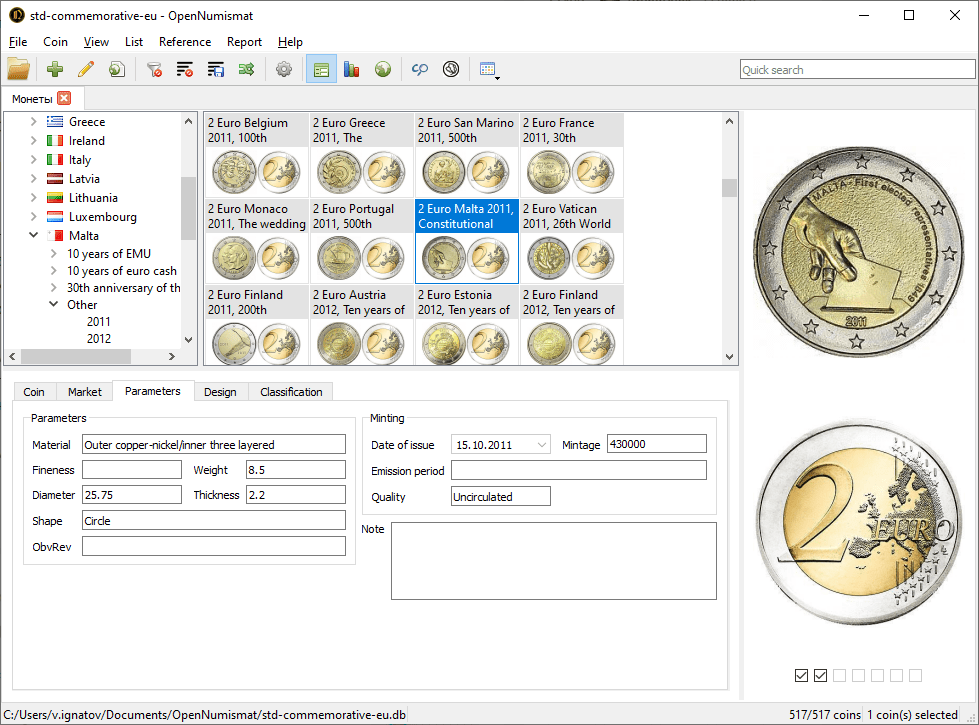
You can change the view of Table of coins by menu View → Change view
2.2 Detailbereich
You can switch Info panel to Statistics or Map by menu View → Details

3 Münzeingabe
3.1 Eine Münze hinzufügen
Verwalten Sie Ihre Sammlung indem sie Einträge über alle gekauften, verkauften oder gesuchten Münzen machen.
To add a new coin, select the Record → Add menu or press the Ins key. After that, the Edit dialog opens:

Der Bearbeitungsdialog enthält 7 Registerkarten mit folgenden Feldern:
- Übersicht – Wichtigste Details:
- Kategorie – Art des Sammlerstücks;
- Name - ein aussagekräftiger Name für die Münze (der Name kann automatisch aus den übrigen Feldern erstellt werden, indem man die "Generieren"-Schaltfläche drückt);
- Region;
- Land;
- Periode – ein Abschnitt in der Geschichte des Landes oder eine Münzperiode
- Herausgeber
- Herrscher;
- Value *;
- Unit *;
- Jahr - gregorianisches Jahr
- Jahr auf Münze
- Prägestätte;
- Münzzeichen - ein Zeichen der Prägestätte;
- Typ;
- Serie - eine Serie von Gedenkmünzen;
- Thema - ein Ereignis oder Objekt, dem eine Gedenkmünze gewidmet ist.
- Übersicht - Zustand (Zustand der Münze aus der Sammlung)
- Status – das Hauptmerkmal, das die Zugehörigkeit einer Münze zur Sammlung bestimmt. Der Münzstatus beeinflusst die Verfügbarkeit und den Inhalt des Markt-Reiters. Verfügbare Werte
(können in den Einstellungen umbenannt werden):
 Demo – ein Objekt, das in der Sammlung weder vorhanden, oder benötigt wird;
 Gebot – ein Artikel, auf den gerade geboten wird;
 Bestellt – ein bestelltes Objekt;
 Im Besitz – ein Objekt, das sich in der Sammlung befindet;
 Duplikat – Kopie oder Ersatzstück aus der Sammlung;
 Ersatz – ein Artikel, der gegen einen besseren Artikel ausgetauscht werden soll;
 Verkauft - Artikel, der bereits verkauft wurde;
 Wunsch – ein Objekt, das man kaufen möchte;
 Verkauf – ein Artikel, der zum Verkauf angeboten wird;
 Fehlt – ein Objekt, das in der Sammlung fehlt (gestohlen oder verloren gegangen);
 Beobachtet – Objekt, das in einer Auktion oder einem Geschäft beobachtet wird.
 - Zustand - Grad der Abnutzung;
- Menge - Die Anzahl von Doubletten oder Münzen in der Rolle;
- Format - Ausgabeformat (Einzelmünze, Set oder Rolle)
- Zustand;
- Platz – ein Platz für die Münze im Aufbewahrungsfach
- Lagerort – eine Beschreibung des physischen Aufbewahrungsortes der Münze
- Barcode;
- Bewerter
- Defekt – eine Beschreibung des in der Münzprägeanstalt entstandenen Fehlers
- Eigenschaften der Münze.
- Status – das Hauptmerkmal, das die Zugehörigkeit einer Münze zur Sammlung bestimmt. Der Münzstatus beeinflusst die Verfügbarkeit und den Inhalt des Markt-Reiters. Verfügbare Werte
(können in den Einstellungen umbenannt werden):
- Markt - Kauf:
- Datum;
- Preis;
- Bezahlt – Endpreis inklusive Provision;
- Provision – zusätzliche Kosten im Zusammenhang mit dem Erwerb einer Münze (Auktionsgebühr und/oder Versandkosten). Es ist möglich, die Höhe der Provision sowie den Prozentsatz des Preises (z. B. 10 %) einzugeben. Das Feld ist nur im Bearbeitungsfenster der Münze verfügbar;
- Verkäufer;
- Handelsplatz
- Invoice - link to the purchase invoice document on disk or URL;
- Info.
- Markt - Verkauf:
- Datum;
- Preis;
- Bailed - the total received amount after commission;
- Provision – zusätzliche Kosten im Zusammenhang mit dem Erwerb einer Münze (Auktionsgebühr und/oder Versandkosten). Es ist möglich, die Höhe der Provision sowie den Prozentsatz des Preises (z. B. 10 %) einzugeben. Das Feld ist nur im Bearbeitungsfenster der Münze verfügbar;
- Käufer;
- Handelsplatz
- Rechnung – Link zum Rechnungsdokument auf der Festplatte oder URL;
- Info.
- Karte
- Adresse;
- Breitengrad;
- Längengrad;
- Technische Daten - Parameter (physikalische Parameter der Münze):
- Zusammensetzung;
- Material;
- Material 2;
- Fineness - available formats 0.999, 999, 9995, 999.5;
- Gewicht;
- Durchmesser;
- Stärke;
- Breite;
- Höhe;
- Form;
- Obv/Rev – das Verhältnis von Vorderseite zu Rückseite (Medaille, Münze).
- Technische Daten - Spezifik:
- Durchmesser - tatsächlicher Münzdurchmesser;
- Gewicht – tatsächliches Münzgewicht;
- Prägeachse – beschreibt, wie die Vorder- und Rückseitenstempel beim Prägen der Münze zueinander ausgerichtet waren. Meist in Grad angegeben, kann aber auch als Zifferblatt in Stunden ausgedrückt werden;
- Änderung.
- Technische Daten – Prägung (Daten zur Münzveröffentlichung):
- Ausgabedatum;
- Auflage;
- Ausgabezeitraum;
- Qualität - Prägetechnik;
- Bemerkung.
- Design (Beschreibung des Münzdesigns):
- Avers - Abbildung der Aversseite;
- Design (Avers);
- Designer (Avers);
- Graveur (Avers);
- Farbe (Avers);
- Rückseite - Das rückseitige Bild;
- Design (Revers);
- Designer (Revers);
- Graveur (Revers);
- Farbe (Revers);
- Rand – das Bild des Randes oder der Unterschrift auf der Banknote;
- Typ – Art des Münzrandes oder Titel des Banknotenunterzeichners;
- Etikett – Beschriftung am Münzrand oder Name des Unterzeichners der Banknote;
- Unterschrift – das Bild der Unterschrift auf der Banknote;
- Typ – Art des Münzrandes oder Titel des Banknotenunterzeichners;
- Unterschrift – Name des Unterzeichners der Banknote;
- Thema – eine Beschreibung des Themas oder Ereignisses, dem die Münze oder das Design gewidmet ist;
- Einstufung:
- 1#, 2#, 3#, 4# - catalog numbers for a coin;
- Seltenheit;
- Fine - der ungefähre Preis einer Münze im Status F-12, F-15;
- VF – der ungefähre Preis einer Münze im Erhaltungsgrad VF-20, VF-25, VF-30, VF-35;
- XF - der ungefähre Preis einer Münze im Zustand EF-40, XF-45;
- Unc – der ungefähre Preis einer Münze im Erhaltungsgrad MS-60 und höher;
- Variante, Vorderseite, Rückseite, Rand – eine kurze Beschreibung der Variante der Münze, ihrer Vorderseite, Rückseite und ihres Randes;
- URL - Weblink zu Informationen über die Münze oder zu einer Datei auf einem Datenträger
- Abbildungen:
- Foto 1, Foto 2, Foto 3, Foto 4, Foto 5, Foto 6 – 6 weitere Fotos oder Bilder. Sie können einem Bild einen individuellen Titel geben, indem Sie auf den Bildtitel doppelklicken oder mit der rechten Maustaste auf das Bild klicken.
- System (nicht änderbar, kann nur in der Münztabelle angezeigt werden):
- ID - Eindeutige Nummer der Münze in der Sammlung;
- Position – Standard-Sortierreihenfolge in der Münztabelle;
- Erstellt – Datum, an dem die Münze hinzugefügt wurde;
- Aktualisiert – das Datum der letzten Bearbeitung der Münze;
- Bild – ein optimiertes Bild der Vorder- und Rückseite der Münze zur Ausgabe in der Münztabelle.
For some fields, values can be obtained from the reference (see 7):

In the Settings dialog, you can remove some of the unused fields (see 8).
* You can disable the Value field and rename the Unit field to Denomination in the Settings dialog. Then you can add denomination icons through the reference:
Some fields (such as Value, Year, Quantity, Price, Fineness, Weight, Diameter, Mintage) are for entering only numeric values. To enter values in the expanded format ("BC" in the Year field, fractions in the Nominal field, range in the Weight field, etc.) in these fields, you must enable the Free format numeric fields in the Settings dialog.
In Textfeldern (z. B. Thema, Eigenschaften, Beschreibung, Anmerkung) werden Hyperlinks unterstützt:

3.1.1 Bilder bearbeiten
Die Anwendung unterstützt bis zu 11 Bilder jeder Münze.
The following image formats are supported: BMP, GIF, JPEG, PNG, TIFF, WEBP. Images are saved in WebP format with transparency. Large images are compressed so that the maximum side does not exceed 1024 pixels (you can change it in the Settings dialog).
To insert or change an image, right-click on the field and select one of the drop-down menu items:
- Lade... - Bilddatei von Datenträger auswählen
- Speichern unter... - Bild auf Datenträger speichern;
- Rename... - set a unique name for the image that will be displayed in the tooltip of the image panel (see 4.2);
- Tausche mit - Vertauscht zwei Bilder;
- Einfügen - fügt ein Bild aus der Zwischenablage ein (möglich sind eine Bilddatei, ein Bild aus einem Bildbearbeitungsprogramm oder ein Hyperlink);
- Kopieren - Kopiert das Bild für eine spätere Bearbeitung in die Zwischenablage;
- Löschen - Löscht das aktuelle Bild.
Double clicking on the image field opens the file selection window if the image is not yet installed, or opens the image in the Image Editor (see 9) or in the standard image viewer of your OS.
Das Bild in der Tabelle wird automatisch aus den Bildern von Avers und Revers erstellt.
3.2 Eine Münze bearbeiten
To edit the coin data, you need to double-click on the required coin, right-click on the desired coin and select Edit..., select the coin and press Enter key or select the Record → Edit... menu. After that, the Edit dialog will be opened, described in 3.1.
3.3 Münzen duplizieren
Um schnell eine ähnliche Münze hinzuzufügen, kann man die Klonmethode benutzen. Dies geschieht mit einem Rechtsklick auf eine bestimmte Münze und der Auswahl Klonen. Es öffnet sich das vorausgefüllte Editieren Fenster. Jetzt kann man die gewünschten Felder ändern und speichern.
Sie können auch (mit Strg + Einfg oder Strg + C) die existierende Münze kopieren und (durch drücken von Shift + Einfg oder Strg + V) - einfügen. Der Bearbeitungsdialog wird ebenfalls geöffnet.
Eine kopierte Münze oder Münzgruppe (siehe unten) kann in eine Drittanbieteranwendung (z. B. MS Excel oder Notepad) eingefügt werden. Beim Einfügen in eine Drittanbieteranwendung werden dabei nur die Textfelder (ohne Bilder) kopiert.
You can also add a new coin with pre-filled fields from the Tree. To do this, right click on the Tree element and select Add new coin.... In the opened Edit dialog all common fields for coins corresponding to this element will be filled.
3.4 Mehrere Münzen gleichzeitig bearbeiten
Sometimes you need to change some fields at once for several coins. To do this, select the required coins (to select several coins, use the click with the Shift or Ctrl key pressed, to select all the coins, press Ctrl + A), right-click on the selected coin group and select Multi edit... or the Record → Edit... menu.
In the opened Edit dialog, all matching fields for the selected coin group will be filled. Each field will have a checkbox that allows or denies the application of the field value to the whole group of coins when saving:
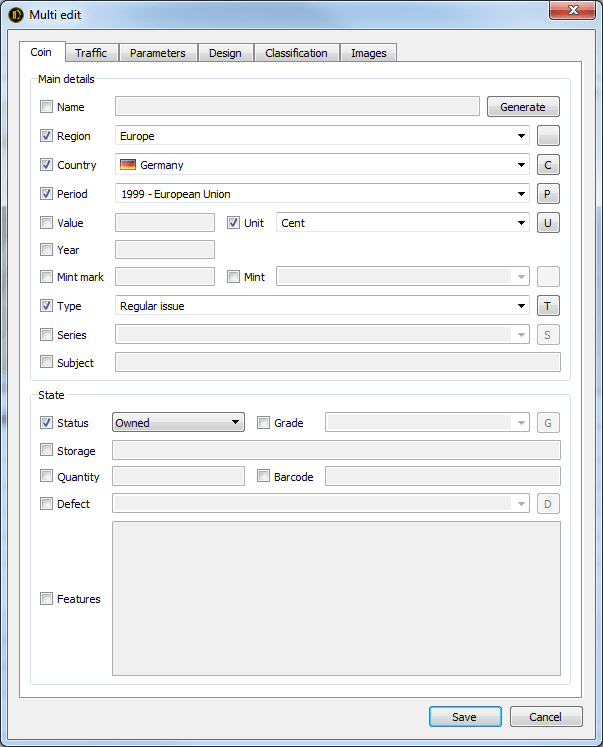
Also, group editing is available from the Tree - right-click on the tree element and select Edit coins....
3.5 Löschen
You can remove coins from the collection one by one or by a group. To delete, select the Record → Delete menu, right-click on the selected coin or coin group and select Delete or press the Del key.
Entfernte Münzen werden sofort aus der Sammlung gelöscht und können nicht mehr wiederhergestellt werden - Vorsicht.
4 Münzen ansehen
4.1 Münztabelle
Die Münztabelle ist das zentrale Element der Anwendung und dient dazu, Münzdaten entsprechend den in den Einstellungen ausgewählten anzuzeigen.
The number and location of fields can be set in the List → Select columns... menu or by right-clicking on the table header and selecting Select columns....
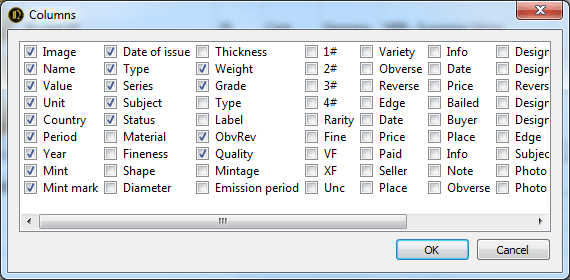
Im geöffneten Dialogfeld müssen Sie die gewünschten Felder markieren. Durch Ziehen der Feldnamen mit der Maus können Sie die Position der Felder zueinander ändern. Sie können Feldüberschriften auch direkt in die Münztabelle ziehen. Ein Klick auf die Feldüberschrift sortiert die Tabelle nach dem ausgewählten Feld.
You can control the width of a column in a table by expanding the border of the column heading with the mouse or by right-clicking on the header and selecting Adjust size.
4.2 Bildbereich
Dieses Bedienfeld zeigt Bilder an, die der Münze zugeordnet sind. Am unteren Rand des Feldes befinden sich Kontrollkästchen, mit denen Sie die Anzahl der gleichzeitig angezeigten Bilder steuern können..
Ein Doppelklick öffnet das Bild im Bildeditor (siehe9) oder im Standard-Bildbetrachter Ihres Betriebssystems. Wenn Sie den Mauszeiger über ein Bild bewegen, wird dessen eindeutiger Bildname angezeigt – sofern dieser bei der Bearbeitung der Münze festgelegt wurde.
4.3 Filter
Mithilfe des Menüs in den Spaltenüberschriften der Tabelle können Sie die Münzen nach den Werten der Felder filtern.
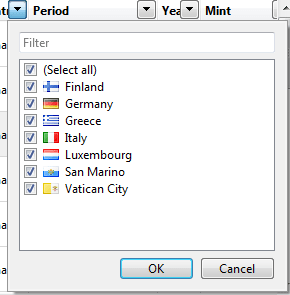
Das Filtermenü enthält alle Spaltenwerte. Markierte Werte werden angezeigt, die übrigen ausgeblendet. Um alle Einträge zu markieren oder die Markierungen aller Werte aufzuheben, wählen Sie(Alle). Am oberen Rand des Menüs befindet sich ein Feld, mit dem Sie die Menüwerte filtern können.
Um alle Filter in der aktuellen Liste zurückzusetzen, klicken Sie auf die Schaltfläche Alle Filter löschen in der Symbolleiste.
![]()
4.4 Verzeichnisbaum
Die Baumstruktur auf der linken Seite des Anwendungsfensters ermöglicht es Ihnen, Münzen nach Feldwerten zu gruppieren. Wenn Sie ein Baumelement auswählen, werden die Münzen, die dem ausgewählten Wert entsprechen, in der Tabelle angezeigt.
To customize the Tree, click List → Customize tree... menu or right-click on the tree element and select Customize tree...:
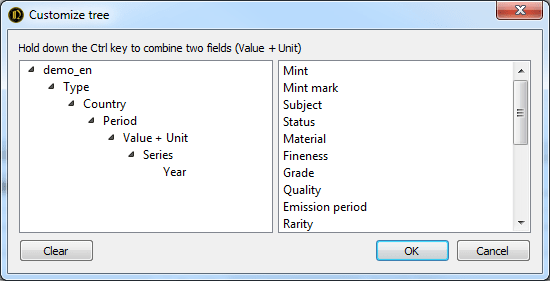
In the opened dialog you can change the structure of the tree by dragging the elements with the mouse. Items that are dragged from right to left are added to the end of the tree. Dragging last item from left to right removes it from the tree. To combine two fields (for example, Value+Unit), hold down the Ctrl key while dragging.
4.5 Listen
Die Listen ermöglichen die Erstellung mehrerer unabhängiger Sammlungsansichten. Jede Liste speichert ihre eigenen Einstellungen für Felder, Spalten, Filter und die Struktur. Dadurch können die Listen als permanente Filter verwendet werden.
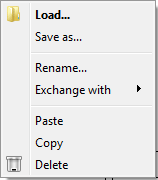
Fügen Sie eine neue Liste hinzu, indem Sie auf das MenüListe → Neu...klicken oder einen Doppelklick auf das Listenfeld ausführen (in den leeren Bereich neben den Überschriften der vorhandenen Listen) und anschließend den Namen der neuen Liste eingeben. Alternativ können Sie eine Kopie einer bestehenden Liste erstellen, indem Sie mit der rechten Maustaste auf die Quellliste klicken undKlonenauswählen.
Sie können den Namen der Liste ändern, indem Sie das MenüListe → Umbenennen.. auswählen oder mit der rechten Maustaste auf den Listentitel klicken und Umbenennen...wählen.
Geschlossene Listen werden nicht gelöscht, sondern sind im Menü Liste → Offen. Um private Listen dauerhaft zu löschen, wählen Sie das Menü Liste → Offen → Alle entfernen .
4.6 Statuszeile
Am unteren Rand des Anwendungsfensters befindet sich eine Statusleiste, die den Namen und Pfad zur Sammlungsdatei, die Gesamtzahl der Münzen in der Sammlung und in der aktuellen Münztabelle sowie die Anzahl der Münzen in der ausgewählten Gruppe anzeigt.

5 Umgang mit einer Sammlungsdatei
Die Sammlungsdatei ist eine reguläre Datei mit der Dateiendung .db und speichert alle Daten zur Sammlung – einschließlich der Bilder, die keine Referenzen sind (siehe 7). Sie können diese mithilfe Ihres Betriebssystems kopieren, verschieben, löschen und umbenennen.
5.1 Erstellen/Öffnen
Um eine neue Sammlung zu erstellen, wählen Sie das Menü Datei → Neu.... Wählen Sie im sich öffnenden Dialog den Speicherort und den Namen der neuen Sammlungsdatei aus.
To open an existing collection file, select the File → Open... menu and select the desired file. You can also associate collection files (for example, if you select the appropriate option when installing the application) and open them automatically when you "call" from the file manager.
The File menu displays up to 7 recently opened collections available for quick opening.
5.2 Sicherung
Um einen Datenverlust der Sammlung durch Hardware-, Software- oder Bedienfehler sowie durch die Einwirkung bösartiger Programme zu verhindern, wird die Erstellung einer Sicherungskopie empfohlen. Um eine Sicherungskopie der Sammlung zu erstellen, wählen Sie im Menü Datei → Sicherung. Hierbei wird eine Kopie der aktuellen Sammlung – versehen mit einem Datums- und Zeitstempel (z. B. demo_171025115112.db für eine am 25.10.2017 um 11:51:12 Uhr erstellte Kopie) – in dem in den Einstellungen festgelegten Verzeichnis abgelegt. Um die Daten wiederherzustellen, benennen Sie die Sicherungsdatei einfach um, indem Sie den Zeitstempel entfernen. Alternativ können Sie die Sammlungsdatei auch direkt über das Betriebssystem kopieren.
Hinweis: Es wird empfohlen, Backups auf einem physischen Speichermedium zu sichern, auf der nicht die Arbeitsdatei ist. Die Wahl eines Cloud-Speichers – z.B. Dropbox, iCloud – kann hierfür eine gute Option sein. Zudem ist es wichtig, regelmäßig Sicherungskopien zu erstellen – entweder vor oder nach der Vornahme einer größeren Anzahl von Änderungen (siehe8.1).
5.3 Komprimieren
Angesichts der Besonderheiten der SQLite-Implementierung, die für die Speicherung von Sammlungsdaten zuständig ist, wird der Speicherplatz nicht automatisch freigegeben, wenn Daten in der Sammlungsdatei gelöscht werden. Im Laufe der Zeit kann dies zu einer Zunahme der Dateigröße, einer Fragmentierung der Datei sowie einer Verlangsamung der Anwendung führen. Bei Bedarf können Sie die Größe der Sammlungsdatei reduzieren, indem Sie nicht benötigten „leeren“ Speicherplatz freigeben; wählen Sie hierfür im Menü den Punkt Datei → Vacuum menu.
5.4 Passwort
Im Menu Datei → Passwort festlegen… können Sie das Passwort festlegen, das jedes Mal beim Öffnen der Sammlung abgefragt wird.
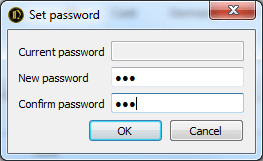
Hinweis: Es findet keine Datenverschlüsselung statt, daher kann der Passwortschutz nicht als vollständig angesehen werden.
5.5 Synchronisation
In mehreren Kopien einer Sammlungsdatei vorgenommene Änderungen können über das MenüDatei → Synchronisieren...sicher zusammengeführt werden.
Die wichtigsten Eigenschaften des Synchronisationsalgorithmus:
- Alle neuen Einträge werden (erkennbar am Feld „Erstellt“) der geöffneten Sammlung hinzugefügt.
- Einträge mit gleichem Wert im Feld „ID“ und „Erstellt“ werden aktualisiert, wenn der Wert im Feld „Aktualisiert“ in der geöffneten Sammlung kleiner ist.
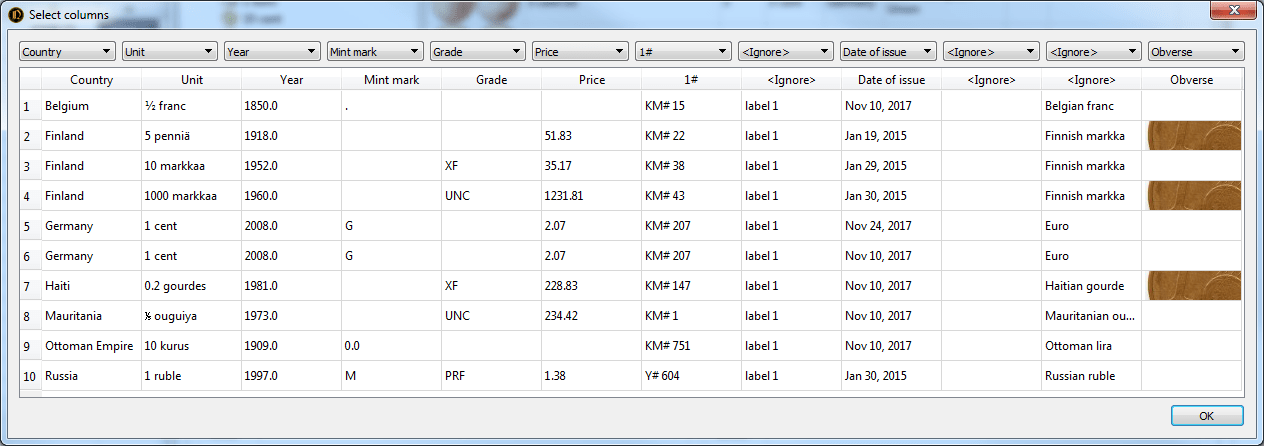
5.6 Importieren
OpenNumismat ermöglicht es Ihnen, Daten aus Sammlungen zu importieren, die mit anderer Software (MS Excel, CoinManage, Collection Studio und Tellico) oder von Websites (Colnect, Numista und uCoin.net) erstellt wurden.
Für den Import aus MS Excel wählen Sie das MenüDatei → Importieren → Excel und wählen Sie die Quelldatei aus. Anschließend öffnet sich der Dialog zur Feldzuordnung, der die ersten 10 Münzen aus der Quelldatei anzeigt:
6 Berichte
6.1 Berichte erstellen
The application supports the generation of reports on templates. You can edit existing ones or create your own report templates.
The generated report can be printed or saved in HTML, PDF, MS Word formats from the Preview dialog.
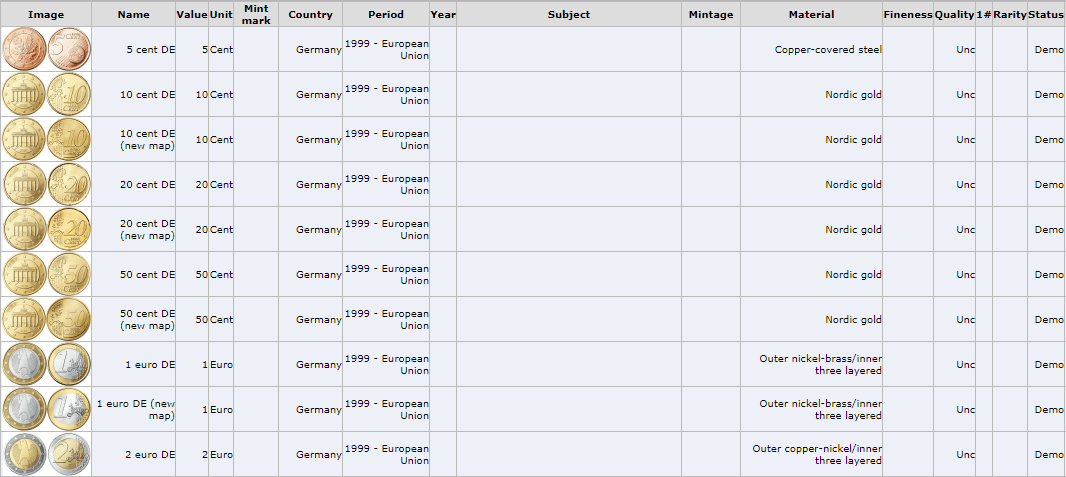
Um einen Bericht zu erstellen, müssen Sie die Münzen auswählen, deren Daten in den Bericht aufgenommen werden sollen, und den Vorschau-Dialog über das Menü Bericht → Bericht... öffnen:
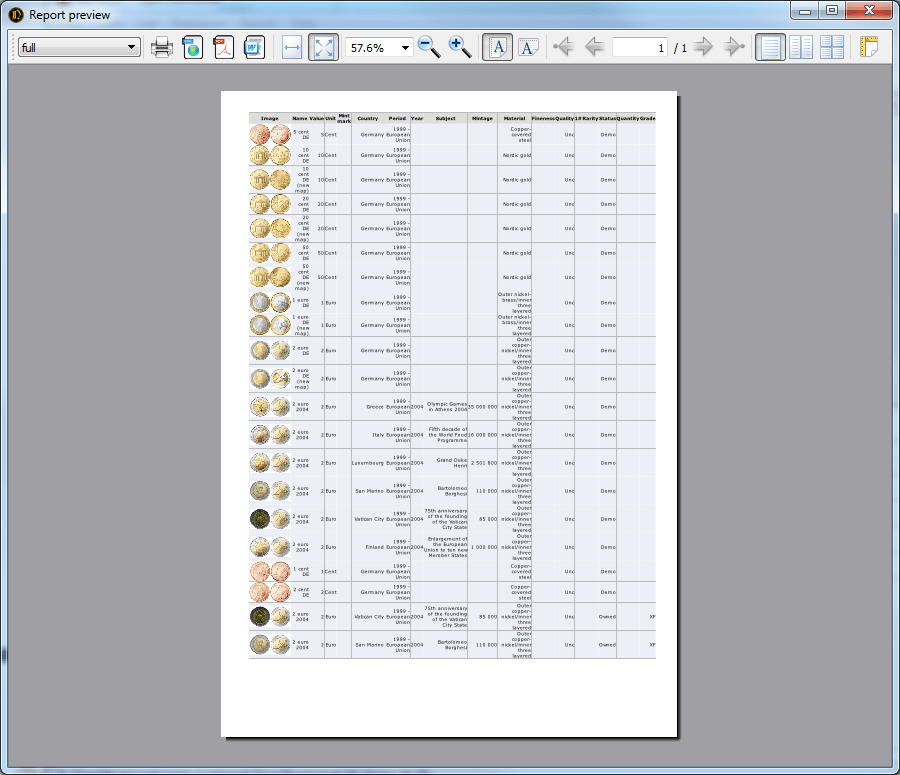
Im Vorschau-Dialog können Sie eine Berichtsvorlage auswählen (die linke Liste in der Symbolleiste), den Vorschaumodus steuern und den Bericht drucken oder in einer Datei des gewünschten Formats speichern (rechte Schaltflächen in der Symbolleiste).
Hinweis: Der Vorschau-Dialog verwendet eine veraltete Bibliothek zur HTML-Generierung. Daher können Berichte in der Vorschau fehlerhaft dargestellt werden und stimmen möglicherweise nicht mit der Ansicht in modernen Browsern überein. Zudem kann es beim Generieren umfangreicher Berichte (mit mehr als 100 Münzen) zu Programmabstürzen kommen. Zum Betrachten und Ausdrucken können Sie die Funktion „Schnellbericht“ (siehe6.2) verwenden, um den Bericht in Ihrem Browser zu öffnen.
6.2 Kurzbericht
By selecting the Report → View in browser menu, you can quickly view the report for the selected coins in HTML format. The report will be opened in the system browser.
Für einen Schnellbericht wurde die im Dialogfeld „Einstellungen“ als Standardvorlagefestgelegte Vorlage verwendet.
6.3 Bearbeitungsvorlagen
To edit templates you need to have basic HTML skills. The engine for generating template reports is based on the open-source Jinja2 library. The reports are generated in UTF-8 encoding and, accordingly, the templates should be in the same encoding. Therefore, for editing templates it is recommended to use, for example, Notepad++.
User templates should be placed into Documents folder (usually %UserProfile%\Documents\OpenNumismat\templates). Each template is in a separate subfolder, the name of which is used as the template name.
Examples of templates can be found in the program folder (usually C:\Program Files\OpenNumismat\templates) or in the source codes.
The main template file name must be coins.htm. If coin.htm is present, it will be used as a template for generating a report for a single coin. Also, if a report is generated for multiple coins, it will be used for each individual coin, in addition to the overall report based on the coins.htm template.
The context variables records and titles are passed to the generator. titles contains the names of the fields to display (e.g. {{titles.subjectshort}} - Subject).
records - an array of all coins to display. Each array element contains one coin with all fields (e.g. {{records[0].subjectshort}} - Subject of first coin). The correspondence of fields can be found in the table.
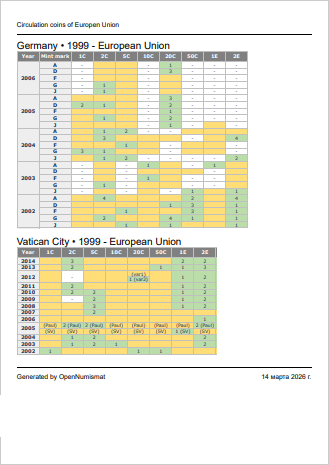
6.4 Beispiele für Berichtvorlagen
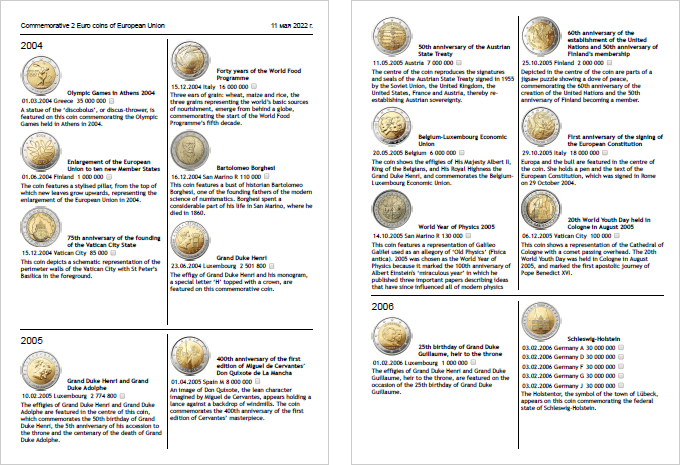
Commemoratives_ByCountry
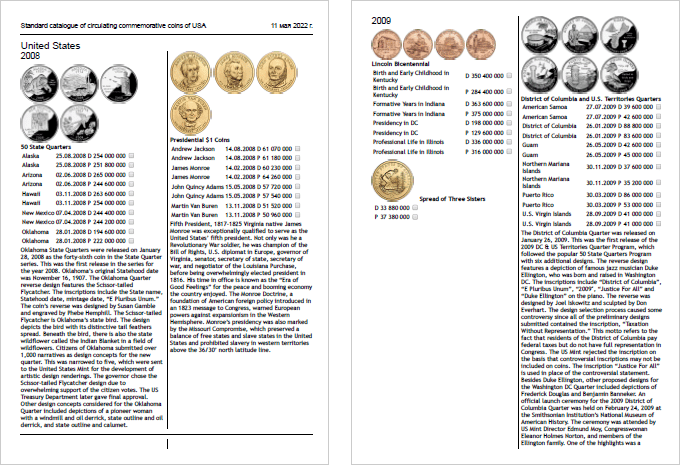
Commemoratives_ByYear
holders
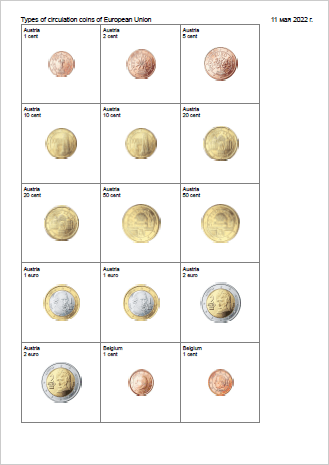
Circulation
6.5 Exportieren der Münztabelle
Mit OpenNumismat können Sie die aktuelle Münztabelle mit allen angewendeten Filtern und Sortierungen in einer separaten Datei im MS Excel-, HTML- oder CSV-Format speichern (Hinweis: In der aktuellen Implementierung werden keine Bilder exportiert).
Sie können die Münztabelle über das Menü Bericht → Aktuelle Liste speichern…exportieren. Wählen Sie im geöffneten Dialog den Dateinamen sowie das gewünschte Format aus und speichern Sie die Datei.
6.6 Statistiken
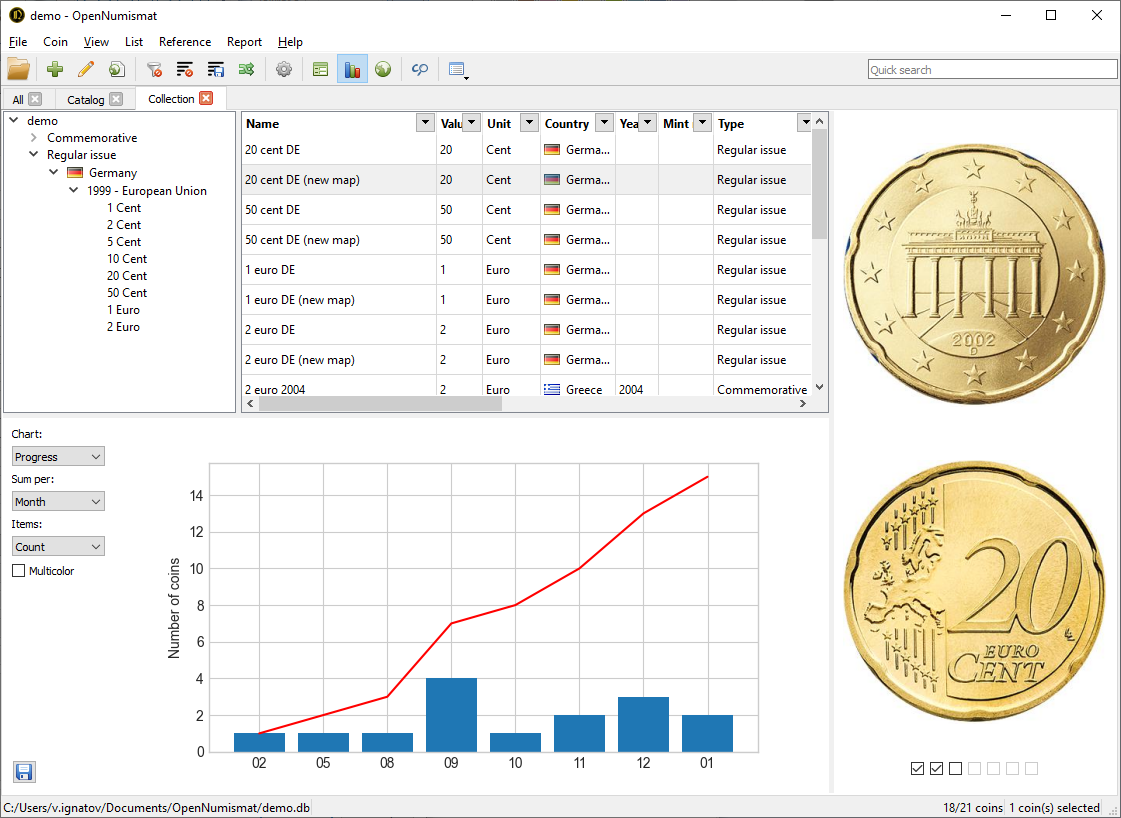
Screenshots von Beispiel-Statistikdiagrammen.
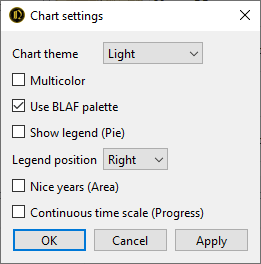
Zusätzliche Einstellungen für Statistikdiagramme:
Auch zur Erstellung von Diagrammen und zur Berechnung von Statistiken können Sie MS Excel verwenden. Kopieren Sie die benötigten Münzen aus OpenNumismat nach MS Excel oder exportieren Sie die Münztabelle in eine MS Excel-Datei (siehe6.5) und nutzen Sie dort dessen Funktionalität.
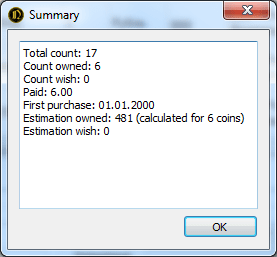
6.7 Zusammenfassung
7. Auswahllisten
Referenzen erleichtern die Dateneingabe beim Bearbeiten einer Münze und fügen der Datenanzeige Symbole (z. B. Flaggen) hinzu. Referenzen sind für folgende Felder verfügbar: Region, Land, Periode, Herrscher, Einheit, Prägestätte, Serie, Erhaltungsgrad, Material, Form, Qualität, Rand, Seltenheit, Vorderseite/Rückseite, Typ, Defekt, Ort (Kauf oder Verkauf).
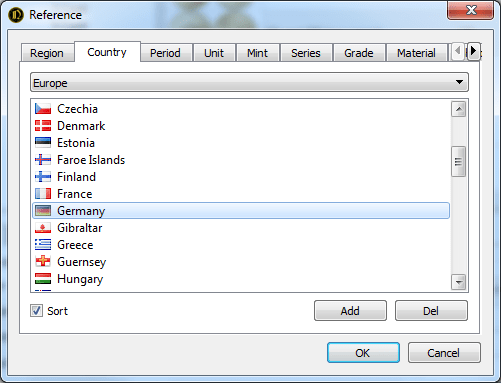
Die Bearbeitung von Referenzen ist im Dialogfeld „Bearbeiten“ möglich:
oder über das Menü Referenz → Bearbeiten....:
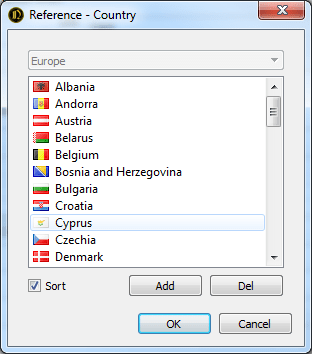
Ein Rechtsklick auf den Eintrag in der Referenz ermöglicht das Hinzufügen oder Löschen des Symbols für das Element.

Die Verweise für Land, Periode, Herrscher, Einheit, Prägestätte und Serie sind Querverweise und können nur aktualisiert werden, wenn Sie den Wert des Basisfelds auswählen, das in dem Verweis vorhanden ist. Um beispielsweise eine neue Prägestätte hinzuzufügen, müssen Sie zuerst ein vorhandenes Land auswählen.
The Sort check box sorts all the entries in the reference, otherwise all items will be displayed in the order they were entered. This order can be changed by Move up/Move down in context menu.
Um schnell Referenzen mit eingegebenen Daten aus der Sammlung zu füllen, wählen Sie das Menü Referenz → aus Sammlung füllen.
Standardmäßig werden Verweise in einer separaten Datei mit der Endung .ref gespeichert, die über Ihr Betriebssystem kopiert, umbenannt oder gelöscht werden kann. Der Pfad zur Verweisdatei kann im Einstellungsdialog festgelegt werden.
Sie können auch eine aktuelle Referenz an eine Sammlungsdatei anhängen. Wählen Sie dazu Referenz → Aktuelle Referenz anhängen oder Referenz → Aktuelle Referenz trennen, um die Referenz aus der Sammlung zu entfernen und die Standardeinstellung aus den Einstellungen zu verwenden.
Sie können die Standardreferenz mit dem Referenzgenerator anpassen..
8 Einstellungen
Im Einstellungs-Dialog können Sie das Erscheinungsbild und das Verhalten der Anwendung konfigurieren. Dazu wählen Sie im Menü Datei → Einstellungen.
8.1 Hauptteil
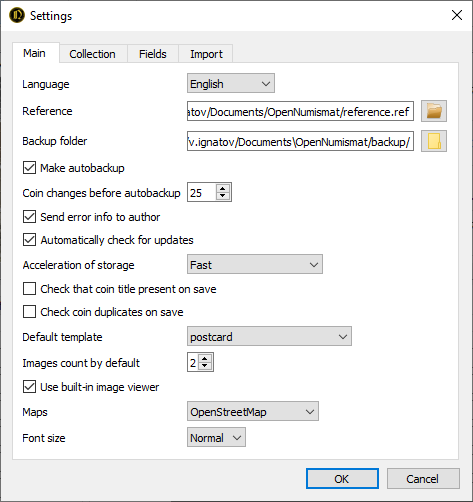
Backup-Ordner
The folder where backups will be saved. See 5.2.
Make autobackup after record changes
You can enable autobackup. This feature will make backups upon closing the collection after changing specified count of records.
Fehlerbericht an den Autor senden
Enabling this flag allows internal error information to be sent to the author's website. This helps improve OpenNumismat. To better understand and quickly fix the error, please include a description of when the error occurs.
Beschleunigen des Speichervorgangs
Die SQLite-Datenbank-Engine verfügt über zahlreiche Einstellungen, die die Geschwindigkeit und Zuverlässigkeit beeinflussen:
- Zuverlässig – alle Änderungen werden garantiert gespeichert;
- Schnell - Änderungen können verloren gehen, wenn die Stromzufuhr während des Betriebs unterbrochen wird (für die meisten Fälle empfohlen);
- Besonders schnell (gefährlich) - empfohlen, wenn Sie eine große Anzahl von Änderungen vornehmen, vorausgesetzt, Sie erstellen vorher eine Datensicherung.
Webcam benutzen
Allows the use of a webcam for scanning barcodes or capturing images in the Image Editor.
Show counters in Tree and Statistics
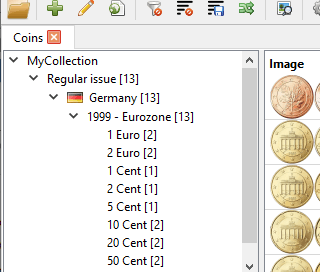
Bild Hintergrundfarbe
When adding an image with a transparency or removing background in the Image Editor, the background will be replaced with the specified color.
8.2 Sammlung
Sammlungsspezifische Einstellungen (für jede Sammlungsdatei gespeichert):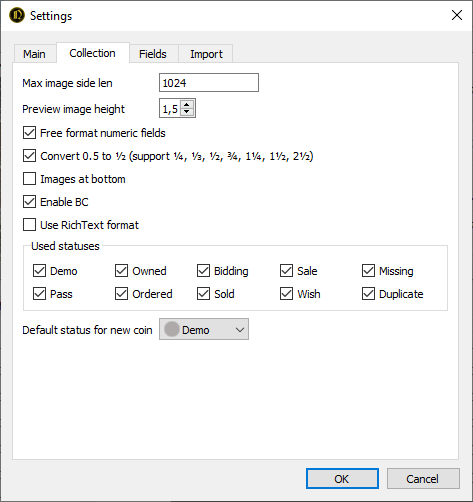
Maximale Bildseitenlänge, Bildqualität
Diese Einstellungen steuern die Bilder in der Sammlungsdatei und beeinflussen deren Größe.
Wenn die EinstellungMaximale Bildseitenlänge auf 0 gesetzt wird, bleibt die Originalgröße erhalten.
Wenn die Bildqualitätauf 100 % eingestellt wird, wird eine verlustfreie Komprimierung verwendet.
Durch Verringern der maximalen Bildseitenlänge oder derBildqualität können alle Bilder in der Sammlung neu berechnet werden, um die Dateigröße der Sammlung zu reduzieren (siehe 5.3).
Vorschaugröße Bilder
Bilder unten
Swaps the Image and Info panels.
Freies Format in numerischen Feldern
Zur Eingabe von Werten im erweiterten Format (Fragezeichen im Feld „Jahr“, Brüche im Feld „Nominal“, Bereich im Feld „Gewicht“ usw.).
Sort Tree by references
When this setting is enabled, items in the Tree will be sorted according to their position in the reference (see 7). When two fields are combined in the Tree, sorting is performed first by the right-hand field.
8.3 Felder
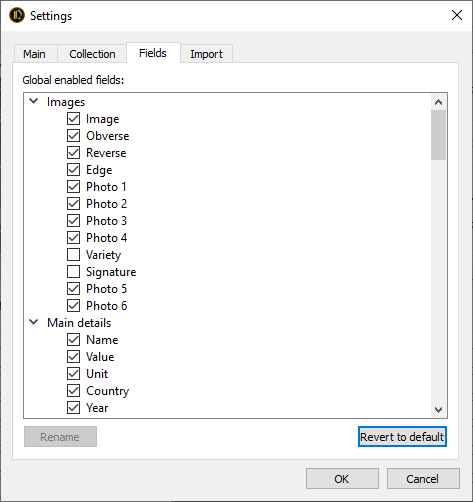
Im Bereich „Felder“ des Einstellungsdialogs können Sie Teile der Sammlungsfelder umbenennen und aus der Benutzeroberfläche entfernen. In diesem Fall werden nur die ausgewählten Felder in der Programmoberfläche angezeigt, die Daten aller Felder bleiben jedoch erhalten.
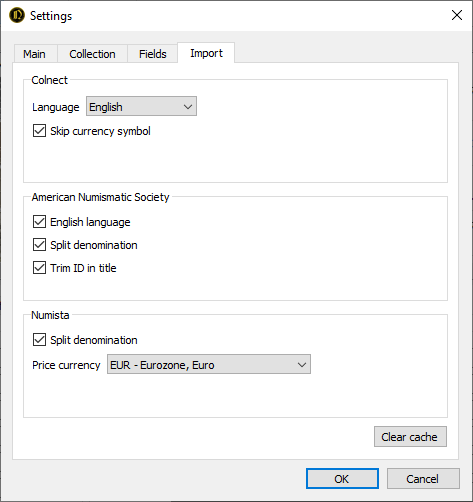
8.4 Import
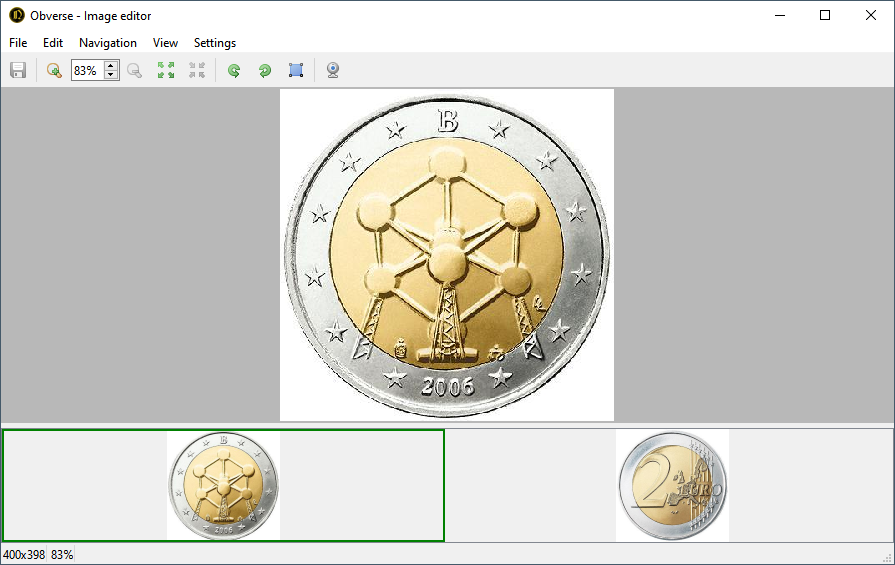
9 Bildeditor
OpenNumismat verfügt über einen integrierten Bildeditor (Hauptprojekt: https://github.com/OpenNumismat/ImageEditor), der über die Einstellungen aktiviert werden kann.
Eigenschaften der Münze
- Unterstützt gängige Bildformate: JPEG, PNG, BMP, TIFF, GIF, WebP
- Machen Sie ein Foto mit der Webcam (für bessere Ergebnisse versuchen Sie es mit Camo)
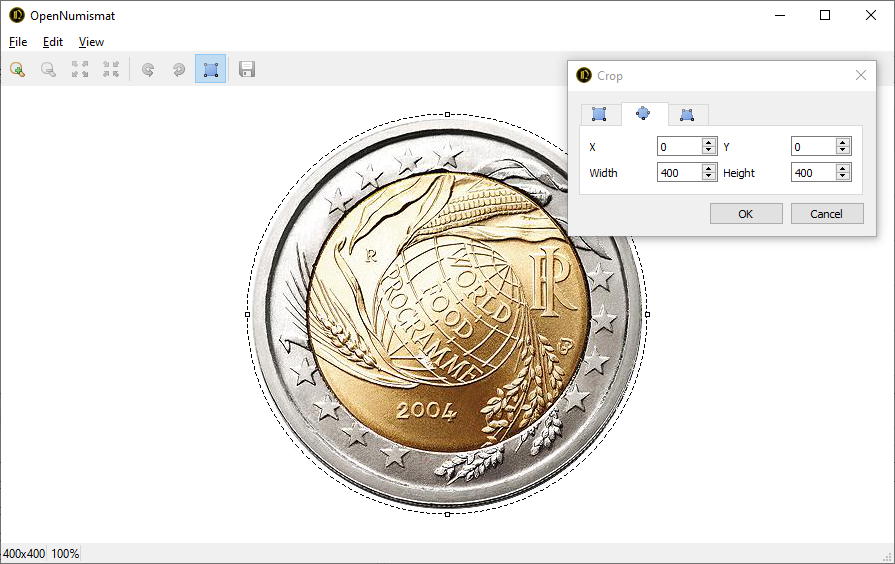
- Bildbearbeitungswerkzeuge: Größe ändern, drehen, zuschneiden (Rechteck, Ellipse, perspektivische Transformation)
- Hintergrund entfernen mit rembg
- Bis zu 10 Rückgängig-/Wiederherstellen-Aktionen
- Einmal klicken, um zwischen „Optimale Passform“ und „Tatsächliche Größe“ umzuschalten.
- Vollbildmodus
- Zoomen mit dem Mausrad
- Navigation durch Bilder in einem Datensatz und durch die Datensätze selbst
Tastenkombinationen
Ctrl/Strg + O — Datei öfnen
Ctrl/Strg + S — Speichern
Ctrl/Strg + C, Ctrl/Strg + Einfg — Kopieren
Ctrl/Strg + V, Shift/Umschalt + Einfg — Einfügen
Ctrl/Strg + Z — Rückgängig
Ctrl/Strg + Y — Wiederherstellen
Alt + ← — Nach links drehen
Alt + → — Nach rechts drehen
C — Zuschneide-Werkzeug öffnen
R — Dreh-Werkzeug öffnen
B — Hintergrund mit KI entfernen
Ctrl/Strg + ← — Vorheriges Bild
Ctrl/Strg + → — Nächstes Bild
Ctrl/Strg + ↑ — Vorheriger Datensatz
Ctrl/Strg + ↓ — Nächster Datensatz
+ — Vergrößern
- — Verkleinern
0 — An Fenster anpassen
1, A — Skalierung 100%
2 — Skalierung 200%
3 — Skalierung 300%
4 — Skalierung 400%
5 — Skalierung 500%
6 — Skalierung 600%
F11 — Vollbildmodus
Esc — Beenden
Mausrad nach oben — Hineinzoomen
Mausrad nach unten — Herauszoomen
Linke Maustaste Doppelklick — Hineinzoomen
Mittlere Maustaste Klick — Hineinzoomenn
Rechte Maustaste Doppelklick — Herauszoomen
Einstellungen
Die Einstellungen des Bildeditors finden Sie unterDatei → Einstellungen.
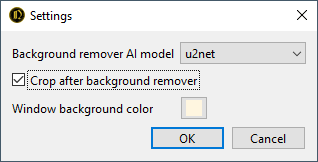
Available background remover AI models:
| Name | Beschreibung | Besonderheit | Geschätzte Zeit pro Bild, Sekunden | Modellgröße, MB |
|---|---|---|---|---|
| u2net | vortrainiertes Modell für allgemeine Anwendungsfälle | optimal | 4.1 | 171 |
| silueta | Dasselbe wie u2net, aber die Größe wurde auf 43 MB reduziert. | am schnellsten | 1.4 | 43 |
| isnet-general-use | neues vortrainiertes Modell für allgemeine Anwendungsfälle | 3.3 | 174 | |
| birefnet-general | vortrainiertes Modell für allgemeine Anwendungsfälle | Beste Qualität | 66.8 | 949 |
| birefnet-general-lite | Leichtes, vortrainiertes Modell für allgemeine Anwendungsfälle | Hohe Qualität | 21.5 | 218 |
Das KI-Modell wird bei der ersten Verwendung automatisch heruntergeladen.