User manual
1 Introduction2 General view
3 Entering coins
4 View Coins
5 Managing a collection file
6 Reports
7 References
8 Settings
1 Introduction
1.1 Description
OpenNumismat is a handy and reliable application designed for collectors of coins and coin collectors, to create a numismatic collection.
With OpenNumismat you will be able to create, organize, and manage your own catalogs of coins with detailed descriptions and photos for each item.
OpenNumismat is distributed in full absolutely free. The source code is licensed under the GPL-3.0 and available at GitHub.
Official website is located at http://opennumismat.github.io.
1.2 Features of the implementation
OpenNumismat is based on the PyQt library with the SQLite database engine to store the data collection, which allowed to achieve lightness and responsiveness of the interface and cross-platform.
A complete list of the used components and libraries is available here.
Icons used in the interface, based on the LED Icon Set v1.0, Soft Scraps Icons by deleket and Flag icons.
Translation of the interface implemented by enthusiasts using the service Transifex. Thank you for the help!
1.3 License
OpenNumismat est un logiciel libre: vous pouvez le redistribuer et / ou le modifier selon les termes de la Licence Publique Générale GNU telle que publiée par la Free Software Foundation, soit la version 3 de la Licence, ou (à votre choix) toute version ultérieure.
OpenNumismat est distribué dans l'espoir qu'il sera utile, mais SANS AUCUNE GARANTIE; sans même la garantie implicite de COMMERCIALISATION ou D'ADAPTATION À UN USAGE PARTICULIER. Voir la Licence Publique Générale GNU pour plus de détails.
You should have received a copy of the GNU General Public License along with OpenNumismat. If not, see https://www.gnu.org/licenses/.
2 General view
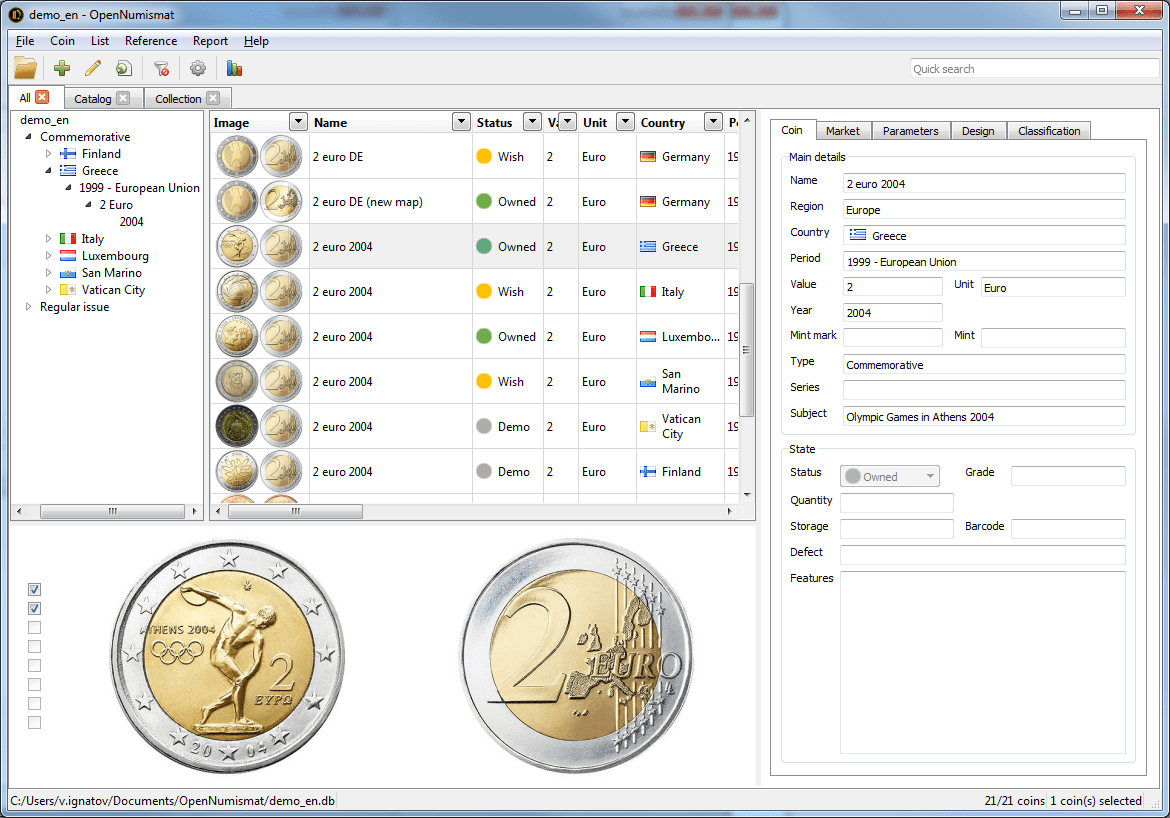
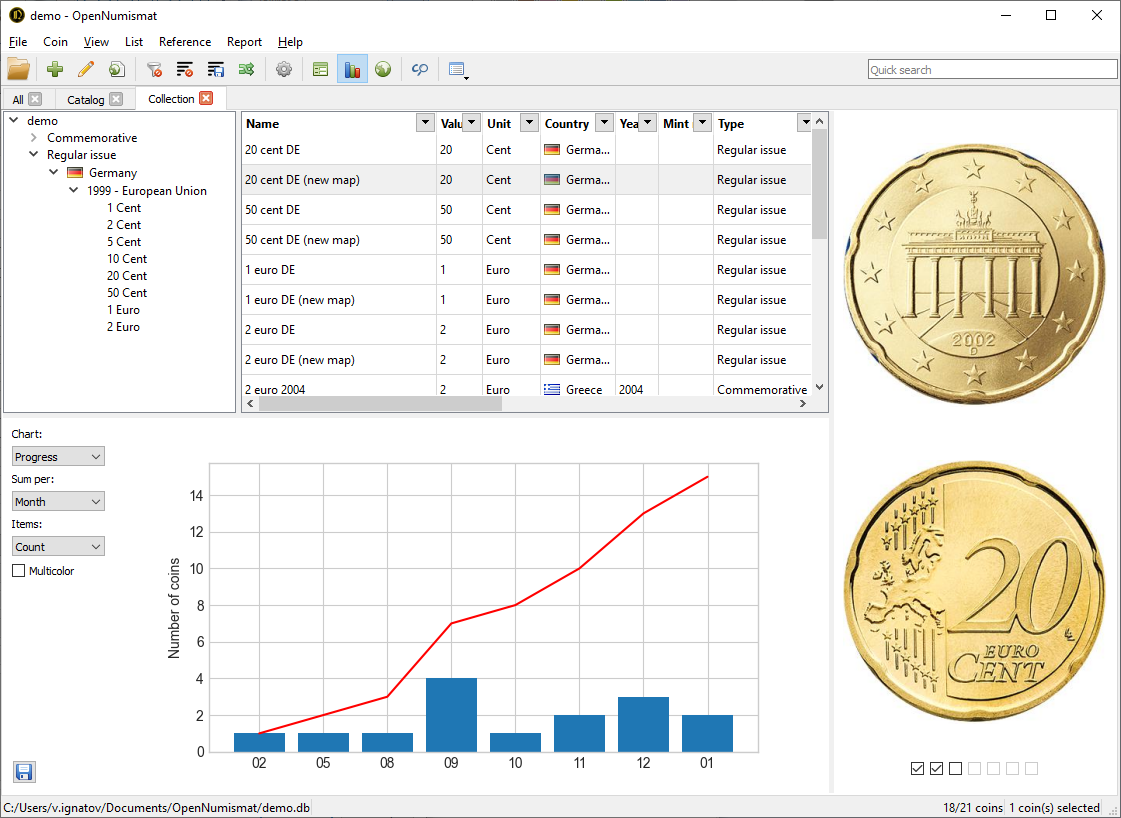
When you first start the application, the main window opens with a demo collection:
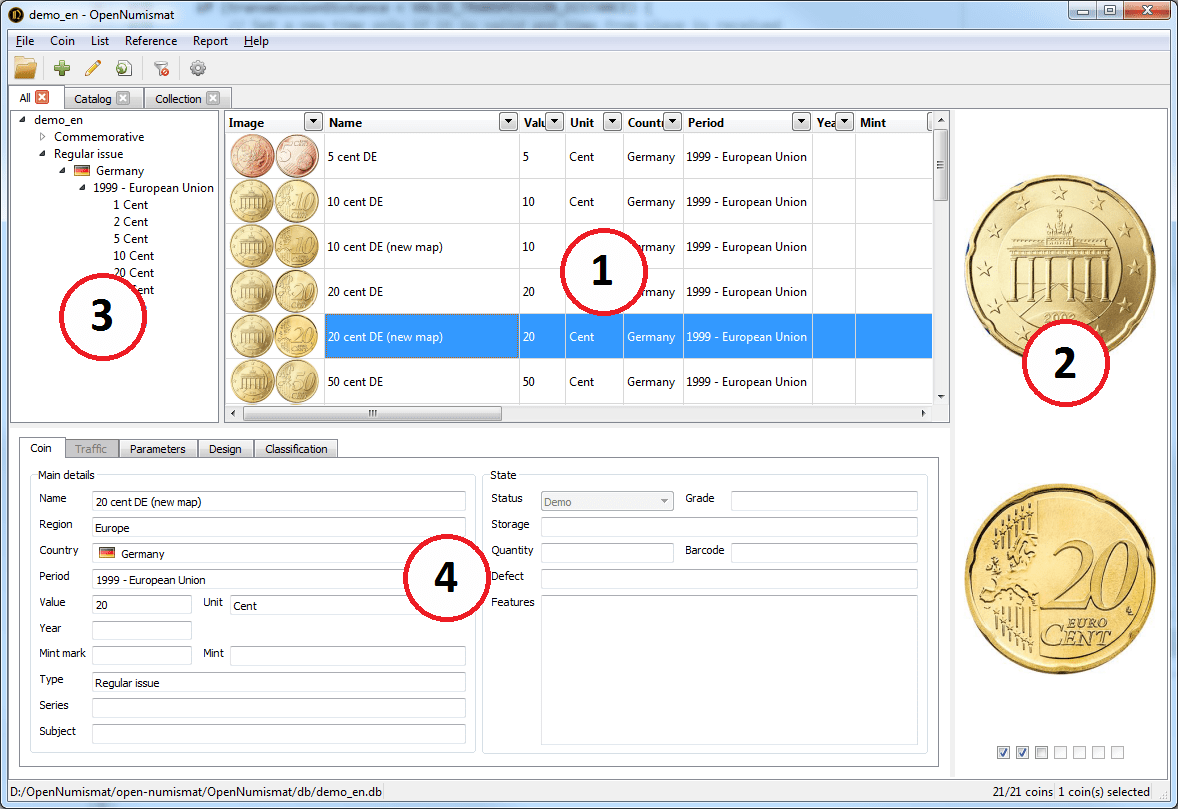
The main window consists of the following main elements:
- Table of coins
- Image panel
- Tree
- Info panel
When you click on any coin in the Table of coins, detailed information is displayed: in the Image panel - coin photographs, the Tree unfolds to the element describing the coin, the Info panel displays all the entered coin data.
You can create a new empty collection or edit a demo by entering new data.
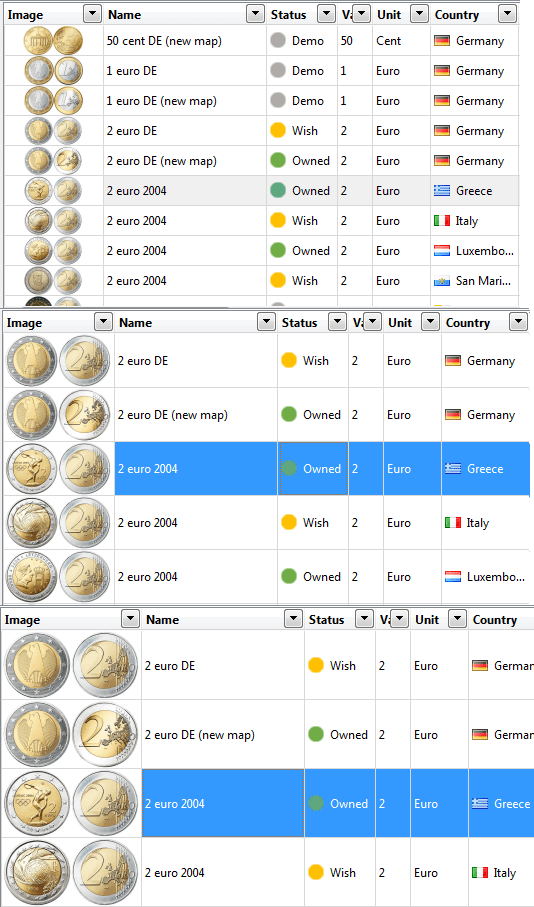
2.1 Table of coins view
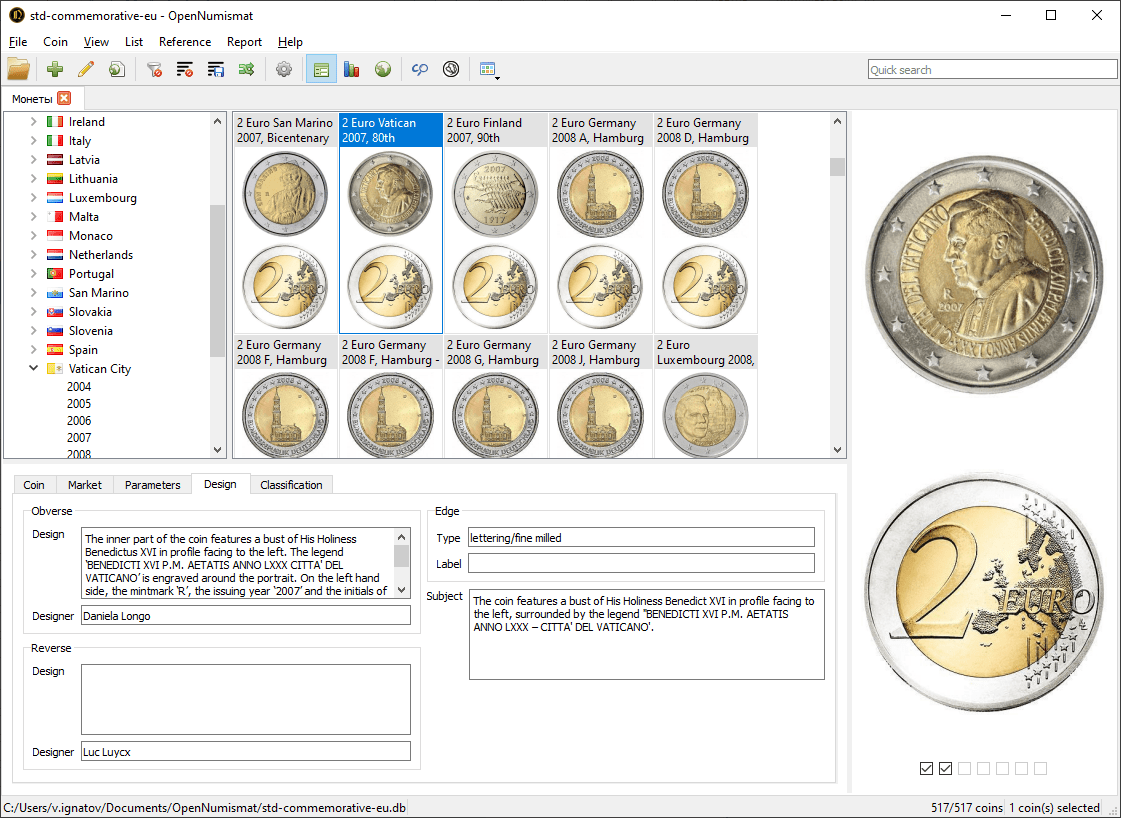
You can change the view of Table of coins by menu View->Change view
2.2 Details panel
You can switch Info panel to Statistics or Map by menu View->Details

3 Entering coins
3.1 Adding a coin
Manage your collection by adding entries about every bought, sold or wished coin.
To add a new coin, select the Coin->Add menu or press the Ins key. After that, the Edit dialog opens:

The Edit dialog contains 7 tabs with the following fields:
- Coin - Main details:
- Name - a descriptive name of the coin (can be automatically created from the remaining fields by clicking the "Generate" button);
- Region;
- Country;
- Period - period in the history of the country or coinage period;
- Ruler;
- Value;
- Unit;
- Year;
- Mint;
- Mint mark - a sign of the mint;
- Type;
- Series - a series of commemorative coins;
- Subject - an event or object to which a commemorative coin is dedicated.
- Coin - State (state of coin from the collection):
- Status - the main characteristic that determines the presence of a coin in the collection. Can take the value of Demo, Pass, Owned, Ordered, Sold, Sale, Wish, Bidding, Missing, Duplicate. The coin status affects the availability and content of the Market tab;
- Grade - the degree of coin wear;
- Quantity - the number of duplicates or coins in the roll;
- Format - destribution format (single coin, set or roll);
- Condition;
- Storage - a description of the physical location of the coin;
- Barcode;
- Grader;
- Defect - a description of the mint-made error;
- Features.
- Market - Buy:
- Date;
- Price;
- Paid - final price including commission;
- Commission - additional costs associated with the acquisition of a coin (the field is available only in the coin editing window). It is allowed to enter the commission amount, as well as the percentage of the price (for example, 10%);
- Seller;
- Place;
- Info.
- Market - Sale:
- Date;
- Price;
- Bailed - the total received amount taking into account the commission;
- Commission - additional costs associated with the sale of coins (the field is only available in the coin editing window). It is allowed to enter the commission amount, as well as the percentage of the price (for example, 10%);
- Buyer;
- Place;
- Info.
- Map
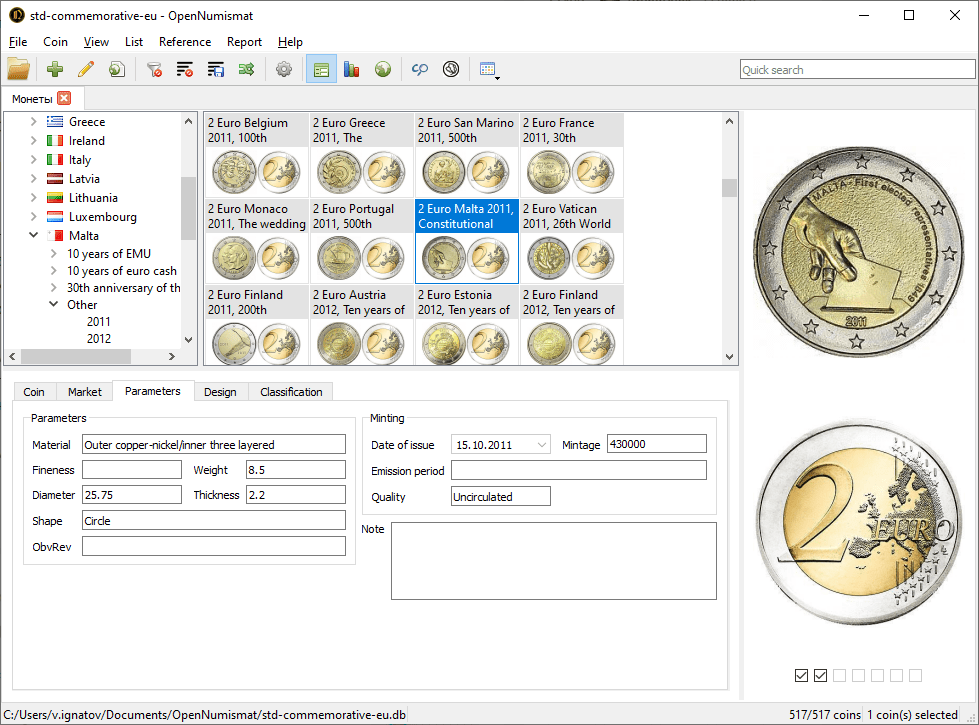
- Parameters - Parameters (physical parameters of the coin):
- Material;
- Fineness;
- Weight;
- Diameter;
- Thickness;
- Shape;
- Obv/Rev - the ratio of obverse and reverse (medal, coin).
- Parameters - Minting (coin release data):
- Date of issue;
- Mintage;
- Emission period;
- Quality - minting technique;
- Note.
- Design (description of coin design):
- Obverse - the obverse image;
- Design (obverse);
- Designer (obverse);
- Engraver (obverse);
- Color (obverse);
- Reverse - reverse image;
- Design (reverse);
- Designer (reverse);
- Engraver (reverse);
- Color (reverse);
- Edge - the image of the edge;
- Type (of edge);
- Label (on the edge);
- Subject - a description of the topic or event to which the coin is dedicated or its design;
- Classification:
- 1#, 2#, 3#, 4# - numbers of a version of a coin under catalogs;
- Rarity;
- Fine - the approximate price of a coin in the state F-12, F-15;
- VF - the approximate price of a coin in the state of VF-20, VF-25, VF-30, VF-35;
- XF - the approximate price of a coin in the state EF-40, XF-45;
- Unc - the approximate price of a coin in the state MS-60 and above;
- Variation, Obverse, Reverse, Edge - a brief description of the variety of the coin, its obverse, reverse and edge;
- URL - web-link to information about the coin or to a file on the disk.
- Images:
- Photo 1, Photo 2, Photo 3, Photo 4, Photo 5, Photo 6 - 6 additional photos or images. You can add specific title for an image by double-click on image title or right click on image.
- System (not editable, can be displayed only in the Table of coins):
- ID - unique coin number in the collection;
- Position - default sort order in Table of coins;
- Created - date the coin was added;
- Updated - the date of the last editing of the coin;
- Image - an optimized image of the obverse and the reverse of the coin for output in the Table of coins.
For some fields, values can be obtained from the reference (see 7):

In the Settings dialog, you can remove some of the unused fields (see 8).
Some fields (such as Value, Year, Quantity, Price, Fineness, Weight, Diameter, Mintage) are for entering only numeric values. To enter values in the expanded format ("BC" in the Year field, fractions in the Nominal field, range in the Weight field, etc.) in these fields, you must enable the Free format numeric fields in the Settings dialog.
Text fields (such as Subject, Features, Description, Note) support links:

3.1.1 Editing Images
The application supports up to 7 images of each coin.
The following image formats are supported: BMP, GIF, JPEG, PNG, TIFF, WEBP, JPEG2000, PBM, PGM, PPM, XBM, XPM. Images are saved in JPEG format. Large images are compressed so that the maximum side does not exceed 1024 pixels (you can change it in the Settings dialog).
To insert or change an image, right-click on the field and select one of the drop-down menu items:
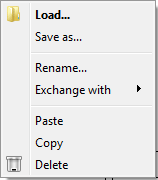
- Load... - select image from file on disk;
- Save as... - saves the image to a file on disk;
- Rename... - set a unique name for the image that will be displayed in the tooltip of the image panel (see 4.2);
- Exchange with - swaps two images;
- Paste - paste an image from the clipboard (it can be a graphic file, an image copied from a image editor or a web link);
- Copy - copies the image to the clipboard for later paste into the image editor;
- Delete - deletes the current image.
Double clicking on the image field opens the file selection window if the image is not yet installed, or opens the image in the standard image viewer of your OS.
The coin image in the Table of coins is automatically generated from the obverse and reverse images.
3.2 Editing a coin
To edit the coin data, you need to double-click on the required coin, right-click on the desired coin and select Edit..., select the coin and press Enter key or select the Coin->Edit... menu. After that, the Edit dialog will be opened, described in 3.1.
3.3 Clone coins
To quickly add a similar coin, you can use cloning. To do this, right click on the coin and select Clone. The Edit window filled with information about the new coin will open, edit the required fields and save.
You can also copy (using Ctrl+Ins or Ctrl+C) the existing coin and paste it (by pressing Shift+Ins or Ctrl+V) - the Edit dialog will also open.
A copied coin or coin group (see below) can be inserted into a third-party application (for example, MS Excel or Notepad). In this case, when inserting into a third-party application, only text fields (without images) will be copied.
You can also add a new coin with pre-filled fields from the Tree. To do this, right click on the Tree element and select Add new coin.... In the opened Edit dialog all common fields for coins corresponding to this element will be filled.
3.4 Editing Multiple Coins
Sometimes you need to change some fields at once for several coins. To do this, select the required coins (to select several coins, use the click with the Shift or Ctrl key pressed, to select all the coins, press Ctrl+A), right-click on the selected coin group and select Multi edit... or the Coin->Edit... menu.
In the opened Edit dialog, all matching fields for the selected coin group will be filled. Each field will have a checkbox that allows or denies the application of the field value to the whole group of coins when saving:
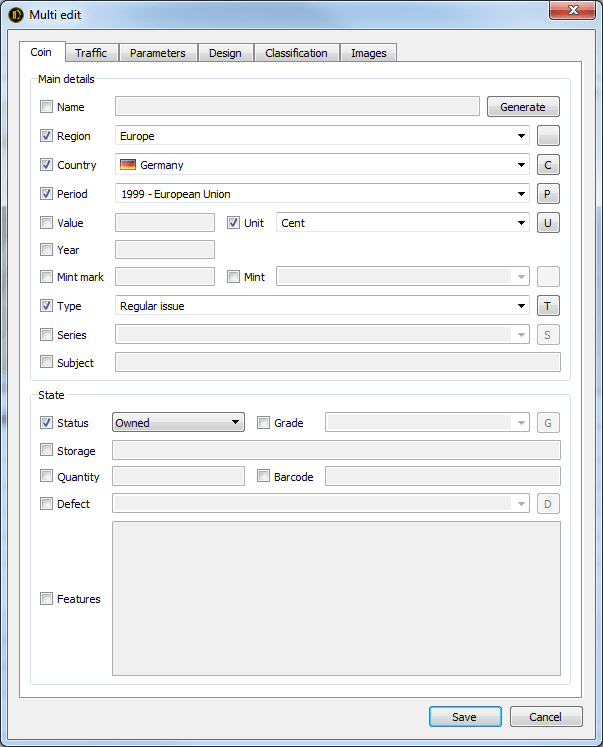
Also, group editing is available from the Tree - right-click on the tree element and select Edit coins....
3.5 Removing
You can remove coins from the collection one by one or by a group. To delete, select the Coin->Delete menu, right-click on the selected coin or coin group and select Delete or press the Del key.
Removed coins are removed from the collection at once and can not be repaired - be careful.
4 View Coins
4.1 Table of coins
The Table of coins is the central element of the application, serves to display coin data according to those selected with the settings.
The number and location of fields can be set in the List->Select columns... menu or by right-clicking on the table header and selecting Select columns....
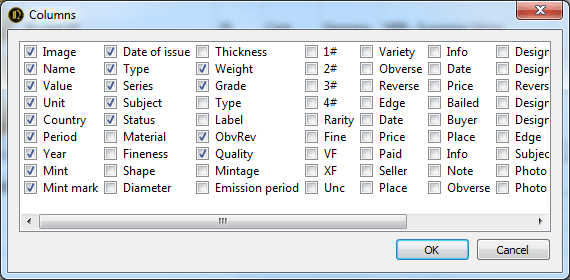
In the opened dialog, it is necessary to mark the fields of interest. Dragging the names of fields with a mouse can change the location of the fields relative to each other. You can also drag field headers directly into the coin table. Clicking on the field header sorts the table according to the selected field.
You can control the width of a column in a table by expanding the border of the column heading with the mouse or by right-clicking on the header and selecting Adjust size.
4.2 Image Panel
This panel displays images tied to the coin. At the bottom of the panel are checkboxes allowing you to control the number of simultaneously displayed images.
Double-clicking opens the image in the standard image viewer of your OS. When you hover your mouse over an image, a unique image name is displayed, if it was specified when editing the coin.
4.3 Filter
Using the menu in the column headings of the table, you can filter coins by the value of the fields.
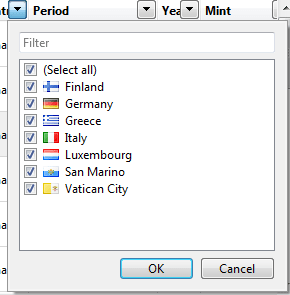
The Filter menu contains all column values. Marked values will be displayed, the rest will be hidden. To mark all items or remove marks from all values, select (All). At the top of the menu is a field that allows you to filter out the menu values.
To reset all filters in the current list, click the Clear all filters button on the toolbar:
![]()
4.4 Tree
The tree on the left side of the application window allows you to group coins by field values. When selecting a tree element, the coins corresponding to the selected value are displayed in the table.
To customize the tree, right-click on the tree element and select Customize tree...:
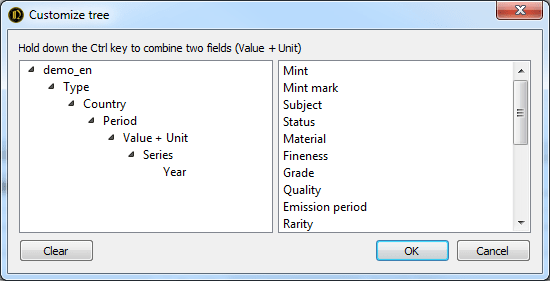
In the opened dialog you can change the structure of the tree by dragging the elements with the mouse. Items that are dragged from right to left are added to the end of the tree. Dragging from left to right removes items from the tree. To merge two fields (for example, Value+Unit), hold down the Ctrl key while dragging.
4.5 Lists
The lists allow you to have several independent collection views. Each list stores its own settings for fields, columns, filters and tree. This allows the lists to be used as permanent filters.
Add a new list by clicking on the List->New... menu or by double-clicking on the list panel (from the empty space next to the headings of the existing lists) and entering the name of the new list. You can also create a copy of the existing list by right-clicking on the source list and selecting Clone.
You can change the name of the list by selecting the List->Rename... menu or by right-clicking on the list title and selecting Rename....
Closed lists are not deleted and are available in the List->Open menu. To permanently delete private lists, select the List->Open->Remove all menu.
4.6 Status Bar
At the bottom of the application window there is a status bar showing the name and path to the collection file, the total number of coins in the collection and in the current Table of coins, the number of coins in the selected group.

5 Managing a collection file
The collection file is a regular file with the extension .db and stores all data about the collection including images other than references (see 7). You can copy, move, delete and rename it by means of your OS.
5.1 Creating/Opening
To create a new collection, select the menu File->New.... In the dialog that opens, select the location and name of the new collection file.
To open an existing collection file, select the File->Open... menu and select the desired file. You can also associate collection files (for example, if you select the appropriate option when installing the application) and open them automatically when you "call" from the file manager.
The File menu displays up to 5 recently opened collections available for quick opening.
5.2 Backup
To prevent data loss of the collection due to hardware, software, human errors, as well as the work of malicious programs, it is recommended to perform a backup. To create a backup copy of the collection, select the menu File->Backup. This will create a copy of the current collection with the date and time stamp added (for example, demo_171025115112.db for the copy made at 11:51:12 on 25/10/2017) in the directory specified in the settings. To restore the data, just rename the backup file by deleting the time stamp. You can also copy the collection file using your OS.
Note: It is recommended to store backups on a physical medium other than the worker. Choosing a cloud storage, such as Dropbox, can be a good option. It is also important to make backup copies on a regular basis, before or after making a large number of changes (see 8.4).
5.3 Vacuum
In view of the peculiarities of SQLite implementation, which provides storage of collection data, memory is not automatically released when data is deleted in the collection file. Over time, this can lead to an increase in the size of the collection file, its fragmentation and slowdown of the application. If necessary, you can reduce the size of the collection file by releasing unnecessary "empty" space by selecting the File->Vacuum menu.
5.4 Password
In the menu File->Set password... you can set the password that will be requested each time the collection is opened.
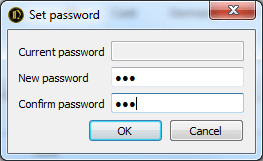
Note: data encryption is not carried out, so the password protection cannot be considered complete.
5.4 Synchronization
Changes made in multiple copies of a collection file can be merged safely with the menu File->Synchronize....
The most important properties of the synchronization algorithm:
- All new entries will be added (detected by Created field) to opened collection.
- Entries with the same value of ID and Created field will be updated when Updated field value is less in opened collection.
5.5 Importing
OpenNumismat allows you to import data from collections creted in another software (MS Excel, CoinManage, Collection Studio and Tellico) or sites (Colnect, Numista and uCoin.net).
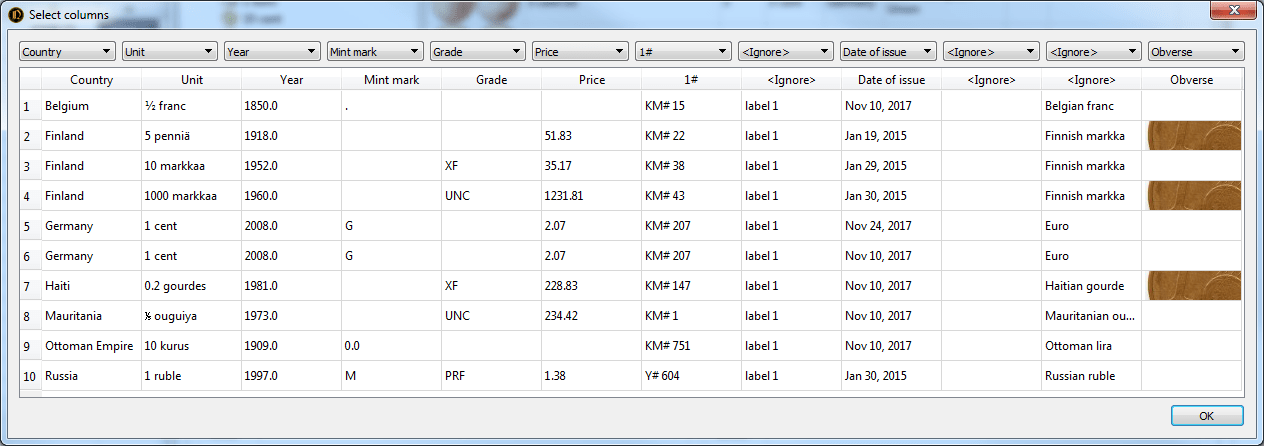
For importing from MS Excel select the menu File->Import->Excel and select the source file. After that, the dialog for assigning fields with the first 10 coins from the source file will be opened:
6 Reports
6.1 Generating reports
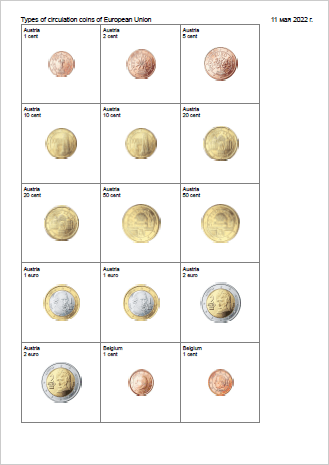
The application supports the generation of reports on templates. You can edit existing ones or create your own report templates.
The generated report can be printed or saved in HTML, PDF, MS Word formats from the Preview dialog.
To create a report, you need to select the coins for which data will be included in the report and open the Preview dialog by selecting the Report->Report... menu:
In the Preview dialog, you can select a report template (the left list on the toolbar), control the preview mode, and print or save the report to a file of the desired format (right buttons on the toolbar).
Note: Preview dialog use old library for generating HTML. So reports in preview may be corrupted and do not match the view in modern browsers. Also it may crash when generating large reports (more than 100 coins). For viewing and printing you can use Quick report (see 6.2) for open report in your browser.
6.2 Quick Report
By selecting the Report->View in browser menu, you can quickly view the report for the selected coins in HTML format.
For a quick report, used the template set in the Settings dialog as the Default template.
6.3 Editing Templates
The engine for generating template reports is based on the open-source Jinja2 library.
User templates should be placed into Documents folder (usually C:\Users\user\Documents\OpenNumismat\templates). Each template is in a separate subfolder, the name of which is used as the template name.
The reports are generated in UTF-8 encoding and, accordingly, the templates should be in the same encoding. Therefore, for editing templates it is recommended to use, for example, Notepad++.
Attention: when deleting, reinstalling or updating the application, user templates can be lost. Always back up your templates, if you make changes to them, before these actions.
6.4 Report template examples
Commemoratives_ByCountry
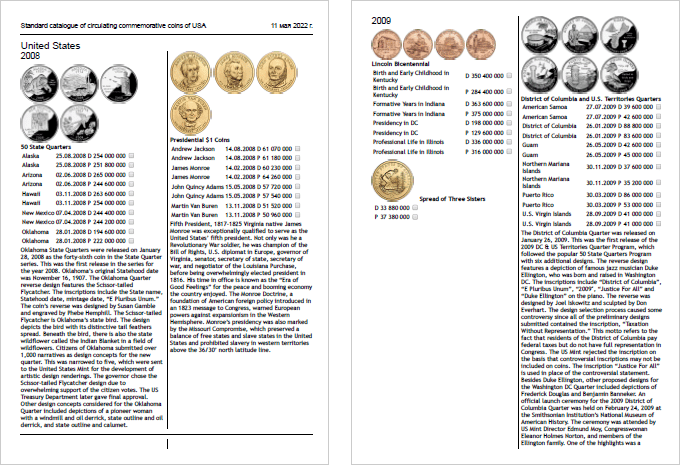
Commemoratives_ByYear
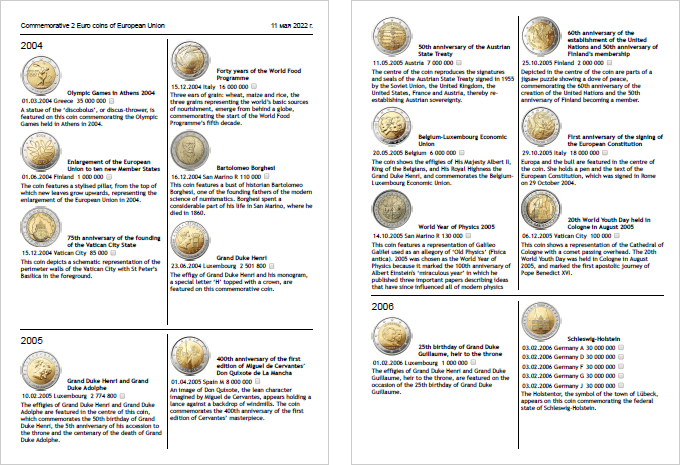
holders
6.5 Exporting the Table of coins
OpenNumismat allows you to save the current Table of coins with all applied filters and sorting in a separate file in MS Excel, HTML or CSV format (Note: in the current implementation, images are not exported).
You can export the Table of coins in the menu Report->Save current list.... In the opened dialog select the file name, the required format and save the file.
6.6 Statistics
Also for create any diagram and calculating statistics you can use MS Excel. Copy coins that you need from OpenNumismat to MS Excel or export Table of coins to MS Excel file (see 6.5) and use its functionality.
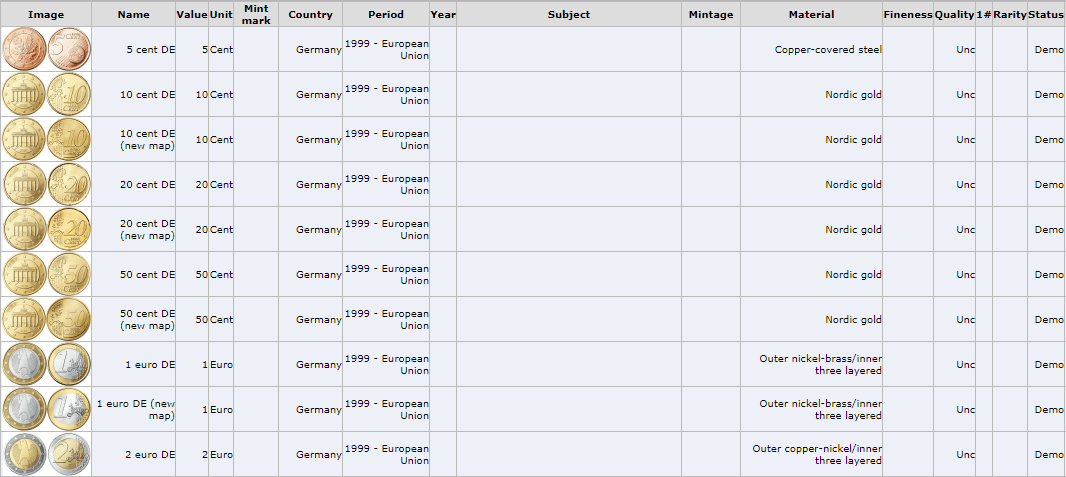
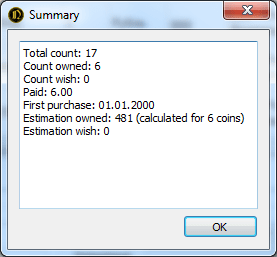
6.7 Summary
7 References
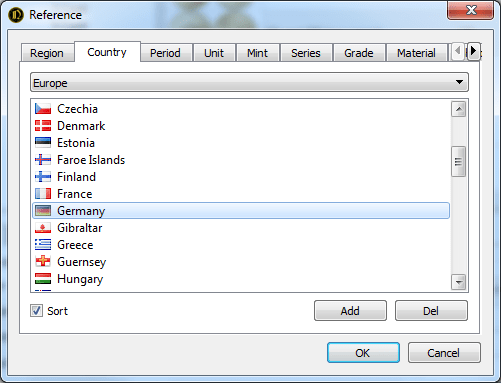
References make it easy to enter data when editing a coin, and also add icons (such as flags) to the data display. References are available for the following fields: Region, Country, Period, Ruler, Unit, Mint, Series, Grade, Material, Shape, Quality, Edge, Rarity, ObvRev, Type, Defect, Place (purchase or sale).
Editing references is available from the Edit dialog:
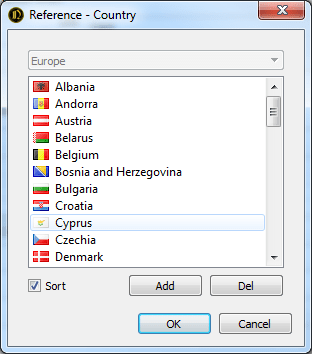
or from menu Reference->Edit...:
Right-clicking on the entry in the directory opens access to adding or deleting the item's icon:

References for Country, Period, Ruler, Unit, Mint, Series is a cross-references and their updating is available only if you select the value of the base field that exists in the reference. For example, to add a new mint, you should first select an existing country.
The Sort check box sorts all the entries in the directory, otherwise all items will be displayed in the order they were entered.
To quickly fill references with entered data from the collection, select the Reference->Fill from collection menu.
By default, references are stored in a separate file with a .ref extension, which can be copied, renamed or deleted by means of your OS. The path to the references file can be specified in the Settings dialog.
Also you can attach current reference to a collection file. Select Reference->Attach current reference for attaching or Reference->Detach current reference for remove reference from collection and use default from Settings.
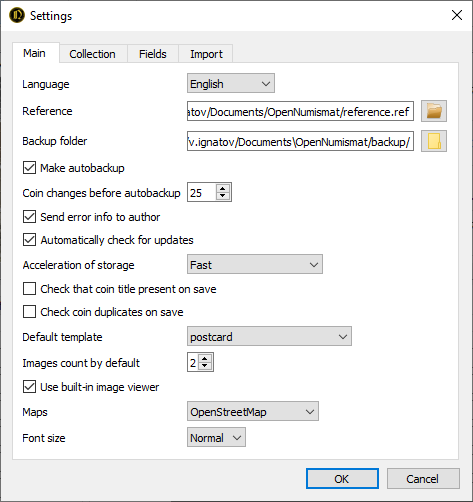
8 Settings
The Settings dialog allows you to configure the appearance and behavior of the application. To open the dialog, select the menu File->Settings:
8.1 Fields
The Fields panel of the settings dialog allows you to rename and remove part of the collection fields from the interface. In this case only the selected fields will be displayed in the program interface, but the data will be saved for all fields.
8.2 Acceleration of storage
The SQLite database engine have a multiple settings that affect the speed and reliability:
- Reliable - all changes will be guaranteed to be saved;
- Fast - changes can be lost when power is turned off during operation (recommended for most cases);
- Extra fast (dangerous) - recommended when you perform a large number of changes, provided that you perform a backup.
8.3 Images count by default
Default images count in Image panel.8.4 Autobackup
You can enable autobackup. This feature will make backups after changing specified count of records.8.5 Collection
Collection specific settings (stored for each collection file):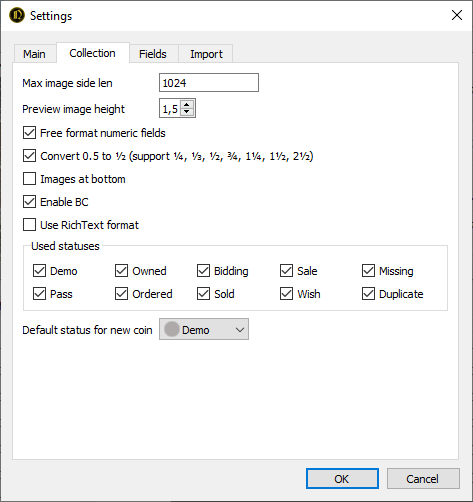
Preview image height:
Free format numeric fields - for entering values in the expanded format (question mark in the Year field, fractions in the Nominal field, range in the Weight field, etc.).
Images at bottom: